Here is version two of these DIY clay ring dishes! First, I made some in white with stamped designs. I love how those look, but keeping the white clay as clean as possible is a bit stressful. The marbled dishes, on the other hand, are so addictive and relaxing!

Here’s what you’ll need:
- Premo Sculpey in a coordinating colors (approximately 2oz per bowl)
- Rolling pin or smooth glass jar
- Parchment paper or wax paper
- Circle to trace (approximately 4″)
- Bowl or other oven-safe mold
- Optional: sandpaper
- Paint brush
- Gold paint
- Clear glossy varnish
Here’s how to do it:
- Make strips of clay in each color you want to include. Twist and roll them together until you get the amount of mixing you want.
- Using a parchment or wax paper work surface, roll the marbled clay flat – about 1/4″ thick
- Cut out the circle – you can take the cut-off edges and add them to your next marbled bowl, so each one is unique!
- Place your circle on your mold – I tried it on the outside of a bowl, but I think inside would be better, if you have the right size, because the mold indented the surface slightly
- Bake according to the instructions for the clay
- Let it cool, and sand rough edges
- Paint rim with gold paint
- Coat with clear varnish
Here are some progress shots and the final products!
Here is how to start the marbling process:
This is what the bowls looked like out of the oven.

Next step: gold paint on the rim!
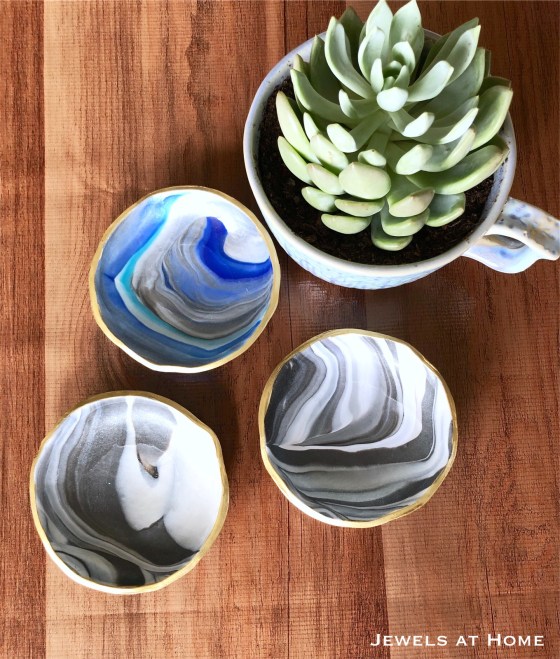
Last step: clear gloss varnish!

I’m seriously addicted to making these bowls… can you guess what’s up next?!
Julie aka “Jewels”
