Propagating Fiddle Leaf Figs by Air Layering

I fell in love with fiddle leaf fig trees a few years ago. I bought three plants that first year, and since then, I have propagated SO many. Most went to new homes with my friends, and a few were added to my collection. A few of my trees have gotten SO big, that I wanted to try propagating by air layering. I’m excited to share this technique with you, and I’ll also put links at the bottom of this post to all my other posts on pruning, propagating, caring for fiddle leaf fig trees!

c8851ea1-1fd1-466f-9bad-e4aa0349a720

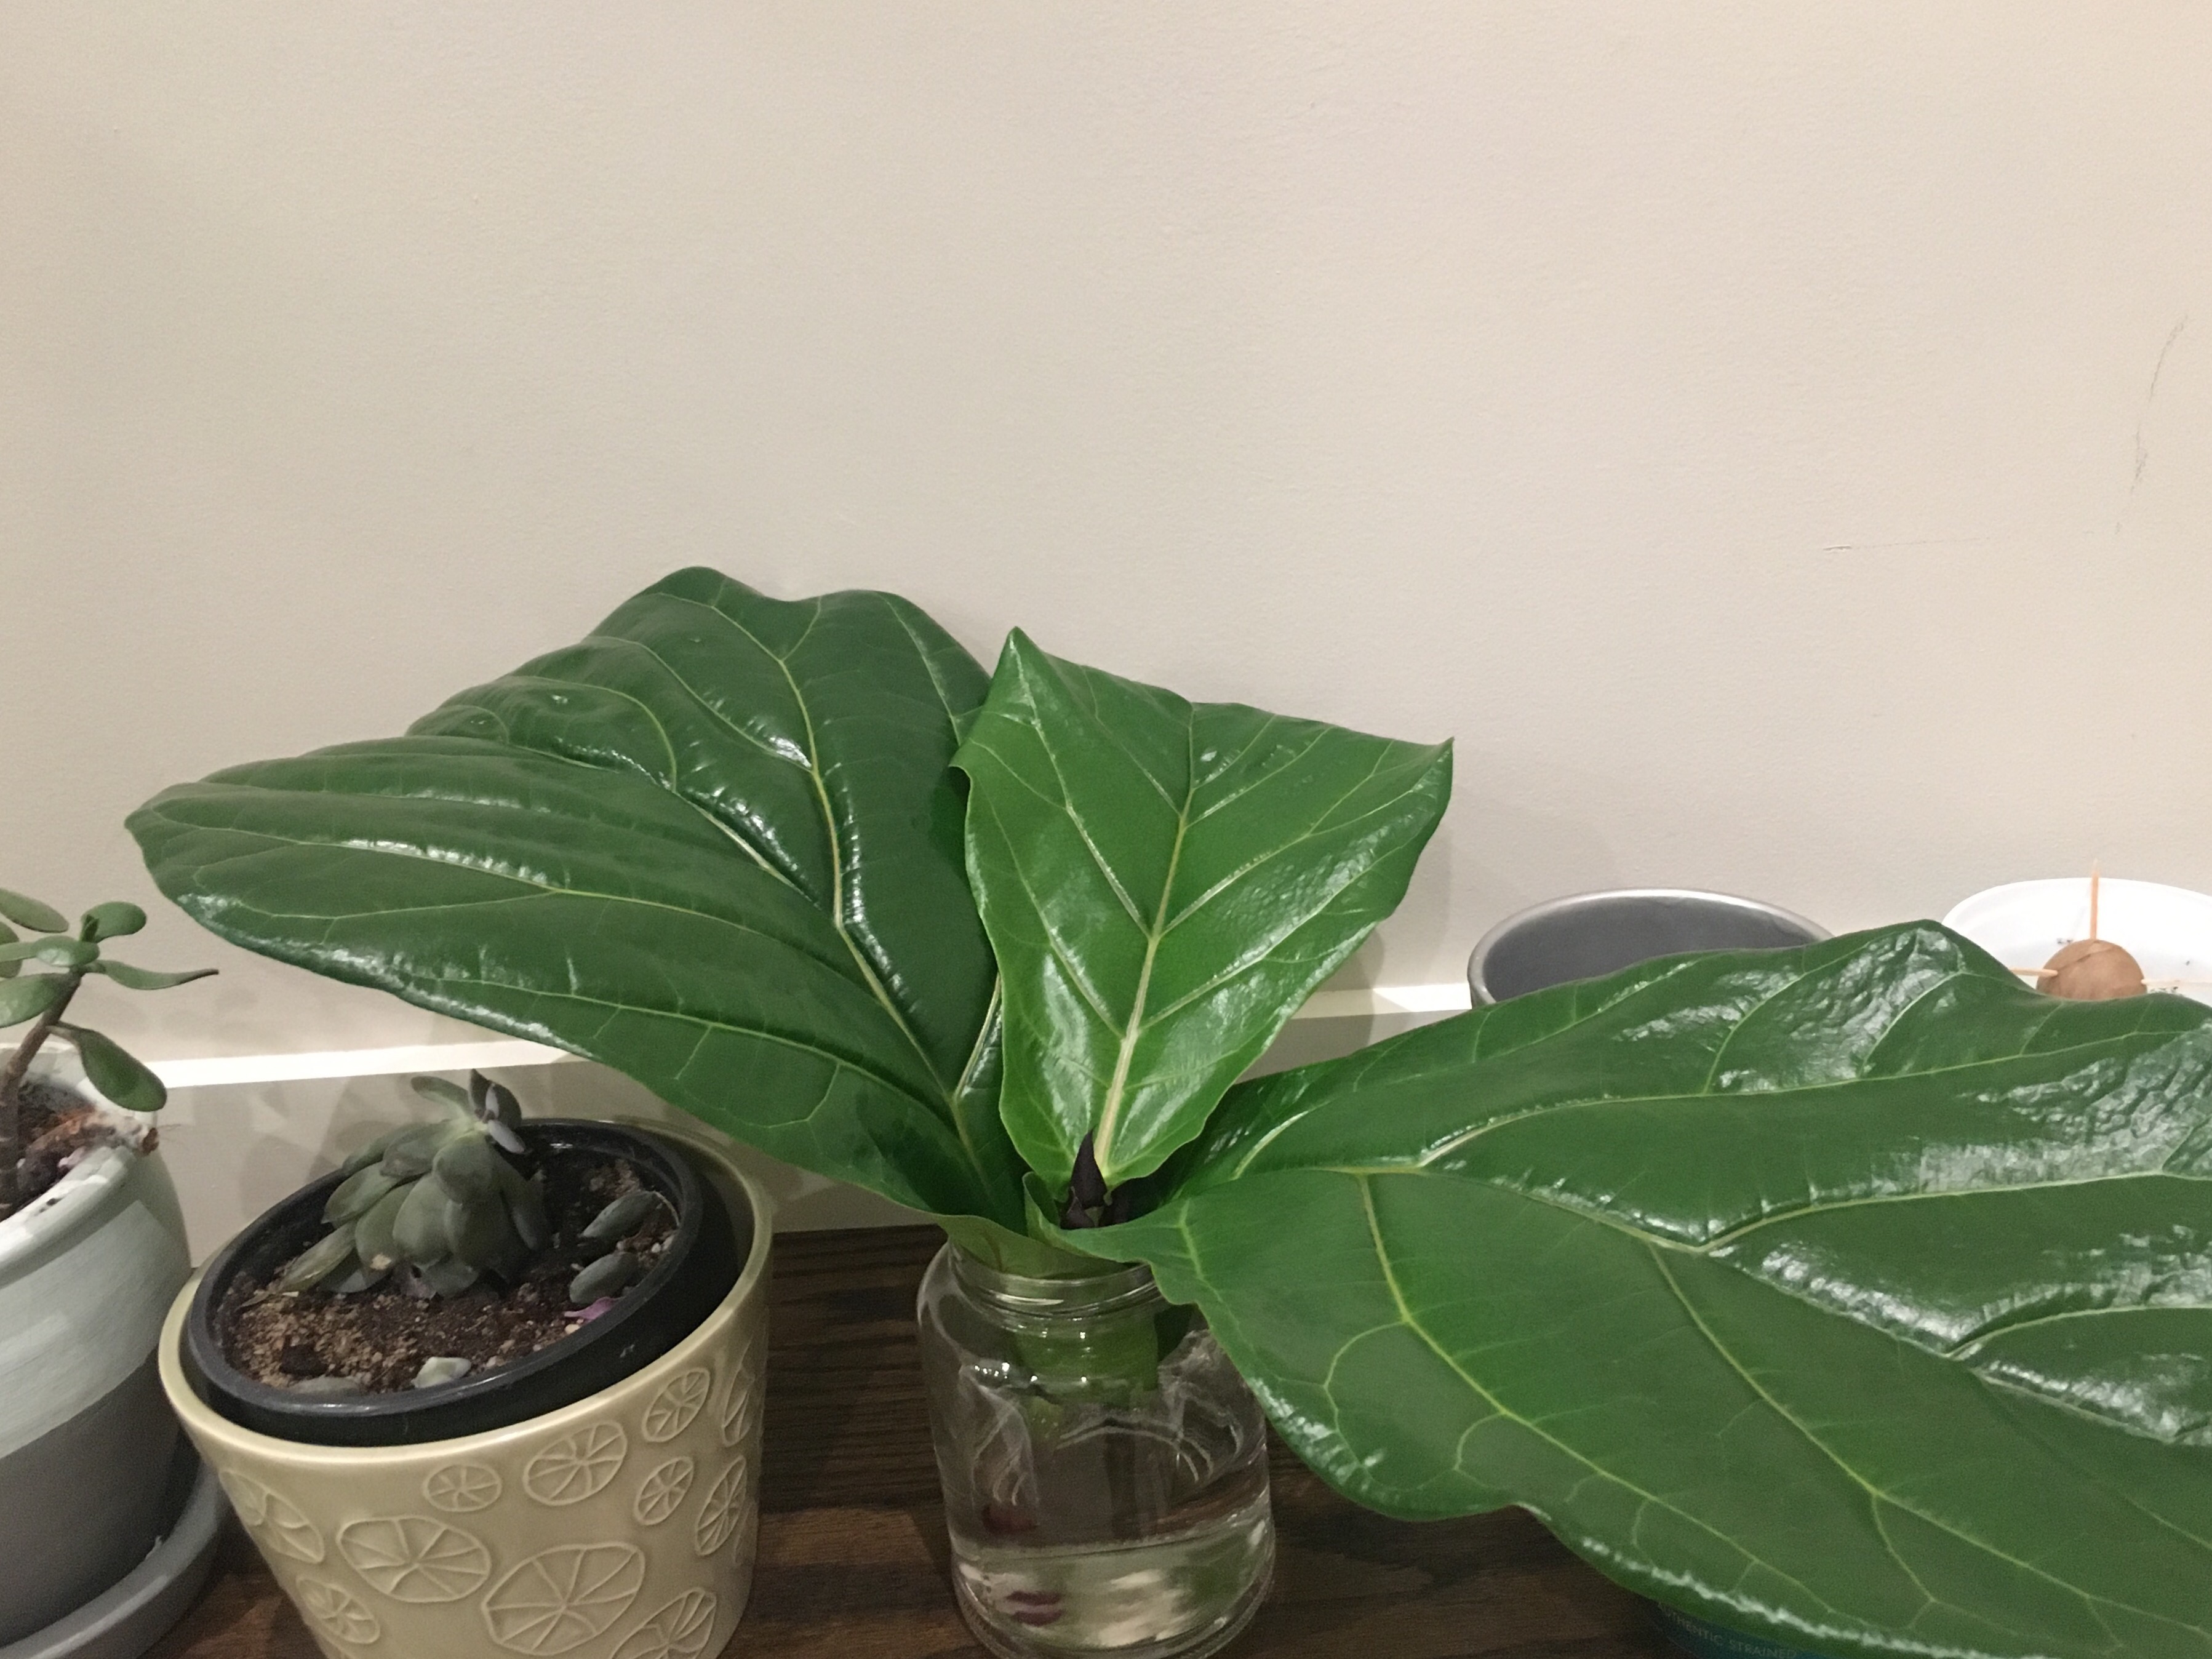
When I have previously propagated new plants off my fig trees, it was by cutting off 2-3 leaves at a time and putting them in water until new roots formed (all the details in this other post). This works quite well, but you can only make plants from small cuttings, because they need to survive until the new roots form. Air layering is great for propagating larger branches, and while it takes a little patience up front, you end up getting a mature new plant much faster!

The principle behind air layering is that you set up conditions for your plant to form new roots, while it is still attached to the original plant.

Here’s what you’ll need:

  • sharp knife or vegetable peeler
  • rooting hormone
  • thick plastic wrap – I cut open a one-gallon ziploc bag
  • sphagnum moss
  • string or rubber bands cut open to use as ties
  • patience (this process takes about two-and-a-half months)

Here’s how to do it:

Choose the section of the plant that you want to eventually cut off for a new plant. I tried this with approximately 2-foot section of my biggest plant – it was hitting the ceiling! It went really smoothly, and I’m now trying with a 3-foot section.

At the base of what will be your new tree, remove a leaf or two to create an open section of stem. Use a knife or vegetable peeler to remove the top layer of the stem – you want to remove the bark and the darkest green layer, but leave a little green and the white section of the stem. This will allow nutrients to continue to flow up into your plant, while it forms roots from the outside of the stem. See the picture on the left below:

img_0329

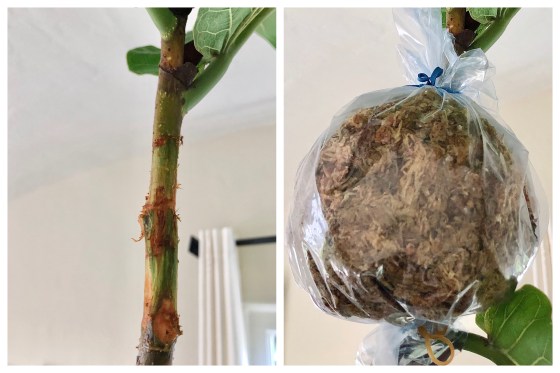
Next, spread some rooting hormone on the bare stem.

Wrap your plastic around the bottom of the bare stem and secure with string or elastic.

Pack wet sphagnum moss into the pouch you have formed and secure the top with string or elastic (see right picture above)

Right around two months, I saw the first roots inside my ball of moss. Within three more weeks, the moss ball was full of roots!

img_0330

Once I started seeing roots, I did check the moisture level of the moss and add water every week or so.

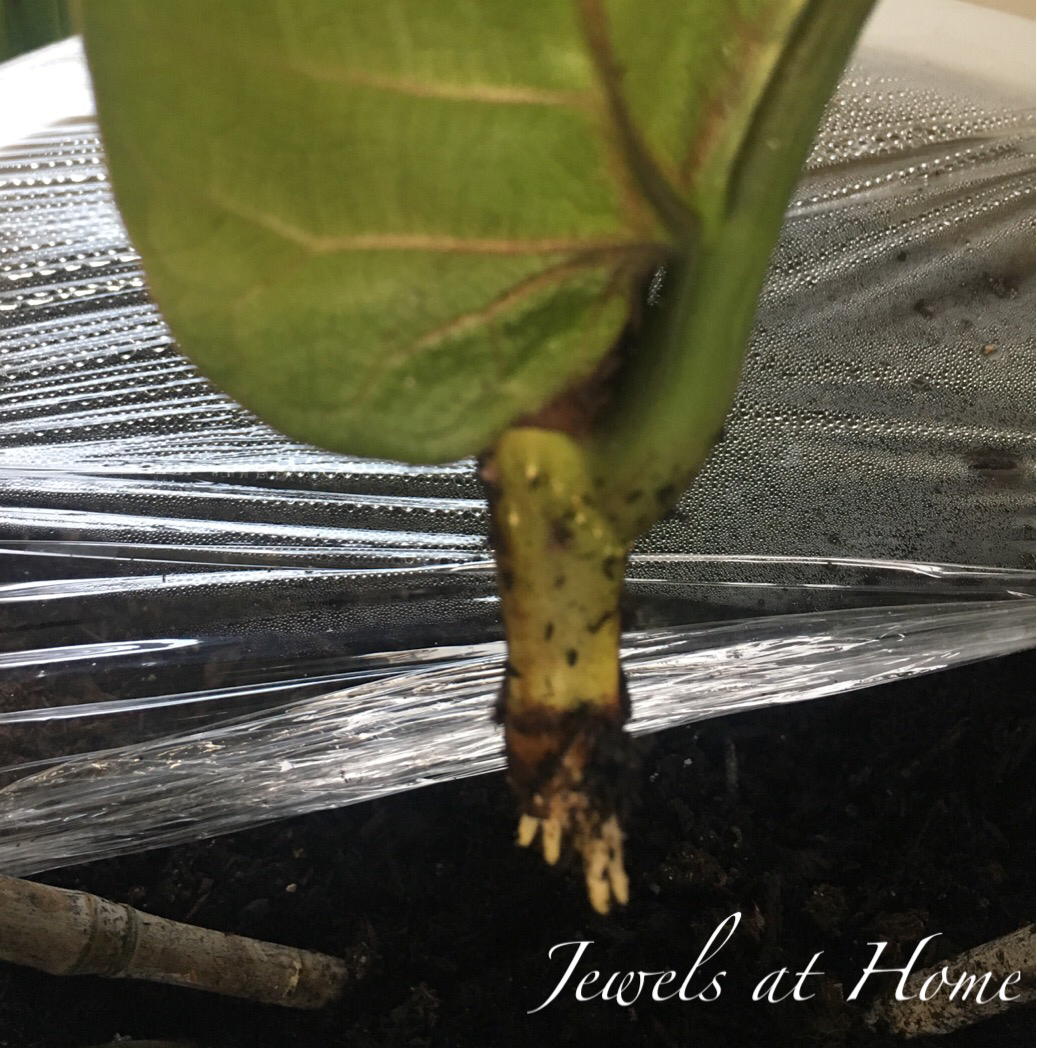
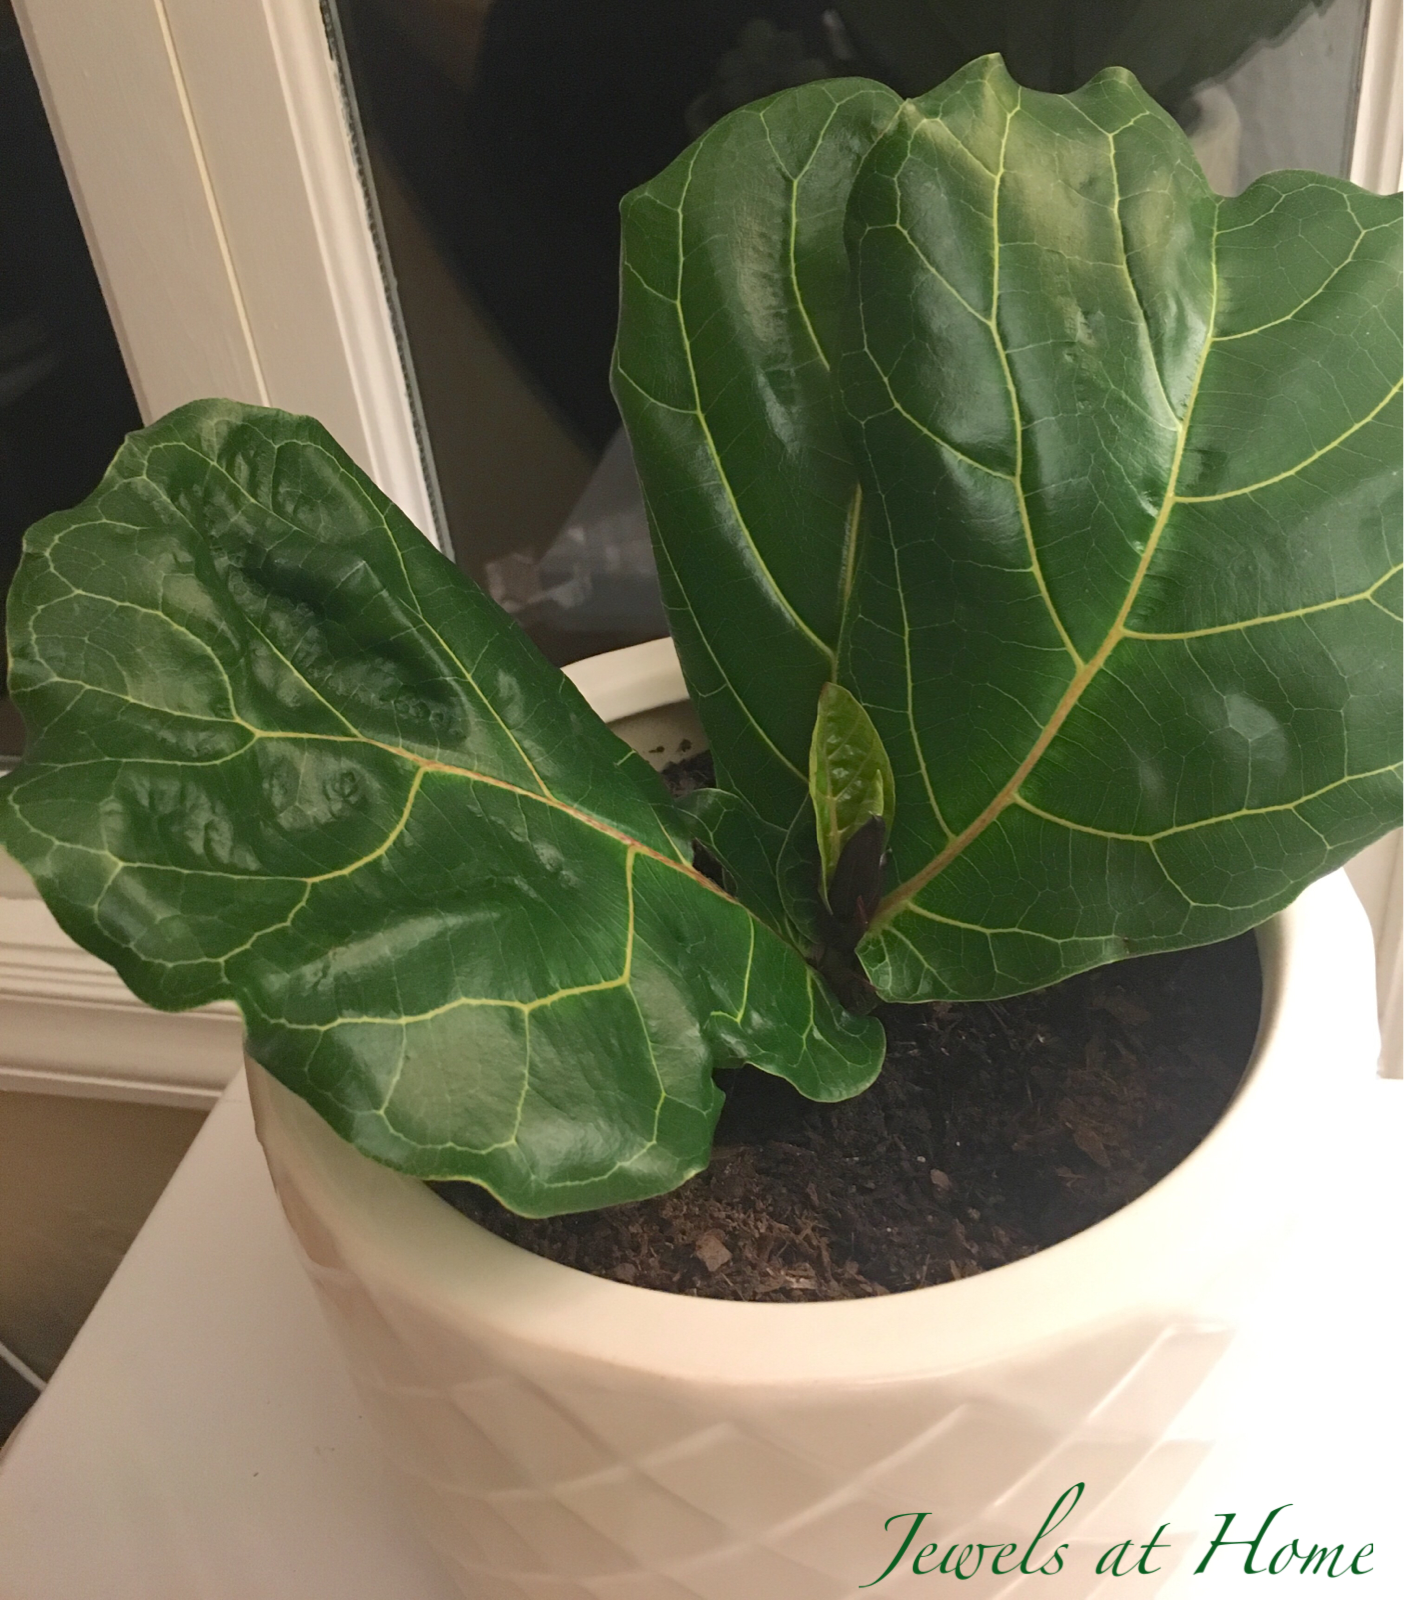
When the roots are filling up the bag of moss, as shown in the last picture above, it’s time to cut off the new plant and plant it in soil. It helps to stake the new plant, as it is top heavy. Here’s how my new plant looked, when I first planted it – much bigger and healthier than the new plants you can get by cutting and rooting in water!

img_9331

A couple of months later, I passed this plant on to a friend as a housewarming present. As I was repotting, it I found that the roots had quickly grown to fill a large pot (see picture below)!

img_0328

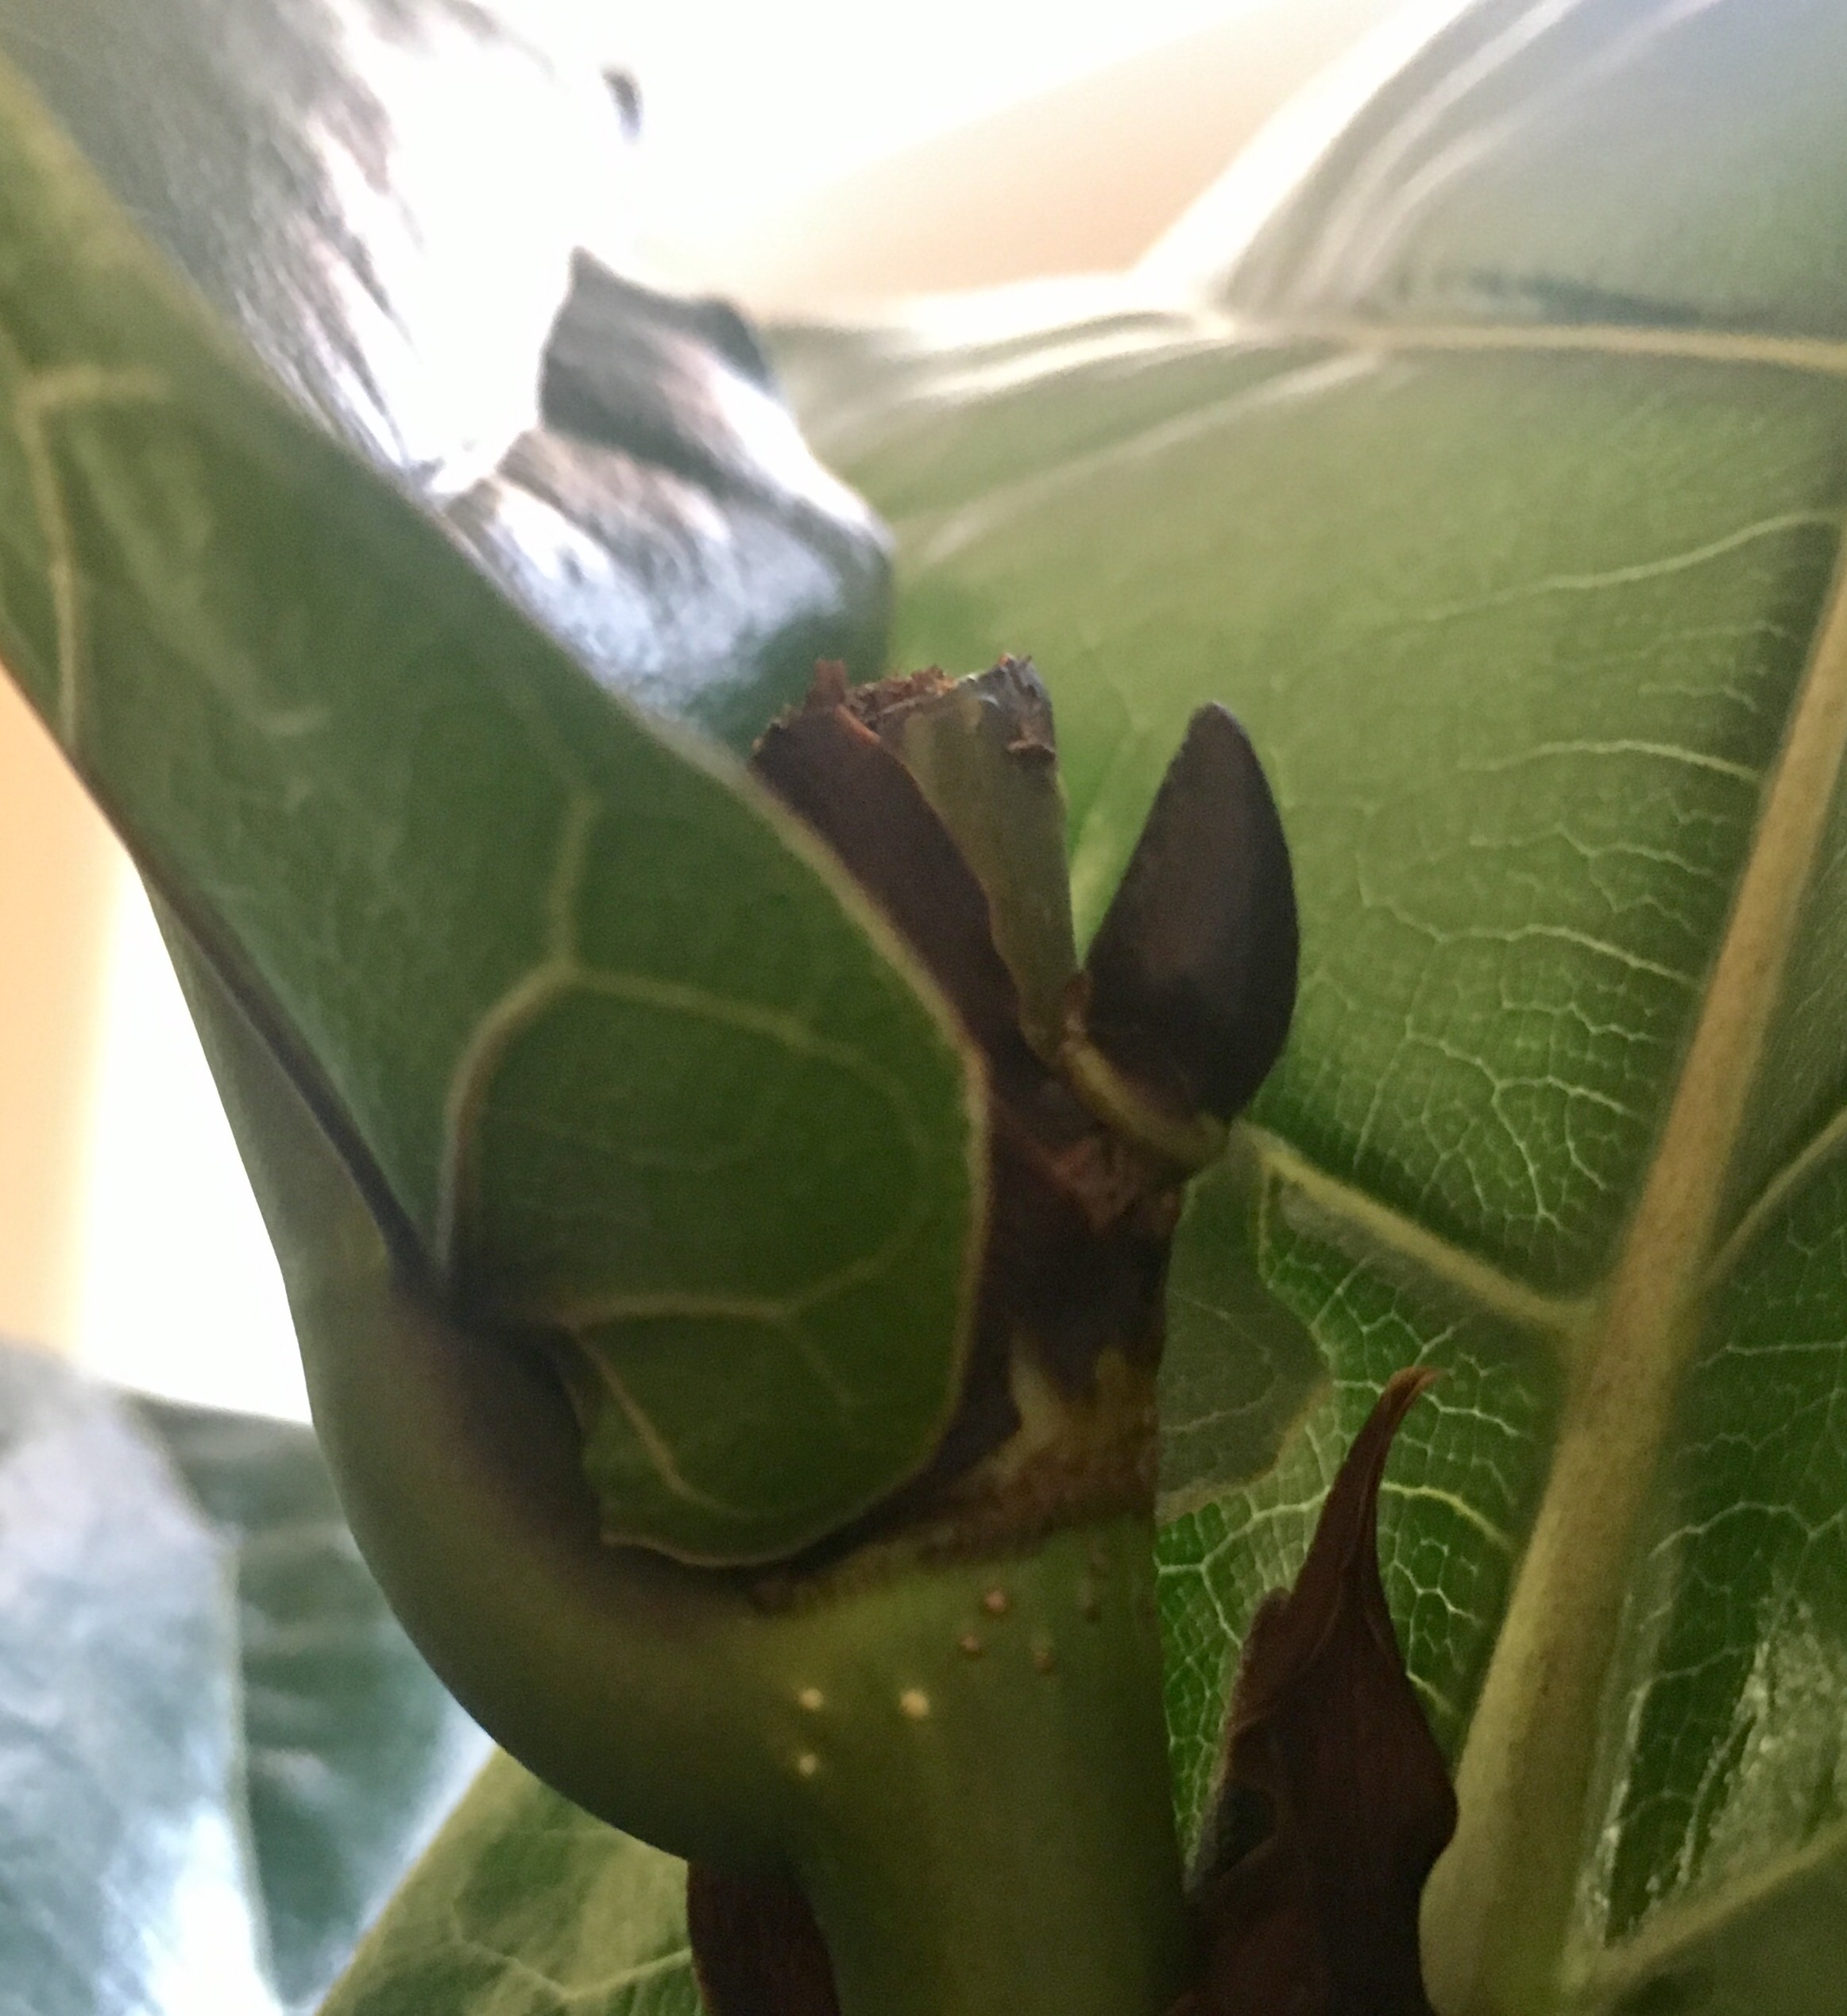
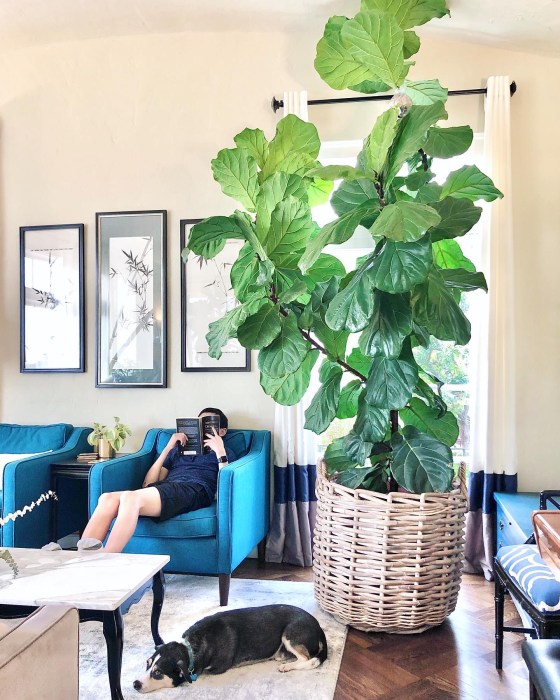
I’m so excited to keep trying this technique for creating healthy new plants while keeping my jungle in check.  Here’s how my “mother” plant looked, hitting the ceiling, before I made a new plant from the top section.

986315e0-e53a-4fe9-b5c3-cbbe9cc5f597

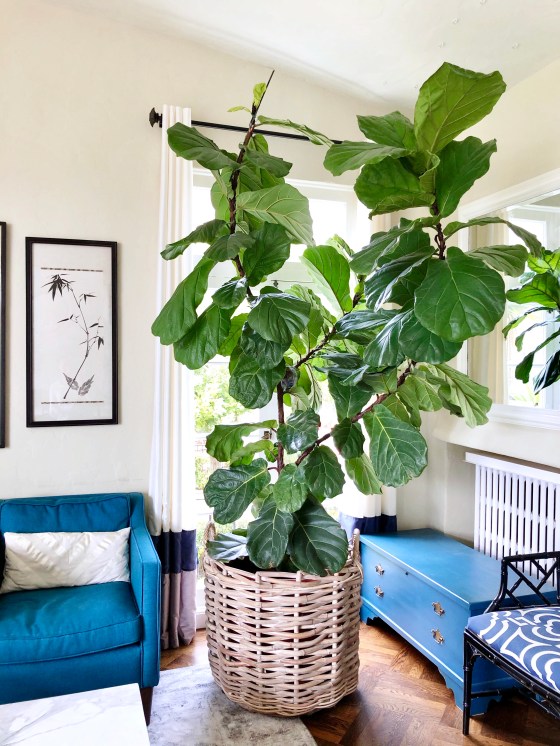
And here’s how it looks now, starting to come back into shape. You can see that a new bud formed where I cut off the new plant, and the branch is starting to grow back. I’m already working on air layering that back branch, so that will get trimmed off soon, too. My favorite stage of this plant was when the two big side branches arched together into a heart shape, so I am hoping to get back to that in a few weeks.

img_0332

Looking for more information on fiddle leaf figs? Check out these other posts:

If you have a big plant, I definitely recommend trying the air laying. I’m sure I am not the only one who feels that time is moving slowly being at home during the pandemic, and watching these new plants grow has been a silver lining.

Happy plant vibes!

Julie aka “Jewels”


Fiddle Leaf Fig Fanatic! How to Propagate Plants from Cuttings

Don’t say you can’t teach an old dog new tricks! After years of joking about my “brown thumb,” I’m getting really excited about gardening and plants. It’s so rewarding to watch things grow, not to mention how plants freshen up any space both visually and literally.

I’m growing all kinds of plants, but one of my greatest loves is the Ficus Lyrata, the fiddle leaf fig, and I’m so grateful that they seem to thrive in our conditions. I originally bought three plants, which have all at least tripled in size, and I’ve successfully started about 10 plants from cuttings. Here is a list of all my fiddle leaf fig-related posts:

I mentioned I originally bought three plants. I’ve heard that some people have found these at big box hardware stores, but I had no luck. I ended up buying one online (really!) but eventually acquired two more at local nurseries Sloat Garden Center and Flowercraft. The one I got online is fine, but the ones from the nursery are much bigger, so I’d definitely recommend looking around locally, if you can.

After just a few months, two of my trees needed trimming already, so I decided to try to propagate new plants from the cuttings. I have done this several times now, so I have updated this post with all the tips – get it? tips!

When and where to propagate?

  • Plants grow fastest in spring and summer, so you’ll have the best success between March and September
  • For more tips on when and how to prune your tree, check out this post
  • Place your cuttings in a bright location, to help them grow, but avoid direct sun that could scorch the leaves. The cuttings are more delicate than an established plant

What type of cutting can you propagate?

  • Newest lesson: the cuttings from more mature branches seem to work better. I tried propagating brand new growth (about a month old), and those cuttings failed to grow 😦
  • Using a clean knife or scissors, take a cutting that includes a section of stem and one to three leaves. If you want to trim more than three leaves, separate the cutting, so each section has no more than three. A bigger cutting can’t get enough water to survive while it’s forming new roots
  • If you cut the tip of a branch, which includes a bud, the cutting will continue to grow from the bud
  • If you cut a section of stem from the middle of a branch, a new bud will form on the side of the stem and will grow upwards
  • I have heard lore of being able to propagate a leaf without a stem section, but the one I tried did not work. I will probably try again, but I don’t have first-hand experience seeing this work.
  • Update: I just got an exciting new tip from Candice on Instagram (@cee_marie923) She accidentally stripped the outer layer off the stem, and the roots grew much better and faster! I can’t wait to try this out myself. Meanwhile, here’s a picture of her cutting – thanks, Candice!

  • What supplies do you need?

    • You can place your cutting in water, soil, or an inert medium like vermiculite. The bottom tip of the cutting needs to stay very moist, which is easy in water. If you use soil or vermiculite, wrap the container in plastic wrap to keep moisture in and check it every few days, adding water when it starts drying out
    • I applied rooting hormone to the bottom end of the cutting to help encourage new root growth. Apply this just once. If you over-use the rooting hormone, it actually hardens the tip and makes it more difficult for roots to grow – yes, I learned the hard way!

    Here are some pictures to show what you can expect over time:

    0 weeks

    Three leaves rooting in water.
    Two leaves rooting in soil. I covered the pot in plastic wrap to keep a moist environment for new roots to form.

    3 Weeks

    You may see some new roots around this time!


    And your original plant should be growing a new bud (or two, or three) where you took the cutting:

    4 weeks

    You can see more robust root growth taking off!


    The original tree where I cut off the top three leaves also looks great. There’s a good-sized bud forming!

    5 weeks

    Exciting news! The single top leaf has grown so many roots that I transferred it to a pot today!


    The tree where I cut off three leaves also grew a ton with three buds on it!


    6 weeks

    Crazy! This is where I cut off three leaves from the top of a plant. It went from buds to tons of new branches and leaves in just one week. So exciting!


    2-2.5 months

    I started to see new leaves growing out of the top of the stem cuttings. (Photo credit here goes to Nicola, who adopted one of the plants and kindly keeps me updated!)

    3 months:

    I came back from vacation to find that the stem cutting which started with a single leaf had two new leaves!

    3.5 months:

    This was the stem with a single leaf. It now has three new leaves and a promising looking bud pushing out the top. Yay!


    If you take a cutting from the center section of a stem, with no bud attached, it may take even longer for a new bud to form, but it can definitely work!

    9 months

    For real! The plant in front was a section of stem with a single leaf off the top of the plant in back. It grew like gangbusters!

    Thanks for reading and please share your questions and tips!

    “Jewels”