
When our kids have birthday parties, I always try to give a single larger party favor, rather than a lot of little trinkets. It’s so gratifying to see the boys’ friends continue to use their Ninjago T-shirts and Superhero capes. … Continue reading
When our kids have birthday parties, I always try to give a single larger party favor, rather than a lot of little trinkets. It’s so gratifying to see the boys’ friends continue to use their Ninjago T-shirts and Superhero capes. … Continue reading
 We’ve moved quite a few times over the years, and I’ve definitely learned a few things. One of those is that while it’s tempting to try to furnish and decorate your new home all at once, it’s better not to take your time. Besides the fact that you’ll make better decisions once you lived in your home for a while, I’ve also found that right after I move, I tend to look for the cheapest possible decor, since I’m still recovering mentally and financially from the move. When I space out the purchases, I usually end up picking better quality things.
That being said, some things just really need to be done quickly, and that includes window coverings. Black garbage bags hung with blue painter’s tape only look good for so long, you know. So, when I bought shades for our house three years ago, I went with the simplest option for the boys’ room. I had it in mind to spruce up the shades eventually, and I finally got to the project this summer.
I really like the look of fabric shades with a ribbon border. I had created a border on the curtains in our master bath, and I love how that turned out. For the boys, I wanted something very simple. I found some cotton twill tape and used tacky glue to attach it to the shades. It’s holding up very well so far. You’ll have to experiment with your own shades, but for reference, the twill tape I used is 1 1/4 inches wide, and I attached it to the shades 3 1/2 inches from the edge.
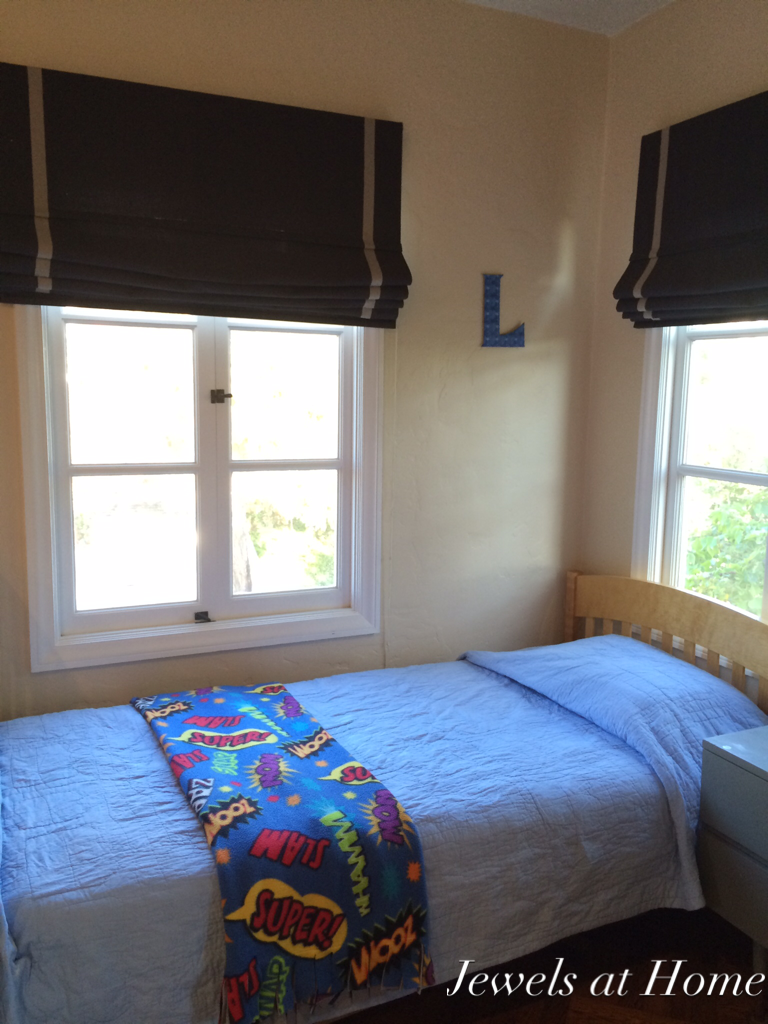


I’m so impressed and happy with what a big difference this little change has made! It gives me hope that I might someday be “done” decorating the little boys’ room, a project which usually makes me think of the saying “Cleaning the house while children are growing is like shoveling snow while it is still snowing.”

Hope to be back with more projects soon. It has been a busy and fun summer. We’re renovating our kitchen and basement, which is a big project. I’m very excited and more than ready to be done with the dust and on to the decorating!
“Jewels”
My little guy, L, just turned eight, and he’s been planning his first sleepover party for most of the past year! I like to make a special gift for our birthday boy and guests, and L requested a reprise of the fleece blankets I made for his big brother’s party a year and a half ago. He calls his “super,” and sleeps with it every night. I wanted to grant his birthday wish, but I didn’t want to make the exact same project, so here’s this year’s superhero version of our fleece blankets.

Instead of fringed blankets, I trimmed the fleece in binding. L loves the superhero action words on his original blanket, and that’s no surprise, given he’s such a bundle of energy. I found the same print in a cotton fabric, so I used that for the binding. For each large blanket (60″x72″), you’ll need:
After prewashing the trim fabric, I ironed it and cut 8″ wide strips. I joined the strips and ironed it to make 2″ wide double-fold binding. I then sewed this to the edges of the fleece blankets that were each 2 yards long. L requested this longer blanket, since he sleeps with his, but you could use 1.5 yards of fleece for a throw blanket.
To add the monograms, I sketched each boy’s first initial and a large circle (I traced a plate) onto Heat’n Bond, ironed on to some other and bright and superhero-themed fabrics, cut them and appliqued onto the blankets (instructions in the post from our onesie decorating party).
Here are some more pictures of how they turned out. The boys love them!


Hope you are staying warm as winter warms into spring!
“Jewels”
I grew up in Canada, so Christmas was associated with cool temperatures, bare branches, and as often as not, snow on the ground. Even my kids, who grew up in California, ask for snow at Christmas. So, I decided to create a snowy Christmas for us at home.
I pared down my decorations to focus on the white and silver. I also made several new projects in a white and woodsy theme. So far, I’ve finished a sleek new gray and white Christmas tree skirt, and I also made some new pillow covers in white and gray with outdoorsy appliques of reindeer, polar bears, and trees.
Since I kept our colorful ornaments packed up for this year, I needed to add some more decorations to our tree. The kids helped me make these sweet clay ornaments, and I am adding these white felt poinsettia ornaments to fill in the branches.

I looked at lots of pictures of real and felt flowers, and I read a lot of tutorials, trying to find felt poinsettias that would have a natural look. My final project was a combination of the felt poinsettia pin by Cheryl at her Tidy Mom blog, Kate’s felt poinsettia’s at her Centsational Girl blog, and my own innovation, as I wanted to make the flowers a bit more natural-looking and just right for my tree!
The thing I liked best about Cheryl’s flowers was how she cut the petals. It’s much faster and easier than using a template, and it allows you to make each petal a little bit unique. I used different dimensions, which I’ll list below, and I also cut my petals with a bit of a wave on the edge, to give them more dimension.
I washed and dried my felt before using it, to make it a bit thicker. To cut the petals, first cut rectangles of felt in the specified dimensions, and then trim them to look like petals. It’s very quick to cut the rectangles, if you cut the felt into strips first (left side of the picture below) and then cut the strips into rectangles (middle of the picture below). I was also able to trim the petals three at a time, so it was all much easier than I expected!

Each flower is constructed the same way, and I’ll give the exact measurements for my two sizes below.
The basic parts of the felt poinsettia are

Start with a round base, add a layer of large petals, and top with a layer of smaller petals.
To finish the flower, I sewed all the layers together while sewing on some pearl beads to decorate the center of the poinsettia. I then used hot glue to attache the flower to a metal alligator clip.

Finish the flower by sewing the layers together while sewing on some beads for the center.
The pictures above are of the larger poinsettias. The finished size is approximately 6.5″ in diameter. The large flower uses:
I also made smaller poinsettias, with a finished size of approximately 4.75″. The small flower uses:
Here are the large and small flowers side by side.

And here are the new poinsettias on our tree!


Hooray for a project that was even more easy and fun than I had expected! If I get enough of these for the tree, they may start showing up elsewhere in our house! Or that may be crazy-talk!
“Jewels”
This project is part of my effort to spruce up my office and get more organized. I don’t know how organized it will make me, but these little notebooks sure are cute! The other project that I did was to cover plain file folders with scrapbook paper, and these look adorable also.

It seems like most workplaces generate a lot of scrap paper. From my first job out of college to my office today, I’ve usually been the one to collect the extra paper for reuse. At my first job, teaching at a small high school, I used the extra paper other teachers left in my cubby to shred for handmade paper, something I’d love to do more of again. These days, scrap paper from the office is the raw material for my three prolific little artists, as well as my own notes.
Even though we’re reusing old paper, it doesn’t have to look sloppy. I decided to make these notebooks to corral all of those loose papers. They’re great, because they can be decorated to create infinite customized looks, and it’s easy to add and remove pages.
Materials:
Instructions:
Paper-covered notebooks

Wrap the notebook cover in clear contact paper to protect it.

As an optional step, I added white contact paper to finish the inside of the covers.

I rounded the edges of some of the covers to make the design more interesting. For these, cut small wedges to fold the contact paper neatly.
Fabric-covered notebooks


Adding coordinating fabric to the inside of the covers gives a more finished look.
Here are the notebooks I made for myself. I can’t wait to whip one out during a meeting!


It’s fun look to make the back and front of your notebook from different papers that work well together. I love this one!

These notebooks have rounded corners for added detail.
And here are the notebooks I made for the boys. They each chose their own covers – Superman for little J, art pencils for my budding artist L, and navy for big boy K. I wasn’t sure if the note books would catch on, but so far, the boys really seem to like keeping all their drawings organized in these! Yay!

The kids each chose the covers for their new notebooks.

L is really into art right now, which is so fun for me. I looped an elastic through the middle ring of his notebook, so he can keep his portfolio together. He has been bringing it to school every day!

Here’s what L is working on in his notebook. I love it!

More of L’s sketches, all neatly contained in his new notebook.
Yay for these little notebooks. They would make great gifts, too!

Some holiday projects coming up next!
“Jewels”
Here’s a quick summary of the recent Superhero-related posts:
Our preschooler is really into Superman. I mean really. As in, he walks up to random kids at the playground and says, “Hey, boy! I’m Superman!” which should be clear from the fact that he’s almost always wearing a Superman shirt. Sometimes, one of our homemade capes also. It’s actually very sweet to see the reactions he gets from strangers big and small.
So, it was pretty obvious what he was going to be for Halloween, and his brother completed the theme as Batman. These costumes served double duty at J’s superhero birthday.
When I was little, my mom always made our costumes, and she usually made them out of things that we could wear again. Even in this age of readily – available store-bought costumes, I’m used to doing things this way.
Superman
I actually made this Superman costume back when our oldest was three, so it has seen a lot of use, and it’s still going strong. It’s made from a set of plain blue pajamas, and I added the Superman logo and made a cape. This year, I added a yellow belt, too. The pajamas have gotten lots of wear, outside of Halloween, but they’re ready for saving the world a few more times.
To make the Superman logo, I used red fabric, yellow fabric, and some Heat’n Bond Lite Iron-on Adhesive.
I started by sketching a superman “S” onto the paper backing of the Heat ‘n Bond. Remember to do it backwards! If you don’t want to draw freehand, you can print out the logo and trace it onto the Heat ‘n Bond, using a lightbox or a window.
I then ironed the pattern onto the red fabric, and cut it out. (see below). I ironed the red “S” onto the yellow fabric, added Heat’n Bond, and ironed it onto the shirt. Finally, I finished the raw edges with stitching. on one version, I also outlined the design with some black puffy paint.

This is the finished Superman costume:

I also made extra shirts in a few colors to give us some variety, since J wants to dress like superman pretty much every day. I sewed this logo onto an older shirt, and I like the worn retro look it has.

Sweet vintage-looking Superman T made from a faded shirt.
The funniest is when he layers his hero shirts, like this day when he wore the Ninjago shirt I made for L’s Ninjago party under his red Superman shirt, so he could make a quick transformation whenever he needed.

He couldn’t decide whether to be Superman or a Ninjago today.
The cape is very simple, with a Velcro closure. I have more details on how to make the cape in this post about the party favors I made for J’s superhero birthday party.
Batman costume
L already had a Batman shirt in gray,so I bought him a pair of matching plain gray sweatpants that he can wear again. I bought some black satin to sew a cape and the hood and mask and used yellow fabric I had to make the belt.
Satin is very slippery, so it was harder to sew than I planned, but with the help of a lot of pins, it turned out alright. I cut the cape using a similar pattern to the other superhero capes, but this one is wider and the bottom edge is scalloped like bat wings. I used bias binding to finish the curves on the bottom.

The first picture below shows the basic shape of the hood. It has a couple of darts (shown with arrows in the second picture) to shape it around the head. The ears are triangles filled with batting, and I hand – sewed them to the outside of the hood. I decided to make the mask separate, so that he could wear the hood more comfortably.


The belt is a simple strap with an oval in front for the bat symbol painted in black puffy paint. The closure at the back has elastic to make it snug and Velcro to fasten the ends. The mask is made with satin fused to felt with Heat’n Bond Ultra Hold Iron-On Adhesive and a black elastic strap.
And here is the finished Batman costume:

Here are our favorite heroes making appearances all about the neighborhood. We had a lot of fun!


You can definitely adapt these instructions to make any superhero, including ones you dream up yourself. Look at the variety of capes for J’s party”

“Jewels”
I have a serious thing for daybeds. There is something so primally cozy about curling up on a deep bed, surrounded by cushions.

Daybeds are practical, too. I have one in my craft studio, which is also our guest room. It’s a twin bed for our single guests, and there is a pop-up trundle below that can be combined with the main bed to make a king bed for couples and families.
When we added built-in closets to our master bedroom, they created a little alcove under the windows that was perfect for a window seat. Rather than a narrow bench, I decided to fill this space with a deep daybed, perfect for reading, napping, or lounging and taking in the view.
This space will also work out for those nights when a nightmare brings a little one into our room in the middle of the night… see, practical!
I considered building something myself, but I was nervous that that kind of project might never get done, with three kids running around. So, I did a lot of browsing and measuring to find ready-made materials that would fit together into an almost-built-in deep window seat and then added handmade touches with the pillows and storage boxes.
I found that three of these Closetmaid 3 Cube White Storage Benches filled the space almost end to end, leaving just enough room to access the electrical outlets on the walls at either end. The benches I bought are only 14″ deep, but I was able to add extra depth with some existing pieces boxes and shelves around the house, to create a luxurious 30″ deep daybed. To top it all off, I used two basic crib mattresses which fit perfectly across and provide great support. This Safety 1st Heavenly Dreams White Crib Mattress
is reasonably priced and on the larger side (did you know crib mattresses were not a standard size?!), so it fills up the bench nicely.
Although I used benches out of a box and ready-made mattresses, this project has lots of handmade touches as well:
I’m beyond happy with out new window seat and am looking forward to enjoying many quiet moments here.


“Jewels”
These little “pillowcase” dresses have been catching my eye for a while. The style is very simple to sew, and the results are so cute! Not to mention that for growing kids, you can’t beat a style that will grow along with them!

For my birthday, Steve and I went to an amazing fabric store in Berkeley, Stone Mountain and Daughter, and among other treasures, I found this cute Japanese-style rabbit print.

I have a weakness for anything rabbit-themed for my little nieces, who were born in the year of the rabbit. You may remember the custom gift bags and silhouette Christmas ornaments that I made for them.
For the basic pattern, I used this tutorial from the Aesthetic Nest. I did alter the pattern in a couple of ways.
Here’s what you will need to make your own unique designs in size 2T:
Instructions:

Cut armholes from the top corners of the front and back panels.
Next, join the front and back panels using a French seam:

To finish off the edges, start with adding bias binding to the armholes. I didn’t get good pictures of this with the dresses, so the picture below is from the pillowcase top I made for myself:
For the neck casing:

For the bottom hem, fold up 2″ towards the inside of the dress and fold back under 1/4″. Iron and stitch the hem in place.
For the tie, I started with two 3″ thick strips of fabric, each 42″ wide.

And here are the finished dresses! So cute!


Pretty dress for a pretty girl!

My cutie niece in her birthday dress!
Happy 2nd birthday, girls!
Auntie “Jewels”
As I have mentioned before, Steve’s birthday and Father’s day are very close to each other, and most years, he gets a combined Happy-Father’s-Birthday-Day celebration. Last year, we went low-frills when I helped the kids make some creative cards for dad.
This year, we’re making some practical gifts with a personal touch – paint your own mugs and aprons. We did the mugs last weekend, while Steve was out for a long run, and they are cute!
Next up: aprons for our amateur Iron Chef.

To make the aprons, I used:
I prewashed the aprons to shrink them and remove some of the sheen to help the colors stay. I then ironed them and pinned them on cardboard, to make it easier to draw. I made two templates: a “tie” apron and a “medal” apron, the latter because Steve ran the San Francisco Marathon on Father’s Day this year!

Then, we each added out own embellishments, and I love how unique the creations turned out to be.


Happy Father’s Day to a loving, patient, and inspiring guy! We love you!
“Jewels”
Steve’s birthday and Father’s day always fall within the same week, and I am sad to confess that he tends to get short-changed with a combined Happy-Father’s-Birthday-Day celebration. Add to the scheduling issues the fact that we are often traveling around that time of year, and sometimes the best I can do is help the kids make some creative cards for dad.
This year, I am planning ahead just a little more, and we have two separate (gasp!) projects to make. Of course, I love doing something handmade, especially from the kids. But I also wanted to make sure that our gifts were practical and I think our projects- mugs and aprons – are perfect!

This morning, the boys and I decorated some coffee cups for Father’s Day – or his birthday – I haven’t decided which is which. This is a fitting gift, because a) Steve’s ability to function as a human being is closely tied to caffeine and b) we keep breaking our cups, so we need more. Not glamorous, but true.
Being an avid fan of Pinterest, I have of course seen the posts about decorating mugs with Sharpies. On closer reading of reviews, however, this might not be as durable as I ideally want. I did, however, find recommendations for these Pebeo Vitrea 160 Glossy Markers. They are meant for glass but also work on ceramics. The colors are very bright, and the markers are easy to use. The one thing I would mention is that these are really paint pens, meaning the paint can splatter, so wear a smock or something you don’t mind getting a few spots on. (Yes, I speak from experience. My cream-colored blouse was an unlucky wardrobe choice, but fortunately the spots are very small.)

We each decorated one of these White Ceramic Mugs and wrote our names and the date on the bottom.


I’ll be baking these to set the color when Steve is at work one day, and I look forward to surprising him with them in a couple of weeks!
“Jewels”
