We moved twice in the last two years, and in the process, I gave away a lot of things. I feel like the universe has decided to reward me by sending me two great finds. First, I found this vintage … Continue reading
We moved twice in the last two years, and in the process, I gave away a lot of things. I feel like the universe has decided to reward me by sending me two great finds. First, I found this vintage … Continue reading

Crafts are definitely calming for me, and this extra time at home has been devoted to learning to make purses and tote bags. I started with the Noodlehead 2-4-1 tote by Anna Graham, followed by her Trail Tote. With some … Continue reading
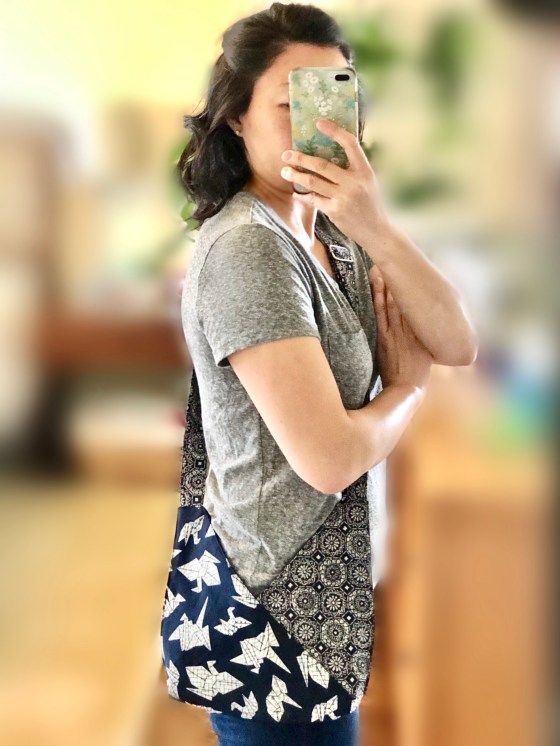
As you may have noticed, my Shelter-in-Place theme is sewing bags. Up next is my first version of an origami bento tote. I found these fabrics in my mother’s stash, and I thought the origami cranes were perfect for an origami bag!

I’ve researched a ton of variations on these origami bento bags and look forward to experimenting with my own versions. There are two main techniques for these origami bento bags. One uses two overlapping triangles and the other uses a long folded rectangle. They look very similar when finished. This bag pattern was made with triangles, which results in a heavier bag, because the pieces are overlapping. I’ll try to put up a general post about the construction of these bags. I found it really helpful to make models of the pattern pieces with scrap paper, to see how they fit together and what direction the pattern would run.
This bag is built from triangles, so the dimensions come out somewhat unexpected. Here’s what I learned from making three different sizes:
Here what you will need:
Prepare the pattern pieces:


Make the strap:

Make the body of the bag:


And here’s the finished bag! So I can wear it around the house!


Stay safe, and happy sewing!
Julie aka “Jewels”
I’ve been admiring felted wool bags and projects for some time now, and I was finally inspired to take the leap into felting after unearthing old sweaters and knitting wool at my parents’ place.
My first project was this felted basket that I’m using for my knitting projects. Steve calls this “Knitting Inception,” because of the knitting within the knitting… you know… well, there’s a reason we were meant for each other, and it may be because I’m the only one who appreciates his humor.

I used this pattern as a foundation for my basket. I wanted to make my basket larger, so I experimented with the dimensions.
To knit the base of the basket, I cast on 35 stitches of 100% wool “Iceland Lopi.” From that, I knit a square in garter stitch (about 45 rows) that is 14″ by 14″, leaving the stitches on the needle.

Knitting the base of the basket.
The next step is to pick up stitches from the other three sides of the square. I found it easier to pick up the stitches on separate knitting needles (or in this case, chopsticks!) and then join them as I knit the first row of the sides of the basket.

Picking up the stitches to knit the sides of the basket.
To create the sides of the basket, I continued to knit a large circle in stocking stitch, switching colors every 2-6 rows. I knit 14″ of stocking stitch and then cast off.

Before felting

Before felting
Now the part I was waiting for: felting! There are lots of tips on felting available, and I found a good summary of felting techniques on the Lion Brand website. I found I needed very hot water (used the “sanitize” cycle on my machine, after “hot” only partially felted the basket), and I preferred to felt the items loose, rather than in a bag, because I found that they felted more evenly.
As for proportions, I’m sure these will vary greatly with each wool and machine, but as a guideline, the garter stitch shrank to about 60% the original dimensions and shrank evenly in length and width. The texture of the garter stitch was still noticeable after felting. The stocking stitch shrank to 50% its original height – actually, even a little shorter because the top folded over. The width of the stocking stitch shrank to about 60% the original size. Overall, the basket held it’s shape very well.

The last step on the basket was to sew on handles. These are cut from an old scarf I found at my dad’s that was accidentally felted. Cutting into the felted material was the weirdest sensation – like defying a basic law of physics! I sewed on the handles using embroidery floss.


My sister asked if I’m pleased with my first felting project, and I am. It takes a little bit of letting go of expectations, because you can’t control the outcome that precisely, but I am happy with the result, and I’m using my new basket already!
I promise more felting ideas will be posted soon!
“Jewels”
These little “pillowcase” dresses have been catching my eye for a while. The style is very simple to sew, and the results are so cute! Not to mention that for growing kids, you can’t beat a style that will grow along with them!

For my birthday, Steve and I went to an amazing fabric store in Berkeley, Stone Mountain and Daughter, and among other treasures, I found this cute Japanese-style rabbit print.

I have a weakness for anything rabbit-themed for my little nieces, who were born in the year of the rabbit. You may remember the custom gift bags and silhouette Christmas ornaments that I made for them.
For the basic pattern, I used this tutorial from the Aesthetic Nest. I did alter the pattern in a couple of ways.
Here’s what you will need to make your own unique designs in size 2T:
Instructions:

Cut armholes from the top corners of the front and back panels.
Next, join the front and back panels using a French seam:

To finish off the edges, start with adding bias binding to the armholes. I didn’t get good pictures of this with the dresses, so the picture below is from the pillowcase top I made for myself:
For the neck casing:

For the bottom hem, fold up 2″ towards the inside of the dress and fold back under 1/4″. Iron and stitch the hem in place.
For the tie, I started with two 3″ thick strips of fabric, each 42″ wide.

And here are the finished dresses! So cute!


Pretty dress for a pretty girl!

My cutie niece in her birthday dress!
Happy 2nd birthday, girls!
Auntie “Jewels”
We’re not formal people… this is how my son showed up to Kindergarten graduation:

Kindergarten graduation. The tie T-shirt is about as dressed up as this kid will get.
I love these tie “Fat Tie” T-shirts that I bought on Zulily. The boys have worn them for a wedding, too, and they seem to strike the right note of respect and whimsy. After getting lots of comments on them, I decided to make some for our boys and to give as gifts.

Another cute “Fat Tie” shirt.
This is not the only tutorial around for this project, but each of us approaches it a little differently, so here’s what I did:
I started with plain long-sleeved T-shirts from Lands’ End. Lands’ End is really hard to beat when you are looking for good quality basics. Their sales are great, and I got these shirts for about $5-$10 each. I prewashed the shirts and the fabric for the ties.

Plain long-sleeved T-shirts from Lands’ End.
I made a template with a piece of scrap paper, using a bit of trial and error to get the shape I wanted.

Paper template for “tie”
To make the tie,

Preparing a fabric “tie” for ironing onto a T-shirt
I ironed the “tie” onto the shirt, lining up the top to the collar of the shirt and using a tape measure to make sure it was centered.

Center the “tie” on the shirt
I’ve seen people describe iron-on projects where they don’t sew down the edges, but it never seems to work for me (the fabric peels off), so I sewed a straight stitch about 1/8″-1/4″ from the edge of the tie.

Sew a straight stitch around the edge of the tie.
And here are the finished shirts! Next time, I think I will try some with a false “knot” at the top, like these shirts by Erin at Lemon Tree Creations. I’d also like to try experimenting with a bow tie!

DIY Iron-on “tie” T-shirts
I’ve also made onesies with these appliqued ties, because even babies need to get dressed up sometimes!


So many ways to have fun with this idea!
“Jewels”
When I bought the roman shades for our master bedroom, I almost ordered one for our bath, too. I’m very glad that I decided to go with something lighter. I ended up making a sheer panel for the bottom half and a matching valance at the top. This gives privacy while still letting in light and our view.
Since I do a lot of my projects after the kids are in bed, I got to see the nighttime view first, and I am so excited that I wanted to post it right away, so here is how our master bath window looks with the new window panels:

Finished window panels with ribbon detail in master bath.

Finished window panels with ribbon detail in master bath.
Daytime view is pretty foggy outside, but I’ll keep trying!


Ribbon border shade tutorial:
You will need:
Lay out your pattern:

Ribbon layout for shade


Mitered corners. On the left, you can see that adding a small triangle of Heat ‘n Bond helped the corners lie neat and flat.
More inspirations!
Here are some other great examples of ribbon borders on window panels and shades. There are so many possible patterns and techniques.

These ribbon border roman shades were sold by Pottery Barn a couple of years ago. I like the use of the wide ribbon and simple pattern. This will be the inspiration for our boys’ shades.

Another simple and elegant ribbon border by Wendy at The Shabby Nest. I would love to do something like this in our kitchen, too!
Go to The Shabby Nest

I fell in love with this beautiful picture on Pinterest, but I cannot find the original source. If you find it, please let me know, so I can give proper credit. I love the detail on the ribbon border. It was too ornate for our bathroom, but I am looking for a place to use it!

Pretty shade with border by Elisa at What the Vita. I love the orange ribbon and the way the shade looks layered with the drapes. She used glue to attach grosgrain ribbon to a plain roller shade! I’m going to look at her tips when I do my boys’ shades, since I won’t be able to iron directly onto them.
Go to What the Vita
Some other ideas would be to
Let me know what you come up with for your windows!
“Jewels”
I shared this post at:


Bad news: I’m blogging and sewing tonight while sitting on a step stool. Good news: it’s because I am in the middle of making over my free Craigslist Queen Anne chairs for the sewing room. They are already repainted, and I just need to re-do the seats, which I hope to do this weekend. Wait! What was I supposed to be talking about… oh yes…
In a recent post, I brainstormed ways to help my friend preserve the record of her children’s heights marked on a door jamb in their house. I loved looking at all the great ideas out there, as well as coming up with some of my own.
At the end of that post, I included a picture of the hanging fabric growth charts I made for my kids. In case you want to make one for your family or as a gift (I first designed this as a baby shower gift!), I’ve broken down the steps here. Let me know if you have any questions!
As I mentioned last time, I’m sure there are similar growth charts out there, but I designed this one myself, keeping in mind that I wanted it to be
The finished size of this growth chart is approximately 11.5″ wide x 54.5″ high.
For each chart, you will need:
1) On a strip of white fabric that is 8.5″ wide for each growth chart, mark out inches from 1’6″ to 6’2″ (or whatever you like) by laying a tape measure on the fabric and using a ruler to draw lines with a fabric marker or Sharpie. I used a different color and longer marking every six inches. The short lines are 1.5″ and the long lines are 2″. Remember that lines on the finished product will be shorter, because a 1/2″ will be in the seam allowance.
If you are making more than one growth chart, you can be efficient and mark lines for two at a time, as shown below. You will need a slightly longer fabric strip and want to number from both ends, so the marks are on the left of each chart.

Inches marked on white fabric using fabric markers.
2) Cut out strips for a border. The side strips are 2.5″ wide. The chart should be 58″ long, but cut your strips about an inch longer, in case you are like me, and straight lines magically transform into uneven ones… For preparing the border, I used a rotary cutter with quilting ruler and mat. These tools are designed for quilting, where you have to piece together very precise lines and angles, but they work well for lots of other projects.

Quilting tools: rotary cutter, quilting ruler, and mat. These are so useful for getting straight lines and square angles on all sorts of projects. I even use the mat and ruler for cutting paper.
3) Sew the side strips onto the white center, using a half inch seam allowance. Iron flat, with the seam toward the border. Trim the border pieces so they are flush with the white section. Again, the quilting tools are great for getting things straight and square.
4) Next, cut strips for the top and bottom border. These are 5.75″tall, and they should be 11.5″ wide. Again, I cut the pieces a bit wider, to compensate for the nasty elves in the sewing machine. Sew these on to the top and bottom, using a half inch seam allowance. Iron with the seam toward the border. Now that the front is complete, trim where necessary to make sure it’s even (square at the corners, same height on both sides, same width at top and bottom).

After trimming the center piece, join the top and bottom borders.
You could add any decorations you want to the front at this point. I put each child’s name at the top, piecing together letters from a fun teddy bear alphabet print. I also added a “Made with love by ‘Jewels'” tag to the bottom.

I put each child’s name on his growth chart using letters from this cute teddy bear print.
5) Cut a piece of backing that is the full size of the front (should be about 11.5″ wide and 69″ long, but measure your actual piece).
6) With RIGHT sides together, pin, then sew the front and back pieces together, using a half inch seam allowance, leaving one of the short ends open, so you can turn the piece.
7) Cut diagonal triangles from the corners, so they turn neatly. Then, turn the growth chart right side out and tuck a half inch seam allowance under on the open end. Iron the whole piece flat.

Cutting across the diagonal at the corner will give a neater finished appearance.
8) Cut two pieces of doweling that are the same length or a tiny bit shorter than the finished width of your growth chart. Attach the screw eyes to both ends of one piece.
9) Fold towards the back and sew down a 1.25″ flap on the top and bottom to create a pocket for the dowels. This will also close the end you left open.
10) Insert the plain dowel in the bottom pocket and the one with the screw eyes in the top. Thread a ribbon through the screw eyes to hang the chart.

Finish: Sew 1.25″ flaps on the top and bottom to hold the dowels. Insert screw eyes in the top piece and thread a ribbon through for hanging.
Tada! The finished growth charts are hanging in the hallway outside our kids’ bath, opposite the newly organized laundry area.

Finished growth charts
Hope I made that clear. I’d love to see pictures, if you make one of these yourself!
“Jewels”
This project is shared at:

