Quick, Easy, No-Sew(!) Ways to Add Room-Darkening Lining to Your Curtains

I wish I were a better sleeper. Trust me, I really do. I’m sensitive to light when sleeping, so room-darkening window coverings are a must! I’ve found some quick tricks that I’m excited to share for adding lining to existing … Continue reading

Cloth Face Masks 2.0


Mixed feelings seem to be the norm these days, so – I am both sad that we need to wear face masks, and happy that I can make them. Now that I have tried a few different variations, it’s gotten pretty quick and easy to put these masks together. They are a satisfying way to use small scraps of fabric, and several have been going out by mail or on the doorstep to my friends. I’ve gotten some lovely chocolate treats in return – it’s a great feeling, when people know you so well!


The original mask pattern I made is in a prior post. Now, I have made a few updates that I think make it more comfortable (nose dart) and practical (opening at the bottom, if you want to add additional filter material).


Here’s what you’ll need:

  • Cotton fabric – use a tightly-woven material, such as high thread count bed sheets or quilting cottons for better protection (two 8″ squares per mask)
  • 1/4″ wide elastic (12.5″ length per mask)
  • Cord for ties – I used spare shoelaces and some bias tape stitched closed (I yard per mask)
  • Basic sewing supplies
  •  

Here’s how to do it:

  • Cut two 8″x8″ squares of cotton
  • Round the top slightly (see picture below)
  • Fold the mask in half vertically, with right side facing, and sew small darts at the top center of each piece. My darts are approximately 7/8″ wide and 2 1/4″ high (see picture below)
  • Zig-zag stitch along the bottom of each piece to stop the hem from fraying, because this side will be left open to insert optional filter material.
  • Place the two pieces right sides together and pin
  • In between the two layers, pin the elastic 3/8″ down from the top corners, careful not to twist and pin the ties 3/8” up from the bottom corners
  • Starting about 1.5″ from a bottom corner, stitch toward the corner and all around the edge of the mask with a 3/8″ seam allowance, ending about 1.5″ from the opposite bottom corner, leaving an opening in the center of the bottom. Backstitch at the beginning, ties, elastic, and end (see picture below)
  • Clip the corners, clip the top curve, and turn right side out
  • Iron the seams flat and top stitch around the edges
  • Pin two or three pleats
  • Stitch the two sides to secure the pleats

Here’s how I wear these masks and some of the fun fabric and color combinations I tried:

Hope that helps others who are sewing masks. Stay safe, friends!

Julie aka “Jewels”

Crossbody Origami Bento Bag

As you may have noticed, my Shelter-in-Place theme is sewing bags. Up next is my first version of an origami bento tote. I found these fabrics in my mother’s stash, and I thought the origami cranes were perfect for an origami bag!

I’ve researched a ton of variations on these origami bento bags and look forward to experimenting with my own versions. There are two main techniques for these origami bento bags. One uses two overlapping triangles and the other uses a long folded rectangle. They look very similar when finished. This bag pattern was made with triangles, which results in a heavier bag, because the pieces are overlapping. I’ll try to put up a general post about the construction of these bags. I found it really helpful to make models of the pattern pieces with scrap paper, to see how they fit together and what direction the pattern would run.

This bag is built from triangles, so the dimensions come out somewhat unexpected. Here’s what I learned from making three different sizes:

  • 17″x17″ squares -> finished bag 11″ wide and 10″ high (but only about 5-6″ of the height is usable for storage. It’s a cute and compact bag, with just enough space for your phone, wallet, keys and chapstick.
  • 21″x21″ squares -> finished bag 13″ wide with 6.5″ height for storage
  • 24″x24″ squares -> finished bag 15.5″ wide with 8″ height for storage

Here what you will need:

  • For the body of the bag, two squares of fabric (see dimension options above)
    • *The pattern of your fabric will run in opposite directions on the front and back of the bag, so pick a pattern than works in both directions*
    • single fabric for a simple, clean look
    • two different squares of fabric to create a two-color exterior and lining
    • create each of the squares from two fabrics – one for the outside, and the other for the lining (this is the version you see below)
  • For the straps – 5″x50″ strap of fabric
  • magnetic snap
  • 1.25″ strap slider and ring
  • Fusible interfacing, basic sewing supplies

Prepare the pattern pieces:

  • Cut the fabric for the body of the bag and the strap. You will likely need to join two strips to create the 50″ strap. I joined the strips on an angle, to reduce bulk
  • If you want to have a different fabric for the lining, join fabric to make your squares, as shown below

fuse interfacing to the wrong side of the large squares. There are many layers in the finished bag, so one option is to leave interfacing off two of the corners of each square, to reduce bulk. In this case, it would be the two solid (not pieced) corners

  • Fuse interfacing to all except the last 3.5″ of the strap, on the wrong side of the fabric

Make the strap:

  • On the end with interfacing, fold a 1/2″ hem, wrong sides together
  • Iron the strap in half lengthwise, wrong sides together
  • Fold each side toward the center, wrong sides together and iron again
  • Fold the strap along the center lengthwise, creating four layers of thickness
  • Top stitch around the strap, including the hemmed end
  • Cut off the 3.5″ section without interfacing
  • Loop the 3.5″ section around the ring and pin (see picture)

img_8576

Make the body of the bag:

  • Fold each square in half to form a triangle. If you are using a different fabric for the lining, like I did, fold it so that the lining fabric is on one side and the exterior fabric is on the other. If you left interfacing off two corners of your squares, the bare corners should be at the top of the triangle, not along the fold
  • Pin the short strap to the right side of one corner of one piece, next to the fold, as shown (see picture)

  • Pin the unfinished end of the long strap to a corner of the other piece, with the strap facing into the fabric
  • Pin and sew around the edge of the triangles, leaving a 4″ opening along one side, for turning. The two corners along the fold should be squared off, as shown below. On one end, you are using the seam to attach the strap. The opposite corner is finished to match

  • clip the corners and turn the triangles right side out
  • Fold each triangle in half again, matching the squared off corners
  • Place one triangle inside the other, as shown

  • On the triangle that is on the inside, topstitch to close the 4″ opening you left for turning the piece. The opening on the other piece will get closed in a later step
  • On the inside triangle, mark spots just under the the spot where the triangles overlap, and install the magnetic snap, as shown

  • Place the two triangles together again, and pin in place (see picture)
  • Topstitch along the edge of the outer triangle, to join the two pieces and also close the 4″ opening you had used to turn the outer triangle

  • Now fold, pin, and topstitch along the the two sides of the bag and the base of the straps. You could choose to leave your bag flat like this (see picture), or add box corners

  • To add box corners, turn the bag inside out, fold the corner, so that the side seam is aligned with the bottom seam, and sew across the white line. The fabric is very bulky at this point, which is when I realized that it would help to leave interfacing off of these corners

  • Finish the strap by looping the long end of the strap through the slider, around the ring, and back up around the inner piece of the slider. Fold the finished end of the strap back on itself and stitch in place

And here’s the finished bag! So I can wear it around the house!

Stay safe, and happy sewing!

Julie aka “Jewels”

A Simple Cloth Face Mask

Sigh, with the novel coronavirus circulating it’s a good idea to have face masks for the times when we go out to get groceries or meals. Some hospitals are also asking for donations of fabric masks. I tried a few different patterns and settled on my own version I’m sharing here.

The features I like about this mask are that it’s easy to make and comfortable to wear, as well as conserving elastic, which is hard to find these days.

Here’s what you’ll need:

  • Cotton fabric
  • Elastic
  • Cord for ties – I used spare shoelaces and some bias tape stitched closed
  • Sewing machine, thread, scissors

Here’s how to make it:

  • Cut a piece of cotton 8”x 16”
  • Fold in half lengthwise and mark the middle
  • Pin the elastic next to the middle on the right side
  • Pin the ties 3/8” up from the bottom corners
  • Fold lengthwise with right sides facing
  • Leaving a 3” opening on one of the edges to turn the mask right side out, stitch around the edges with a 3/8” seam allowance
  • Using the 3” opening, turn the mask right side out
  • Iron the seams flat and top stitch around the edges
  • Pin three pleats
  • Stitch the two sides to secure the pleats

Here’s how I wear these masks and some of the fun fabric and color combinations I tried:

Hope that helps others who are sewing masks. Stay safe, friends!

Julie aka “Jewels”

The Neutral Pillow Project

Whether you lean towards Scandinavian-inspired, Modern Farmhouse, or California Casual, everything light, white, and wood is in right now – and I love it!

While I’m always excited to incorporate new looks into my home, it takes some creativity to do this – we’ve had most of our major furniture pieces for a decade or more.

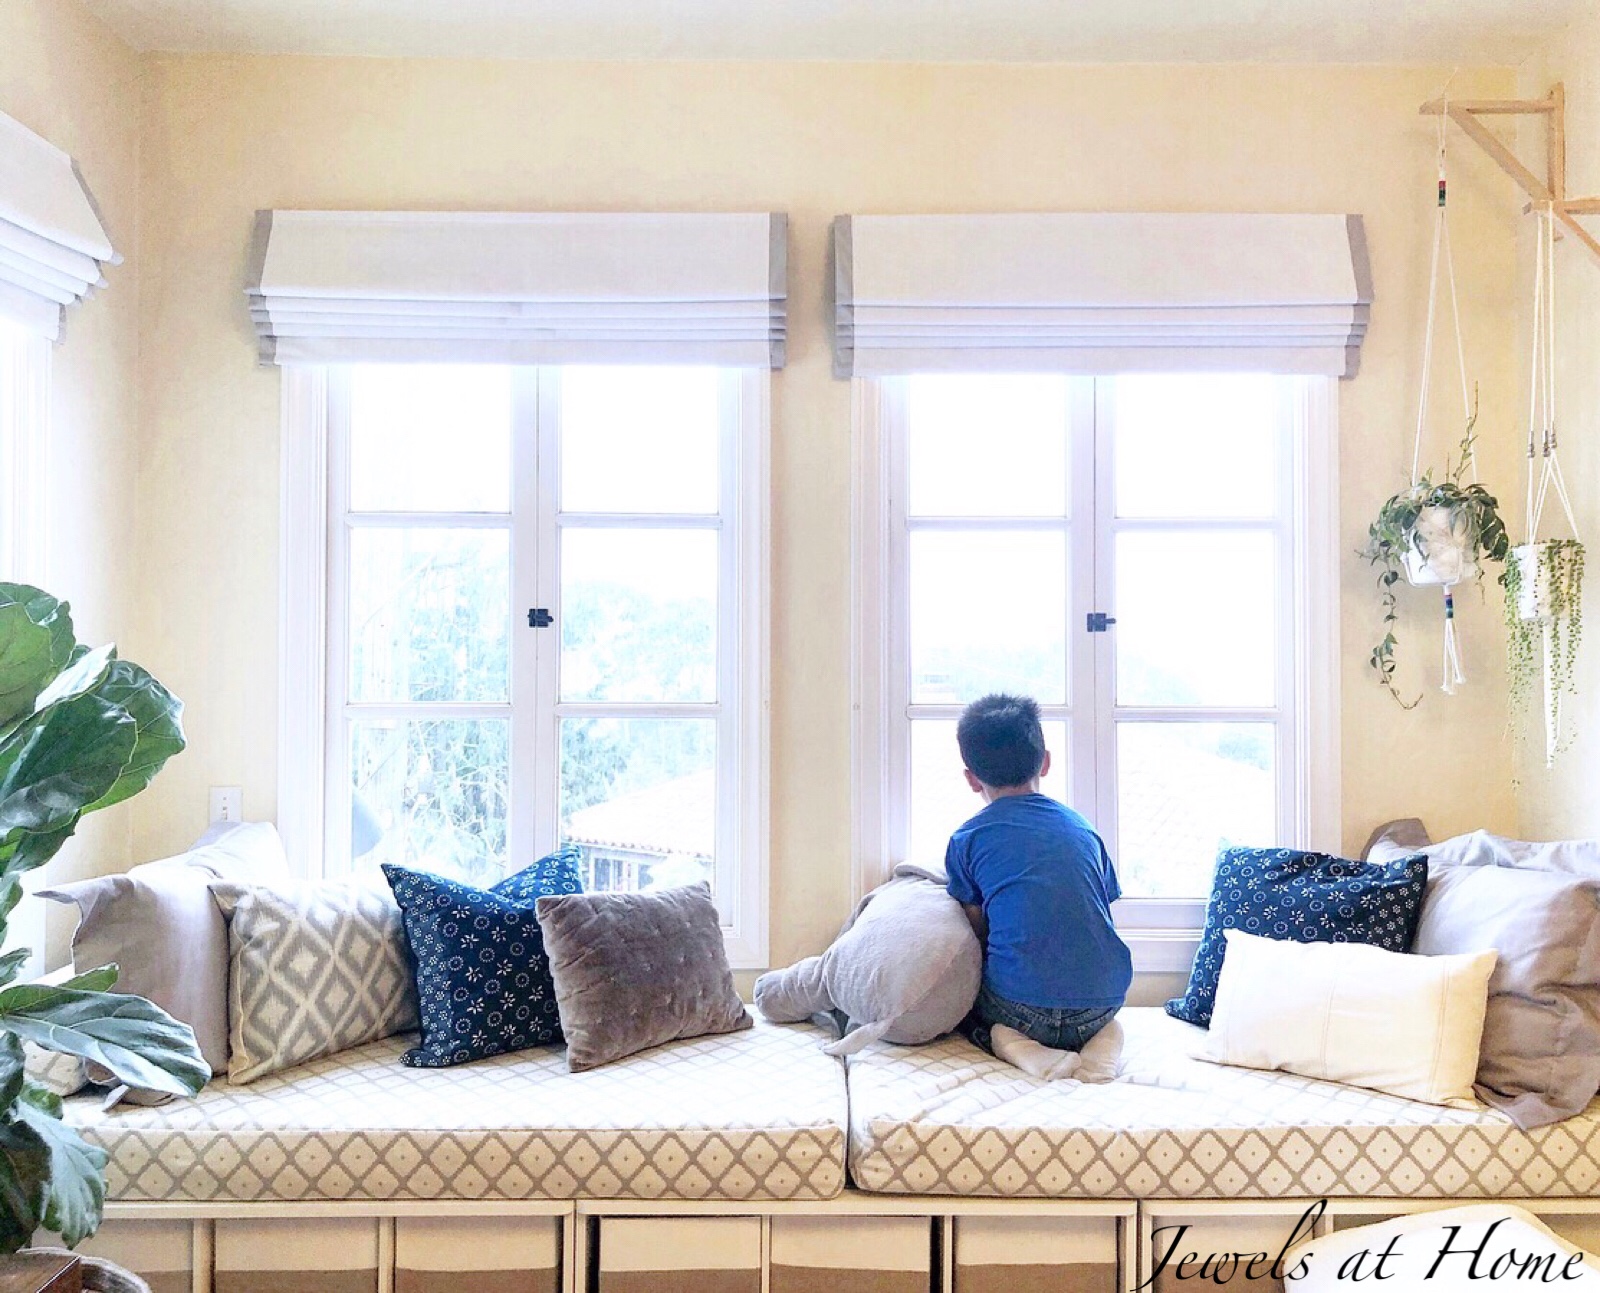
One strategy that’s easy on the budget and environment is to change out accessories like pillows. Here are some light and bright ideas that you can use to give your room a new look!

Admittedly, my “things I have in the house already” is rather extensive, but I’m still proud that I managed to make all these pillows with them.

Here are the links to a tutorial on making simple throw pillows and tutorials for the window seat pillows, including bolster and flanged pillows.

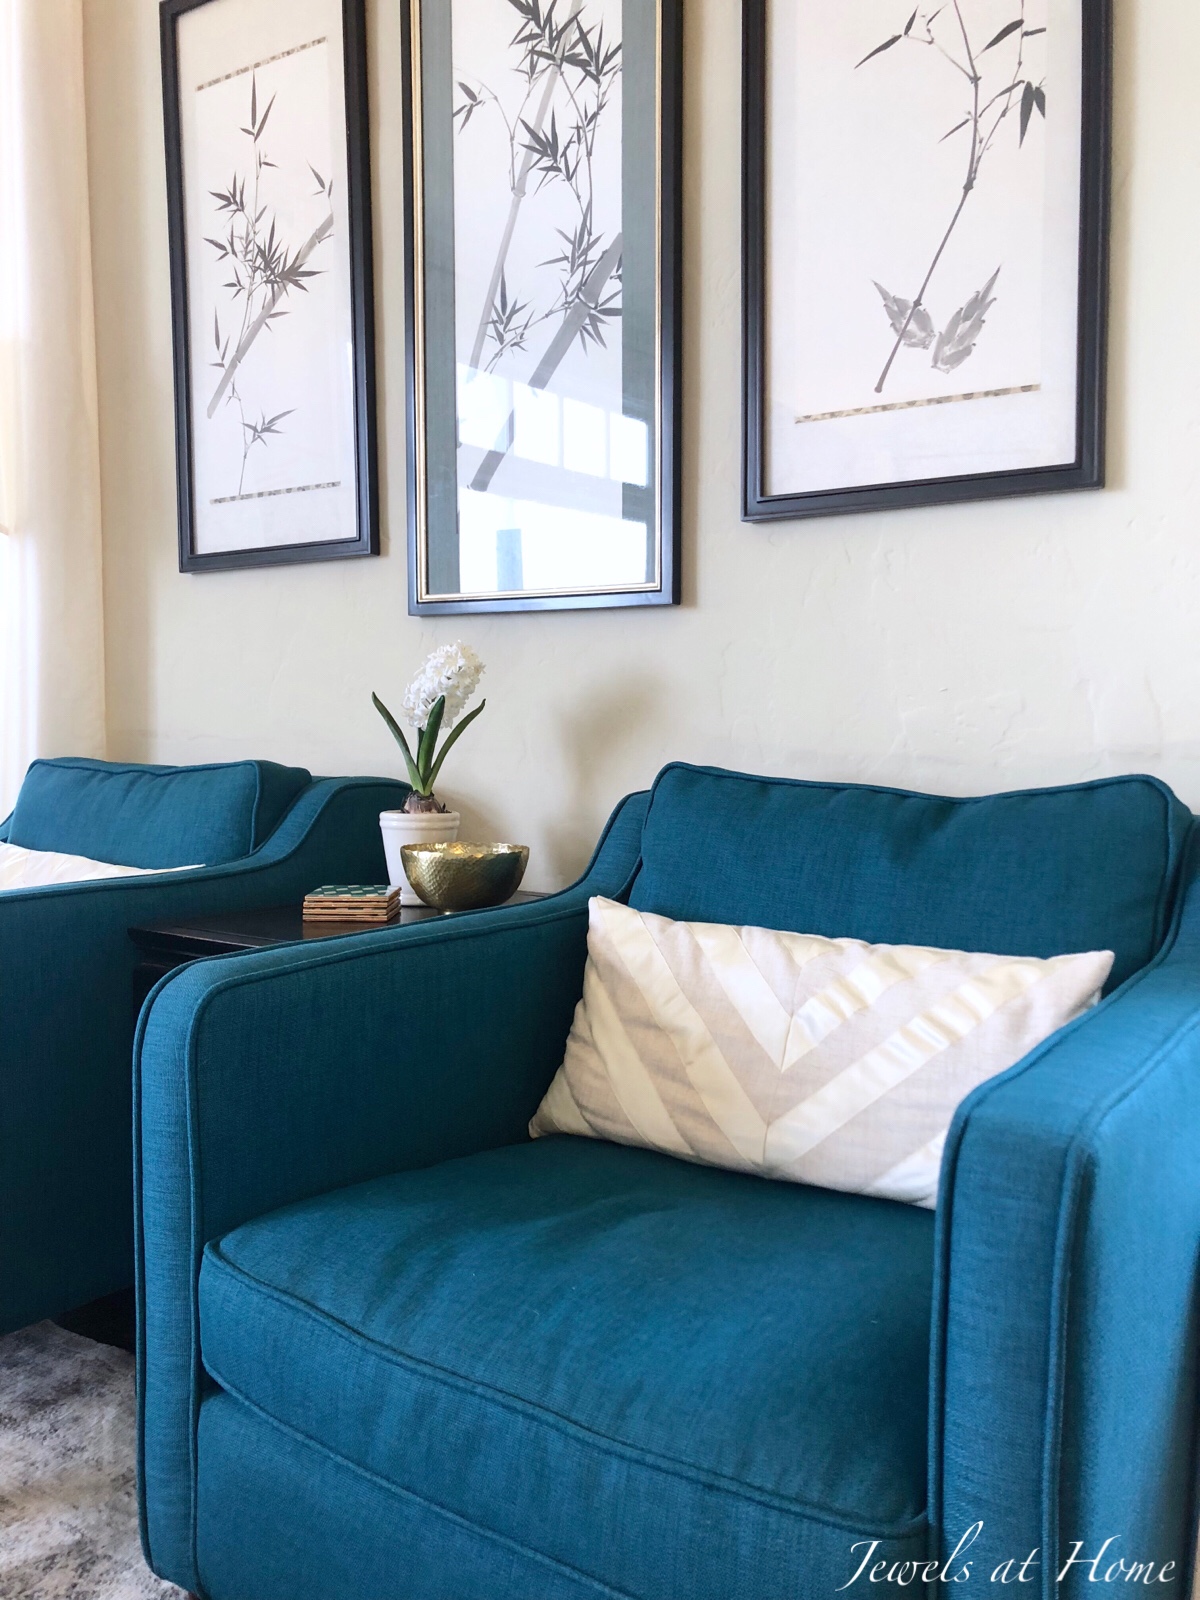
Starting with: Ribbon-embellished geometric pillows:

  • I started by sewing lengths of ivory ribbon onto a linen-like fabric in diagonal stripes
  • I then cut out panels to create a chevron or herringbone pattern for two bolster pillows to add a neutral accent to my teal armchairs
  • With the leftover sections of ribbon-embellished fabric, I created one more throw pillow for our living room loveseat

Mudcloth-inspired contrast stitching:

Neutral doesn’t have to mean boring! I took some plain canvas fabric I had and, inspired by the oh-so-popular mudcloth trend, cut it into panels and sewed it together with contrasting navy thread:

There are a million more ideas for sewing simple pillows to change the look of your space – and when I try them all, you’ll see it here!

“Jewels”

DIY Padded Laptop Sleeve in Graphic Modern Fabric

Happy New Year!

I am feel super-stoked about work this year. I have my long-time work “family,” and we have added some strong new staff as well. We are moving to new offices, and I am part of building a new clinic, which is a bit daunting but mostly exciting. To help kick off the new year at work, I decided to make myself a cute laptop sleeve.


DIY Padded Laptop Sleeve in Modern Graphic Fabric | Jewels at Home

I was inspired by this pattern from Mandi at A Beautiful Mess. I made a few adaptations, like a velcro closure, a sewn-in name tag, and a rectangular flap.

To make your laptop sleeve, you’ll need

  • half yard of outer fabric – I used this graphic modern print
  • half yard of inner fabric – I used dark red faux suede for extra protection
  • quilt batting
  • velcro
  • scrap fabric for label and reinforcement
  • bias binding – mine matches the red on the inside

Start by cutting rectangles out of all three materials. For the width, the fabric should be 1 3/4 inches wider than your laptop on either side. For the length, wrap the fabric around your laptop and add about 6 inches for the flap. I’m lucky the print on my fabric worked out perfectly to line up… I mean I carefully planned and lined up the pattern on my fabric!

I made a label out of scrap muslin and put my name and contact information on it, in case I should ever be so unfortunate as to lose my laptop by fortunate enough to have someone host find it… I sewed this onto the lining fabric, as show below.

DIY Padded Laptop Sleeve in Modern Graphic Fabric | Jewels at Home

Next, I laid all three layers together and pinned them to keep them in place. I sewed quilting lines through all three fabrics for most of the sleeve, but I did want to sew across my name tag, so for the top section, I used some scrap fabric for backing and just sewed the outside fabric and batting to the scrap fabric, also shown below (folded over).

DIY Padded Laptop Sleeve in Modern Graphic Fabric | Jewels at Home

Next, I added the velcro. For the velcro on the body of the bag, I sewed all the way through, since the velcro is on the outside fabric, and I didn’t mind having stitching on the inside. However, for the velcro on the inside of the flap, I didn’t want the stitching to show on the outside, so I used more scrap fabric for backing, and I sewed the velcro to the inside fabric, batting, and scrap fabric, as shown below.

DIY Padded Laptop Sleeve in Modern Graphic Fabric | Jewels at Home

You can see the sleeve taking shape now! I finished one short end of the rectangle with bias binding (shown bel0w) and folded the entire piece to make the sleeve and trimmed some excess from the sides for a snug fit. I pinned the fabric in place to form the shape of the sleeve.

DIY Padded Laptop Sleeve in Modern Graphic Fabric | Jewels at Home

I sewed the sides together with a zig zag stitch and then added bias binding to the sides of the sleeve and top of the flap.DIY Padded Laptop Sleeve in Modern Graphic Fabric | Jewels at Home
 This was a pretty quick and easy project, and I love how it turned out. I think Steve is eyeing the laptop sleeve, and I offered to make one for him, but he does work from home most days and so he has turned me down so far…

Here are some pictures of the finished product!

DIY Padded Laptop Sleeve in Modern Graphic Fabric | Jewels at Home

DIY Padded Laptop Sleeve in Modern Graphic Fabric | Jewels at Home
Looking forward to many adventures both at work and “at home” in 2016!

“Jewels”