“Elegant and Airy” is my inspiration for our dining room. One of the projects was to switch out the Roman shades. I wanted something more formal-looking, and I also wanted to install my shades above the windows – a classic … Continue reading
“Elegant and Airy” is my inspiration for our dining room. One of the projects was to switch out the Roman shades. I wanted something more formal-looking, and I also wanted to install my shades above the windows – a classic … Continue reading
Whether you lean towards Scandinavian-inspired, Modern Farmhouse, or California Casual, everything light, white, and wood is in right now – and I love it!

While I’m always excited to incorporate new looks into my home, it takes some creativity to do this – we’ve had most of our major furniture pieces for a decade or more.
One strategy that’s easy on the budget and environment is to change out accessories like pillows. Here are some light and bright ideas that you can use to give your room a new look!
Admittedly, my “things I have in the house already” is rather extensive, but I’m still proud that I managed to make all these pillows with them.
Here are the links to a tutorial on making simple throw pillows and tutorials for the window seat pillows, including bolster and flanged pillows.
Starting with: Ribbon-embellished geometric pillows:


Mudcloth-inspired contrast stitching:
Neutral doesn’t have to mean boring! I took some plain canvas fabric I had and, inspired by the oh-so-popular mudcloth trend, cut it into panels and sewed it together with contrasting navy thread:


There are a million more ideas for sewing simple pillows to change the look of your space – and when I try them all, you’ll see it here!
“Jewels”
It’s graduation season! Somehow (well, I guess we know how), I ended up with boys graduating from middle school, elementary school, and Kindergarten all in one year. This calls for some crafting. I decided to make graduation leis for the boys and their friends using ribbon.

I researched a ton of ideas, which you can browse on my Pinterest page. Some of those ideas are definitely for the expert level lei-maker, and I am a humble beginner. However, I did find inspiration for something that is both easy and pretty over at Sakacon.com. These spiral ribbon leis don’t require advanced skills, but they do take some time. I modified the method a little, and I love how you can mix and match so many ribbons for infinite ideas!
Materials:
Instructions:
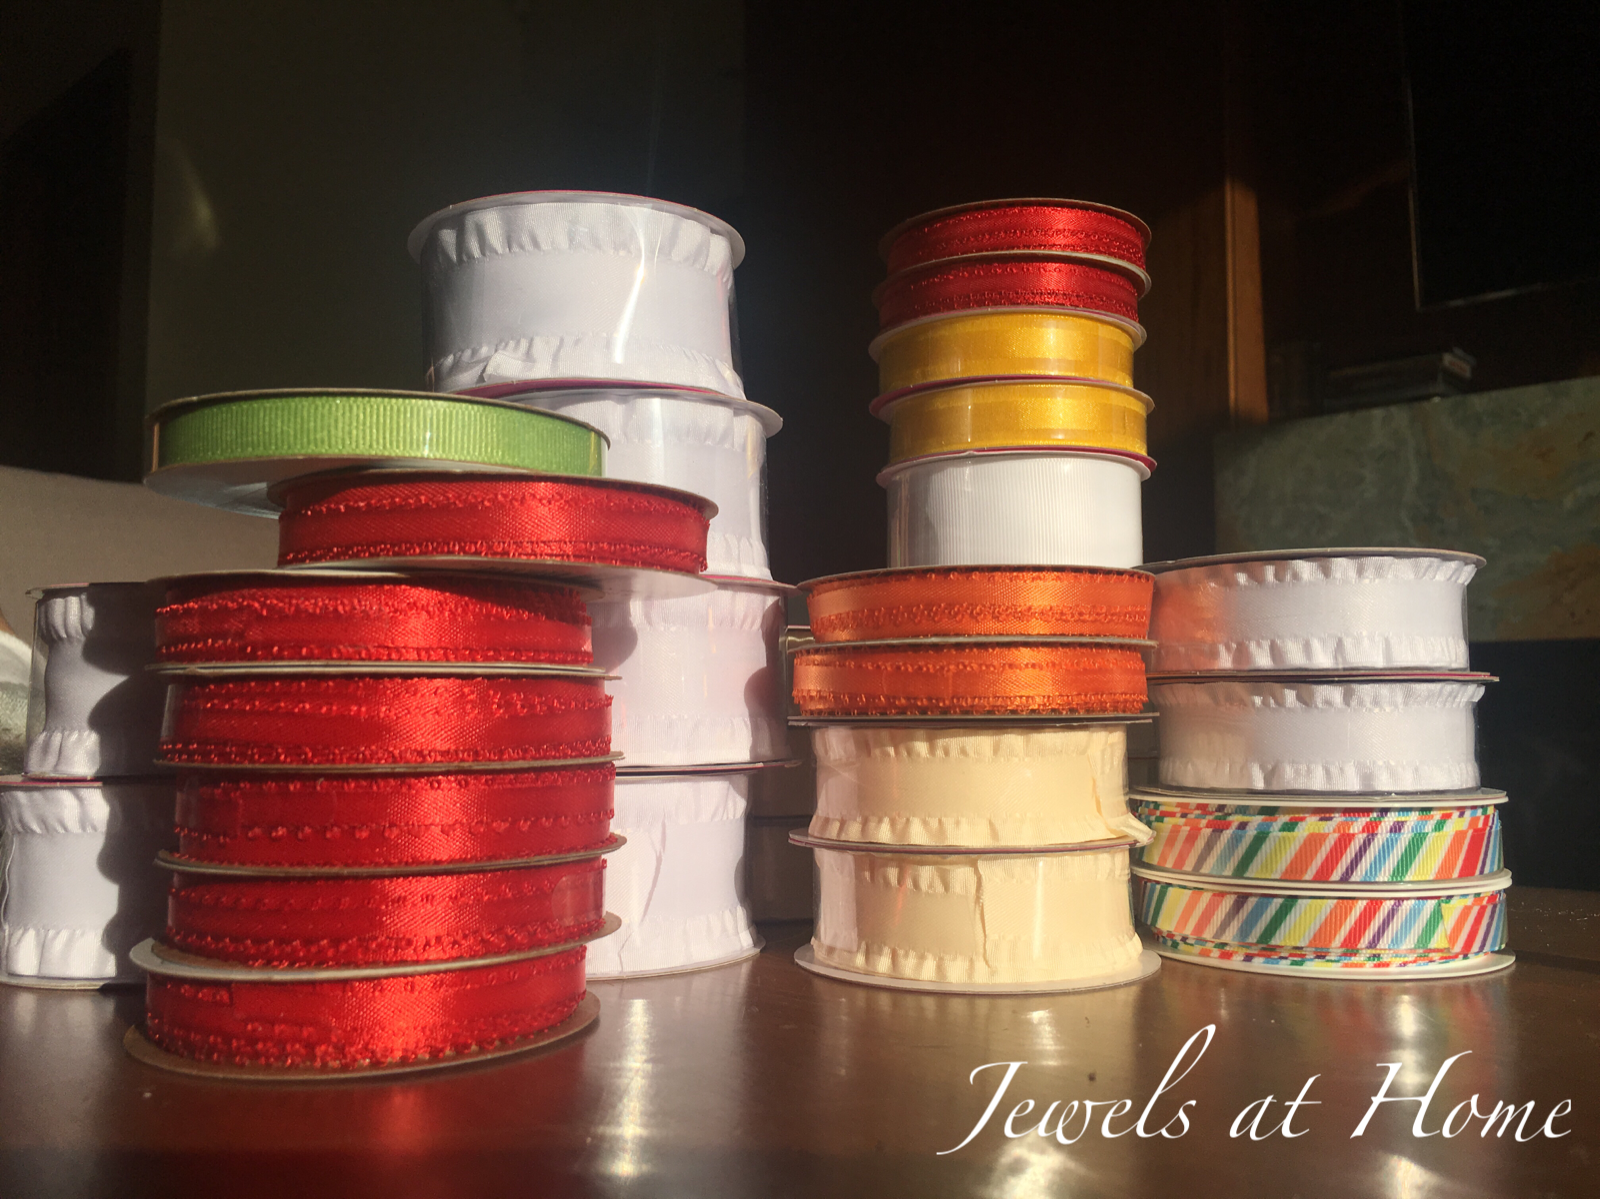
First, go to your local craft store and go crazy! I actually feel like I have accomplished a project just by getting supplies (…but I realize this isn’t quite true). Since the design of the leis is simple, you can add a lot of detail by picking interesting ribbons. You can see i found some ribbons with ruffled edges and picot ribbon (apparently this is what you call the ribbon with the little loops in the side) that really make your “flowers” look more realistic. For fun, I bought some rainbow stripe ribbon, and the possibilities are really endless.
To make the lei, thread three strands of embroidery floss onto your needle. I used about 18″ of floss at a time. Tie a secure knot at the end of your floss.
The Sakacon version has a long tail you can use to tie the lei on with a bow. I decided to make a continuous round lei, because I thought it would be more comfortable for the boys. I still staggered the length of the wide and narrow ribbons – ie left a long tail of the wide ribbon before starting my lei – so there would not be an obvious join in the lei.
I lined up the narrow ribbon to one side of the wide ribbon, folding under the edge to avoid fraying, and sewed a few stitches in place to secure it. I then started doing a long running stitch, with stitches every centimeter (3/8″) or so.

Once you have sewn a few stitches, pull the thread to make the ruffles and guide them into a spiral shape to look like a chain of flowers. This really feels like magic!
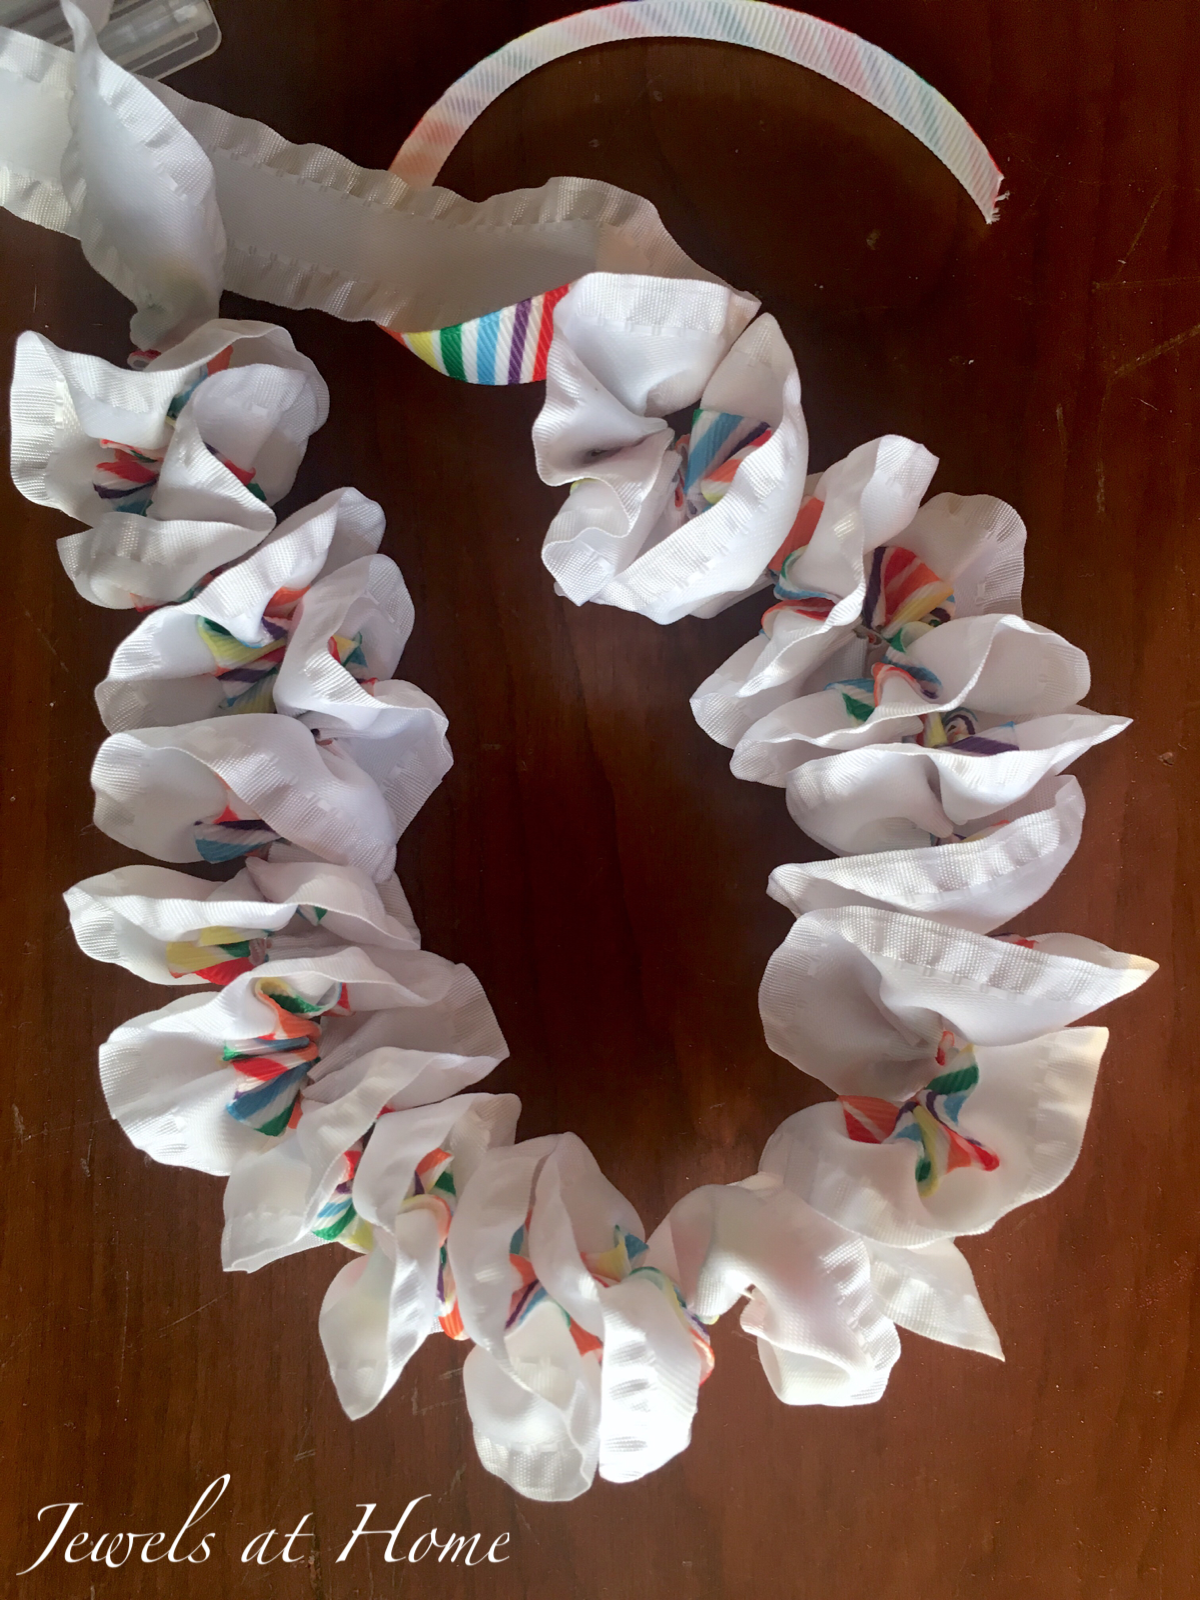
You basically continue this for a long, long time. To make the lei a continuous loop, I cut off the wide ribbon first, and picked up the section of wide ribbon I had left as a “tail” at the beginning, continuing I until I reached the start of the narrow ribbon.
I bought spools of craft ribbon, which comes in 3-6 yard sections, so there are several joins in the lei. These aren’t visible, because the ribbons are staggered, and there are so many ruffles. At the ends of the ribbon, I used clear nail polish on the wide ribbon and just folded under the ends of the narrow ribbon. I also changed embroidery floss a few times, being sure to tie secure knots and hide the ends.
Behold! Here are the finished leis. I’m still making more and will add the pictures when they are done, to give you more ideas for ribbon combinations. I can’t wait to share them with my boys and their friends in a few more weeks!


Aloha!
“Jewels”
I’m making a daybed window seat in our master bedroom, and it makes me so happy!! This is going to sound weird, but I think I like to look at it as much as I like to sit on it…
The whole seat just about done now, so I will get the final pictures up soon. So far, I have shared the bench cushions, and today, I’ll show you some of the special pillows I sewed to dress it up: round bolsters, flanged shams, and a ribbon-bordered pillow.

I’m not going to go into the basics of how to sew throw pillows, as you can find that in this old post.
Ribbon-bordered pillow
This was just a basic pillow, and I used to add ribbon the same way I did for our master bath curtains. This time, I did sew down the ribbon as well.
Round bolster pillows
Okay, I’m pretty proud of these. I was feeling intimidated by sewing the circles, but now that they are done, I’m so pleased! I made these round bolsters out of the same fabric, Robert Allen Souk in Dove, that I used for the bench seat. They sit on either end and really make the daybed feel finished.
The pilllow design is very simple, with just three pieces and some velcro. For each pillow that has a finished size of 24″x 8″ diameter, I cut a rectangle that is 25″ wide by 27″ long. I cut two circles that are 9″ in diameter (pictured below). I hemmed the short ends of the rectangle and finished all the other edges with a zig-zag stitch.

Three simple pieces for sewing a round bolster pillow.
Next, I joined the two short ends of the rectangle, with one inch overlapping, to make a cylinder and pinned this in place. Then, I fitted a circle into the open end, with right sides facing. I used a lot of pins, to make sure that it fit evenly (pictured below).

Form a cylinder with the rectangular piece and fit a circle into the open end.
I sewed the circle into place by hand (pictured below). You could definitely try this by machine, but my fabric was quite stiff, and I thought I would just end up with a jagged circle and unpicking it 10 times. Repeat on the other end.

Stitch the circle onto the open end of the cylinder.
Last, I added Velcro to the long opening to hold the pillow closed (pictured below).

Add velcro for the pillow closure.
What’s inside my bolster pillows? You can purchase these forms, but I was able to construct some pillow forms from supplies I already had in the house. Yes, that’s right. While I may fantasize about being on HGTV, I think I have a better shot at getting on Hoarders. I used one thick piece of foam and two thinner strips for the core of the pillow, wrapped it all in batting and then stuffed it all in a simple tube sewn from scrap fabric (pictured below).

Making a pillow form for a round bolster pillow.
And here’s the finished bolster pillow. Something about conquering those circles is very satisfying!

Flanged pillow sham
I wanted pillows of different sizes on the daybed, so I beefed up some standard 20″x26″ pillows by sewing flanged covers.
For this project, you’ll need fabric, fusible interfacing, velcro, and thread.
I cut a large rectangle 29″ wide x 70″ long and hemmed the two short ends. I cut the fusible interfacing into 3″ strips and ironed the strips into place along the long sides of the rectangle and cut 6″ strips to sew, as show below, where the sides of the pillow will be.

Iron strips of interfacing onto the inside of the pillow cover.
I folded the rectangle as show below, so the hem overlaps on the back where the closure will be. I stitched along the top and bottom edges.

Fold the rectangle to make the pillow cover, and sew with the right sides together and the interfacing on the outside.
Then, turn the pillow cover right side out, iron, and sew around the pillow 2 1/2″ from the edge. I put a strip of painter’s tape on my machine to mark this distance (shown below).

Sew around the pillow cover on the outside, 2 1/2″ from the edge.
Ta-da! Pillow cover with edges that will stand up nice and crisp!


And here’s how the window seat is looking so far, with all the pillows and throws. I just need to finish the storage boxes to go below, and I’ll be done! This is one of the projects that got me so excited I could barely sleep, so it feels good to be almost done… I might need to catch up on sleep with a nap on this cozy daybed!


The blue pillow and knit throw tie into the art in the master bathroom. Ahhh….

Not much longer until I’ll show you the finished project with all the details!
“Jewels”
Do you have some plain towels calling out for a bit of interest? Adding some ribbon or a beautiful fabric – or both – to some towels is an easy way to transform them. The finished products make great accents for your home and would be great housewarming gifts! The sewing is all straight lines, so a forgiving and doable project. These plush towels were lovely already, but I felt like dressing them up a bit. I used a band of fabric and some bias tape.
Before you start this project, prewash the towels and fabric, so they won’t pucker later, if they shrink unevenly.
I started by cutting strips of each fabric to the width I wanted and joined pieces end to end to make a long strip.

Make long strips of the fabrics you want for the towels
Then, I joined the strips of different fabric to each other and ironed down a seam allowance on the top and bottom.

Sew together the different fabric strips
Finally, I cut sections a bit wider than each towel and pinned it onto the towels, folding a seam allowance on the ends before sewing the fabric to the towel.

Pin the fabric in place, turning under the raw edges.
This was really an easy project, and I think it makes a big impact! I used a little bit of the green and white fabric to decorate a basket in the vanity, to tie the room together.

Finished towels with new fabric border in our master bathroom.

New fabric border on master bath towels.
A funny story along the way: ever wonder what the kids think of all these craft projects? Our six year-old saw the fabric pinned to the towels in my sewing room and asked, “But won’t the pins hurt?” It reminds me that all my great ideas might seem a little crazy to others.
Now that I’ve decorated these towels for our master bathroom, I’d love to try some more. I’ve seen some very pretty versions of this idea on tea towels or burp cloths, all of which would make great and special handmade gifts.
And with these towels, our master bathroom is pretty much done, do that room tour will be coming up soon!
“Jewels”
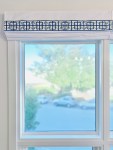
When I bought the roman shades for our master bedroom, I almost ordered one for our bath, too. I’m very glad that I decided to go with something lighter. I ended up making a sheer panel for the bottom half and a matching valance at the top. This gives privacy while still letting in light and our view.
Since I do a lot of my projects after the kids are in bed, I got to see the nighttime view first, and I am so excited that I wanted to post it right away, so here is how our master bath window looks with the new window panels:

Finished window panels with ribbon detail in master bath.

Finished window panels with ribbon detail in master bath.
Daytime view is pretty foggy outside, but I’ll keep trying!


Ribbon border shade tutorial:
You will need:
Lay out your pattern:

Ribbon layout for shade


Mitered corners. On the left, you can see that adding a small triangle of Heat ‘n Bond helped the corners lie neat and flat.
More inspirations!
Here are some other great examples of ribbon borders on window panels and shades. There are so many possible patterns and techniques.

These ribbon border roman shades were sold by Pottery Barn a couple of years ago. I like the use of the wide ribbon and simple pattern. This will be the inspiration for our boys’ shades.

Another simple and elegant ribbon border by Wendy at The Shabby Nest. I would love to do something like this in our kitchen, too!
Go to The Shabby Nest

I fell in love with this beautiful picture on Pinterest, but I cannot find the original source. If you find it, please let me know, so I can give proper credit. I love the detail on the ribbon border. It was too ornate for our bathroom, but I am looking for a place to use it!

Pretty shade with border by Elisa at What the Vita. I love the orange ribbon and the way the shade looks layered with the drapes. She used glue to attach grosgrain ribbon to a plain roller shade! I’m going to look at her tips when I do my boys’ shades, since I won’t be able to iron directly onto them.
Go to What the Vita
Some other ideas would be to
Let me know what you come up with for your windows!
“Jewels”
I shared this post at:


Happy Mother’s Day! (Well, for many years, I didn’t find this day happy at all, because it made me feel my mother’s absence even more, but with three little ones of my own, it is happy again, and I celebrate the many wonderful memories of my own mom, whose creativity and talent are constant inspiration for me. So, if this is a hard day for you, hugs! And I hope it will get better.)
I’m making some throw or accent pillows for our home. Sewing straight lines is a doable project for me, and I like to make pillows using some of the same fabrics that are in other parts of a room (such as the upholstered chairs in our dining room and my craft room), to tie the space together.
With a beautiful fabric, a very simple pillow design will work well. There are also many ways to add interest and details to your pillows, and I’ve been collecting some of those ideas to try:
Embellish with Ribbon:

By Caitlin Wilson Textiles. Click the picture for details.

I like this pattern shown at Better Homes and Gardens. They used fusible web to attach the ribbon. Click the picture for more pillow ideas on their website.
These ribbon details on simple pillows gives a classic and elegant feel. You could also do a simple square.
Use Contrasting Fabric on Back:

I love the look of a different color on the front and back. This picture is from Grosgrain, where Kathleen has some tips on making a quick pillow cover.
Embellish with Buttons:

Add a letter or other pattern with buttons. This is a beautiful example by Peggy at Letter Perfect Designs on Etsy. (And I’m not just saying that, because it’s a “J”!) Click the picture to see more beautiful button art!
3-D Felt Embellishments:

These three dimensional felt butterflies are so sweet! Click the picture to see the tutorial from Better Homes and Gardens.
Piping/ Welting:

This pillow is made by Weego Home. Click on the picture to see their stunning collection.
A stunning print like this would be beautiful on its own, but I love the piping detail. Here’s a tutorial on eHow for applying store-bought welting or piping. I’d love to learn how to do that!
Silhouette:

This incredible pillow by Weego Home is cut velvet appliqued on linen. I think you could get a similar look with painting on fabric, though obviously, it won’t have the rich feel of this original. Click to see their collection.
Pieced Pillow:

I like the use of panels made from two fabrics, especially the way it is asymmetrical. This pillow is from Anthropologie, though it is no longer sold.
These are some of my favorite ideas – what are some of yours?
Hope to post my new pillows soon!
P.S. Don’t forget that there’s a May Giveaway. Comment on any post by May 15, and I’ll select a winner to receive a custom wall initial.
“Jewels”
