A Boy’s Room in Blue Full of DIY Treasures

Sometimes, milestones are measured in unusual ways. I know my kids are getting big, because it’s finally possible to take a picture of JJ’s room that is not a total disaster! We (I) were focused on finding a new house … Continue reading

Crossbody Origami Bento Bag

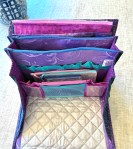
As you may have noticed, my Shelter-in-Place theme is sewing bags. Up next is my first version of an origami bento tote. I found these fabrics in my mother’s stash, and I thought the origami cranes were perfect for an origami bag!

I’ve researched a ton of variations on these origami bento bags and look forward to experimenting with my own versions. There are two main techniques for these origami bento bags. One uses two overlapping triangles and the other uses a long folded rectangle. They look very similar when finished. This bag pattern was made with triangles, which results in a heavier bag, because the pieces are overlapping. I’ll try to put up a general post about the construction of these bags. I found it really helpful to make models of the pattern pieces with scrap paper, to see how they fit together and what direction the pattern would run.

This bag is built from triangles, so the dimensions come out somewhat unexpected. Here’s what I learned from making three different sizes:

  • 17″x17″ squares -> finished bag 11″ wide and 10″ high (but only about 5-6″ of the height is usable for storage. It’s a cute and compact bag, with just enough space for your phone, wallet, keys and chapstick.
  • 21″x21″ squares -> finished bag 13″ wide with 6.5″ height for storage
  • 24″x24″ squares -> finished bag 15.5″ wide with 8″ height for storage

Here what you will need:

  • For the body of the bag, two squares of fabric (see dimension options above)
    • *The pattern of your fabric will run in opposite directions on the front and back of the bag, so pick a pattern than works in both directions*
    • single fabric for a simple, clean look
    • two different squares of fabric to create a two-color exterior and lining
    • create each of the squares from two fabrics – one for the outside, and the other for the lining (this is the version you see below)
  • For the straps – 5″x50″ strap of fabric
  • magnetic snap
  • 1.25″ strap slider and ring
  • Fusible interfacing, basic sewing supplies

Prepare the pattern pieces:

  • Cut the fabric for the body of the bag and the strap. You will likely need to join two strips to create the 50″ strap. I joined the strips on an angle, to reduce bulk
  • If you want to have a different fabric for the lining, join fabric to make your squares, as shown below

fuse interfacing to the wrong side of the large squares. There are many layers in the finished bag, so one option is to leave interfacing off two of the corners of each square, to reduce bulk. In this case, it would be the two solid (not pieced) corners

  • Fuse interfacing to all except the last 3.5″ of the strap, on the wrong side of the fabric

Make the strap:

  • On the end with interfacing, fold a 1/2″ hem, wrong sides together
  • Iron the strap in half lengthwise, wrong sides together
  • Fold each side toward the center, wrong sides together and iron again
  • Fold the strap along the center lengthwise, creating four layers of thickness
  • Top stitch around the strap, including the hemmed end
  • Cut off the 3.5″ section without interfacing
  • Loop the 3.5″ section around the ring and pin (see picture)

img_8576

Make the body of the bag:

  • Fold each square in half to form a triangle. If you are using a different fabric for the lining, like I did, fold it so that the lining fabric is on one side and the exterior fabric is on the other. If you left interfacing off two corners of your squares, the bare corners should be at the top of the triangle, not along the fold
  • Pin the short strap to the right side of one corner of one piece, next to the fold, as shown (see picture)

  • Pin the unfinished end of the long strap to a corner of the other piece, with the strap facing into the fabric
  • Pin and sew around the edge of the triangles, leaving a 4″ opening along one side, for turning. The two corners along the fold should be squared off, as shown below. On one end, you are using the seam to attach the strap. The opposite corner is finished to match

  • clip the corners and turn the triangles right side out
  • Fold each triangle in half again, matching the squared off corners
  • Place one triangle inside the other, as shown

  • On the triangle that is on the inside, topstitch to close the 4″ opening you left for turning the piece. The opening on the other piece will get closed in a later step
  • On the inside triangle, mark spots just under the the spot where the triangles overlap, and install the magnetic snap, as shown

  • Place the two triangles together again, and pin in place (see picture)
  • Topstitch along the edge of the outer triangle, to join the two pieces and also close the 4″ opening you had used to turn the outer triangle

  • Now fold, pin, and topstitch along the the two sides of the bag and the base of the straps. You could choose to leave your bag flat like this (see picture), or add box corners

  • To add box corners, turn the bag inside out, fold the corner, so that the side seam is aligned with the bottom seam, and sew across the white line. The fabric is very bulky at this point, which is when I realized that it would help to leave interfacing off of these corners

  • Finish the strap by looping the long end of the strap through the slider, around the ring, and back up around the inner piece of the slider. Fold the finished end of the strap back on itself and stitch in place

And here’s the finished bag! So I can wear it around the house!

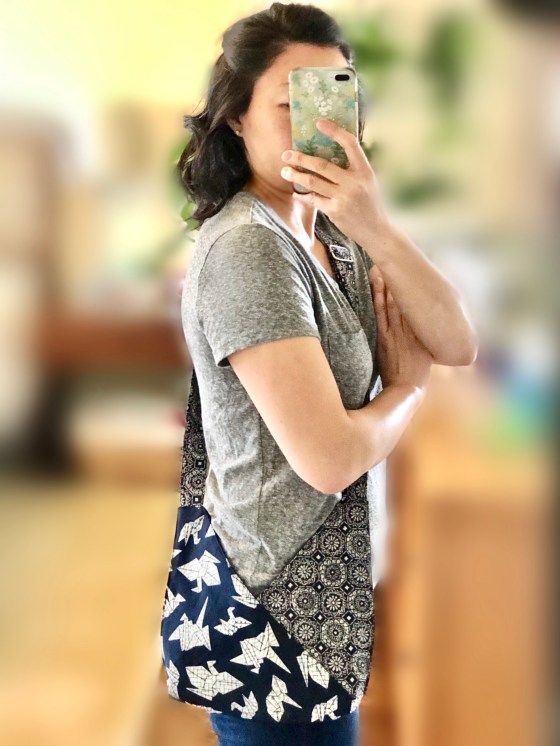
Stay safe, and happy sewing!

Julie aka “Jewels”

DIY Felt Wreath in Winter Whites

I’m here to share my latest project and also ask for your help! Here’s a felt wreath I made for Christmas decorating, and I really, really love it – but I don’t know where to display it, especially since it … Continue reading

DIY Hand-Painted Chinoiserie Christmas Ornaments

For this year’s Chinoiserie Christmas, I mostly used decorations I already had from our “white and woodsy Christmas,” with the addition of these hand-drawn ornaments! This post is coming late, because it took me all month to finish these ornaments, … Continue reading

That Spells DNA – Nerdy and Beautiful Stacked Coins Baby Quilts

“DNA, you’re in my heart
DNA, in fact you’re in every part of my body
Each cell has a nucleus, each nucleus has chromosomes
And DNA, baby, that spells DNA”

-That Spells DNA by Jonathan Coulton

I can thank Steve, who is at the forefront of all things nerdy, for introducing me to Jonathan Coulton over a decade ago. Of course, as a genetic counselor, I have a particular soft spot for “That Spells DNA.” If you’re as nerdy as we are, and you don’t already know and love this song, you will want to check it out!

So, when we found out we were having a mini baby boom in our work family, with two babies due within two months, it wasn’t too hard for me to decide on DNA-themed baby quilts as gifts.

I found the DNA-themed fabric, Color DNA stripe by Melissa McCulloch, on Spoonflower. The fabric in the quilts is actually left over from a few Halloweens ago when our group dressed up as (if terrible puns cause you pain, skip this next part!) Gene-gnomes. The colors were a perfect jumping off point for this colorful gender-neutral patchwork of yellow, blues, greens and coral-red.

This pattern is called Stacked Coins and is easy to adapt to scraps of all kinds.

Here are some close-ups of the beautiful fabrics. I wanted to use every last scrap of the DNA fabric, so there is one patch in each of the quilts that I like to call “CRISPRed.” Can you spot one?

And here are a few more pictures of the quilts during their photo shoot, before they went off to their new homes!

All the colors and patterns together make me so happy! I am excited to meet the newest babies of our work family and give them their quilts, so they can start their genetics lessons early!

“Jewels”

Custom Scrapbook Luggage Tags

These little luggage tags make wonderful gifts that are quick to make and practical!

Every kids loves having something with their name on it, and every adult fears taking the wrong bag at the airport. I’ve actually done this – and it was a huge pain, because I had to spend hours and $$ going back to LAX to exchange the bag, but I was relieved that at least the woman whose bag I accidentally took was really nice about it.

I love all the ways you can customize these luggage tags. I am showing these with scrapbook paper, but I’ve also made some out of wedding invitations to give as a gift to the couple, and you could use photos or lots of other ideas!

I’ve made tags with two different types of lamination:

img_5487

There’s really nothing better than a beautiful combination of scrapbook paper and stickers, is there? … Well, maybe dark chocolate and red wine… or world peace… okay, but these are really fun and pretty, so go and make some, because world peace may take a while to achieve.

“Jewels”

It’s in the Bag – Stenciled Totes

Most years, I try to make something creative as holiday gifts for our teachers and coworkers. There’s so much joy in giving, but we’re also living in a time and place where it feels like everything is at your fingertips, so something handmade feels like a good way to express how much we appreciate those around us. When I can manage it, I make a few extra to last through the year as hostess and grown-up birthday gifts. I’ve linked to previous years’ handmade gifts at the bottom of the post, if you’re looking for more ideas.

This year, I decided to make stenciled canvas tote bags as our holiday treat. They’re so pretty and unique, yet also practical, as we’re trying to minimize our use of disposable shopping bags. I had so much fun trying different combinations of colors and patterns.

What you’ll need:

How to do it:

  • Prewash the bags
  • Choose a stencil and use blue painters tape to hold it in place
  • Put an eye md magazine inside the bag, so the paint won’t go through to the other side
  • Mix paint with textile medium according to the instructions
  • Use the spouncer to apply light coats of paint
  • Once thoroughly dry, iron the pattern using a press cloth to set the paint
  • That’s all! Unless you’re me and repeat it many, many times!

Here are just some of the combinations I made!

Tile stencil in navy and in ombré blues:

Arrows, with a contrasting accent color and (bottom left) ombré blues:

Feathers,with a contrasting accent color or (bottom) ombré blues and greys.

I really liked the feathers!

I loved the tile in this mix of copper and gold paint. The metallic paints were very thick and made very crisp designs.

A close up of the feathers:

The birds were fun to arrange in different patterns and colors.

My mother-in-law likes gingko leaves, so I made this one for her:

And I got to keep this one for myself!

No matter how I plan, the holidays are hectic. I definitely all felt worthwhile when I went to give out the bags. Our teachers and friends were so excited – it definitely put me in the spirit of the season!

it made me happy to make the people I care about happy. My friend Liane took this great photo of her bag:

Looking for more handmade gift ideas? Here are some from past years:

“Jewels”