My brain has a tendency to look at furniture and think, “What else could this be?” Our family has been on a journey this past year – we wanted to move houses, and logistically, it worked best for us to … Continue reading


My brain has a tendency to look at furniture and think, “What else could this be?” Our family has been on a journey this past year – we wanted to move houses, and logistically, it worked best for us to … Continue reading
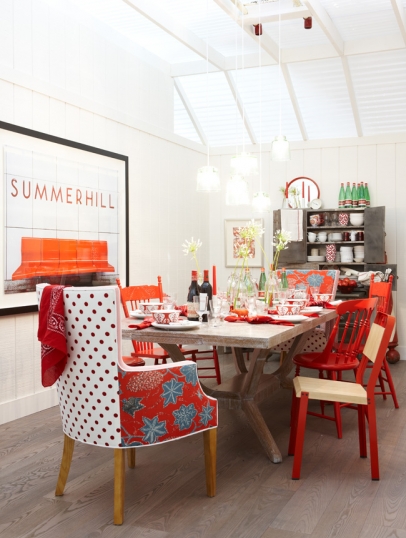
I love such a love for beautiful fabrics! And why use just one fabric to upholster a chair, when you can use two?! The back of a chair is a great place to use a more delicate, expensive, or ornate fabric that might not be ideal for the seat, and the contrast between the two materials adds a lot of interest. I’ve seen great examples of this from some of my favorite designers:

Candice Olsen used a contrasting fabric on the outside of these beautiful dining chairs. The blue ties the seat and outside together.

Sarah Richardson strikes a great playful note with these chairs upholstered in multiple fabrics. Again, the color theme - in this case, red - tie them together.
So, I was looking around my house for a way to try this, when my eyes landed on a pair of green side chairs that we’ve had for many years as extra seating in our living room. They were originally dining chairs that worked well for saving space, and I cut down the legs to make them more comfy for lounging. Our new house can get dark, so I’ve been trying to lighten up our furniture, and I just happened to have recently bought this gorgeous floral fabric. I didn’t even have a specific plan for it, but I knew that I had to have it (did I mention, I have a weakness for beautiful fabrics?!) I spotted it on Fabricguru.com, which is my favorite online fabric store. They have great prices on remnants and an easy-to-browse interface. The downside is that a lot of the fabrics are discontinued or almost so, so if you need more down the road, it may be hard to find.
Here’s what happened when the old chairs met my new fabric:
To apply the fabric, I experimented with our staple gun, but in the end, it worked best to apply the fabric with just a regular craft glue gun. I folded about a half inch “seam” around the edge and just glued it on. I was prepared to cover the edges – or staples, had I used them – with some piping, but I lucked out, and the panels had piping already, so it looked very finished with very few steps. I think you could retrofit a variety of existing chairs with some creativity and minimal upholstery skills.
For some more inspiration, check out these beautiful examples found by other bloggers:
Go give it a try! It might take some adaptation to work on your particular chairs, but keep in mind using nailhead trim, piping, or decorative braid to hide staples and seams, creating a transition as you turn your chairs into eye-pleasing conversation pieces!
“Jewels”