A lot of people groan when they think about moving, and while I plan to stay put for many years to come, I actually love the excitement and challenge of arranging a new space. I’ve had a lot of fun … Continue reading
A lot of people groan when they think about moving, and while I plan to stay put for many years to come, I actually love the excitement and challenge of arranging a new space. I’ve had a lot of fun … Continue reading
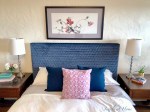
I love little changes that make a big difference! No, this is not a new bed – just an easy-to-sew slipcover for our headboard. I have been creating a light and neutral look in our bedroom, but something wasn’t quite … Continue reading
Re-inventing an old chair is one of the easiest furniture makeovers, and it is so rewarding to create a one-of-a-kind gem like this!

Free Queen Anne chairs found through Craigslist: from worn and boring to fresh and elegant!
When I debuted my Queen Anne chair makeover, I provided some tips for painting. Today, I’ll cover the basics of reupholstering a chair seat. I had also mentioned in the earlier post that I had discovered a great fabric choice for seats, so let’s start there.
Choosing Fabric:
The secret is that this beautiful fabric, with its bold graphic pattern and textured weave, is not a standard decorator upholstery fabric but an outdoor fabric! It won’t stain, fade, or wear out. You can wipe or even scrub it clean! These days, the options for colors, patterns, and textures in outdoor fabrics are immense. I’ve used outdoor fabrics on several projects, and the results have been great!

“Muse” by P. Kaufmann in Aqua. A colorful outdoor polyester fabric with a linen texture.

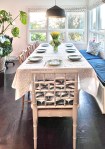
“Lake Paradise” by Robert Allen in Spa. Another outdoor polyester with a whimsical print. These are our dining room chairs. More about them soon!

“Dupione” by Sunbrella in Sand. This acrylic weave indoor/outdoor fabric was on a built-in bench in our old house and was clearly toddler- and sippy cup- friendly. I’d love to recreate that bench in our current home. It was great for lounging and had lots of storage in those drawers underneath.
I bought the Lake Paradise and Muse fabrics from fabricguru.com. This is definitely my favorite source for online fabric shopping. They have good prices and selection, and they make it easy to search, which can be overwhelming with some of the other sites. I bought the Sunbrella Dupione from a marine supply store online.
A couple of caveats: the polyester outdoor fabrics are stiffer than cotton upholstery fabric, so they don’t feel as soft or wrap as neatly around corners as a cotton. Also, while fine for the upholstery, they would feel stiff on a cushion, so if you want to create coordinating pillows or other items, you might want to look for the same print in a regular decorator cotton. I found the acrylic was much softer to the touch, though I did not do the sewing on those fabulous bench cushions. I also have noticed some slight piling on our dining chairs, but it’s very minor, and I am sure that they would be in much worse shape by now, if I had used a standard cotton fabric, because we eat there every day.
Upholstering a Seat:
You will need:
1. Use a flat head screwdriver and pliers to remove all the old staples. Argh! Look at all those staples. This took a long time!

2. If you aren’t reusing the old foam, cut a new cushion from a sheet of foam from the craft store. I used two pieces of 1/2″ foam, one cut to fit the seat exactly and the other a bit wider, to wrap around the outside of the seat.

3. Center the fabric under the foam and seat bottom. For a large print, like the “Muse” on my Queen Anne chairs, pin the fabric in place, to make sure the pattern is centered.

4. Using the staple gun, tack the fabric onto the seat bottom on the center of each side. (Apparently, I forgot to take a picture of this!)
5. Next, staple from the center of each side towards the corners, stopping about two inches from the corner. Fold up the fabric at the corner and tack it to the bottom of the seat:

6. Now finish stapling the fabric on the sides. Depending on the angle, sometimes you need an extra fold in the fabric.

7. Repeat for all sides and corners, and you’re done!

Let me know if you have any questions!
“Jewels”
I have a confession: I am in love… with my newly made-over chairs.
I like a lot of classic furniture, but I never was interested in traditional ornate wooden chairs. The curves and details just didn’t do it for me… until I saw how fabulous they can look when painted in a fresh color! Here are some of the inspirations that made my heart go pitter-patter.

A fresh-looking chair in grey with a white and green seat by Molly at the Nesting Game. Click the picture to see the details on her blog.
Go to The Nesting Game

Kate at Centsational Girl has so many great ideas for furniture makeovers, including this sweet desk chair in blue with gold leaf.
Go to Centsational Girl
When I saw these chairs, I desperately and urgently wanted to make my own! And I could not believe my luck when, on the first day I looked, I found someone giving away two Queen Anne chairs for free on Craigslist. The chairs are not vintage, but all the better, so I needn’t feel guilty about painting them. The guy who was giving them away had several other pieces of furniture for free that had all been victims of his cat, as you can see in the “before” picture.
From worn and boring to fresh and elegant!
I wish I had the space and a use for ten of these chairs, because I’d love to paint some in apple green, light blue or white. The upholstery options are endless, too. For this project, I decided on grey. Grey is the popular “new neutral,” and I agree that it is beautiful and timeless.
Painting furniture can be broken down into just a few simple steps:
1) Prep: sand and wipe down your surface.
2) Prime: it’s worth the time and money to use a coat of primer, as this will seal the existing wood or paint and help the new paint adhere.
3) Paint: I used a grey spray enamel from the hardware store.
4) Clear topcoat: this step is also worth the time and money, as the paint will wear and could rub off on walls or other furniture.

Another look at the new chair. I love the feminine and elegant look! have a secret about that beautiful fabric that I’ll share soon!
I love home decorating ideas that don’t have to cost a lot of money to get a one-of-a kind beautiful result. I definitely have my eye out for the next great find! These chairs are for my sewing and craft room, which is also our guest room. In a house full of boys, it’s the one place where I have fun adding some flowers and curves.
UPDATE: I followed up with a post about the upholstery, including my new favorite choice for durable and beautiful fabric.
“Jewels”
This project is shared at:

I love such a love for beautiful fabrics! And why use just one fabric to upholster a chair, when you can use two?! The back of a chair is a great place to use a more delicate, expensive, or ornate fabric that might not be ideal for the seat, and the contrast between the two materials adds a lot of interest. I’ve seen great examples of this from some of my favorite designers:

Candice Olsen used a contrasting fabric on the outside of these beautiful dining chairs. The blue ties the seat and outside together.

Sarah Richardson strikes a great playful note with these chairs upholstered in multiple fabrics. Again, the color theme - in this case, red - tie them together.
So, I was looking around my house for a way to try this, when my eyes landed on a pair of green side chairs that we’ve had for many years as extra seating in our living room. They were originally dining chairs that worked well for saving space, and I cut down the legs to make them more comfy for lounging. Our new house can get dark, so I’ve been trying to lighten up our furniture, and I just happened to have recently bought this gorgeous floral fabric. I didn’t even have a specific plan for it, but I knew that I had to have it (did I mention, I have a weakness for beautiful fabrics?!) I spotted it on Fabricguru.com, which is my favorite online fabric store. They have great prices on remnants and an easy-to-browse interface. The downside is that a lot of the fabrics are discontinued or almost so, so if you need more down the road, it may be hard to find.

Robert Allen Waldemere Contemporary Floral Printed Cotton Drapery Fabric in Noir
Here’s what happened when the old chairs met my new fabric:

Waldemere floral fabric on the outside of green velvet chairs.
To apply the fabric, I experimented with our staple gun, but in the end, it worked best to apply the fabric with just a regular craft glue gun. I folded about a half inch “seam” around the edge and just glued it on. I was prepared to cover the edges – or staples, had I used them – with some piping, but I lucked out, and the panels had piping already, so it looked very finished with very few steps. I think you could retrofit a variety of existing chairs with some creativity and minimal upholstery skills.
For some more inspiration, check out these beautiful examples found by other bloggers:

Spotted by Caitlin Wilson at Saks.

Chairs by K-design, spotted by Decorati.
Go give it a try! It might take some adaptation to work on your particular chairs, but keep in mind using nailhead trim, piping, or decorative braid to hide staples and seams, creating a transition as you turn your chairs into eye-pleasing conversation pieces!
“Jewels”
This project is shared at:

