DIY Gold-Painted Vases

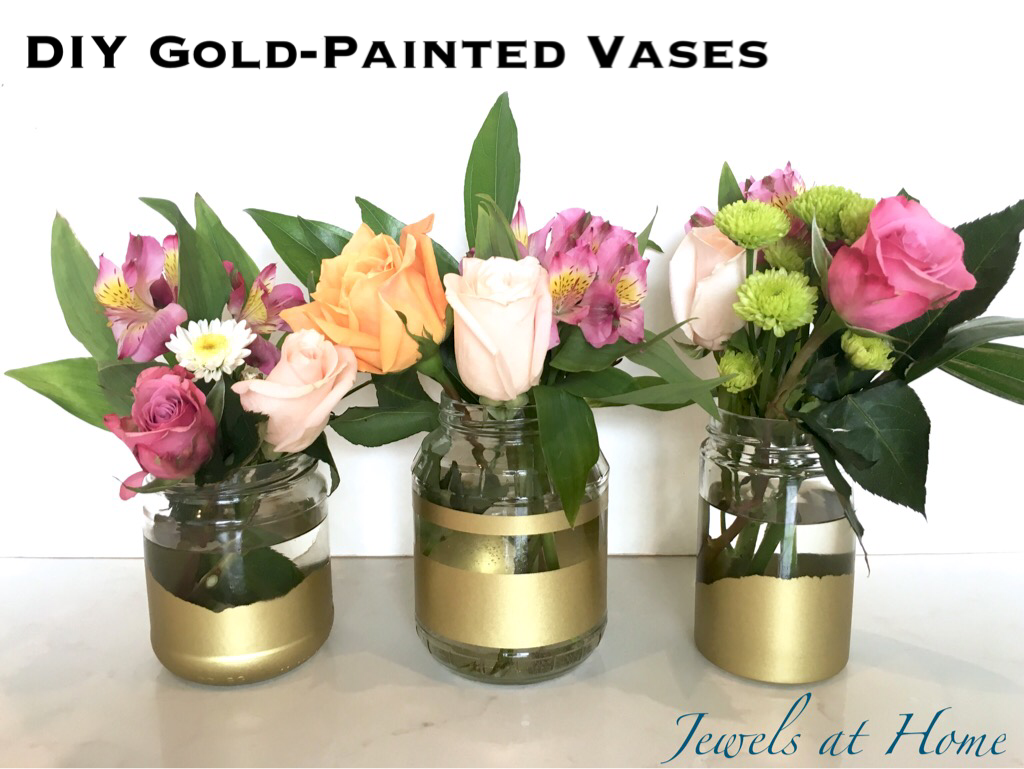
One of my favorite partners in craft-crime recently hosted a bridal shower for one of our coworkers, and I offered to make some decorations. First, I made giant paper flowers for a photo backdrop, and next up were these gold-painted vases.

DIY gold-painted vases | Jewels at Home

Materials:

  • Empty glass jars (pasta sauce, peanut butter, mustard, etc.)
  • Goo gone
  • Painters tape
  • Gold spray paint

Instructions:

  • Clean your jars thoroughly. I peel my labels as much as I can and then use Goo gone to remove the adhesive. Then, I run them through the dishwasher.
  • Mask off the area you don’t want to paint. I did a few variations: simple horizontal stripes, uneven edges (tape some torn paper around the vase), elastic bands, and geometric angles. You could get creative with round stickers for polka dots, etc.
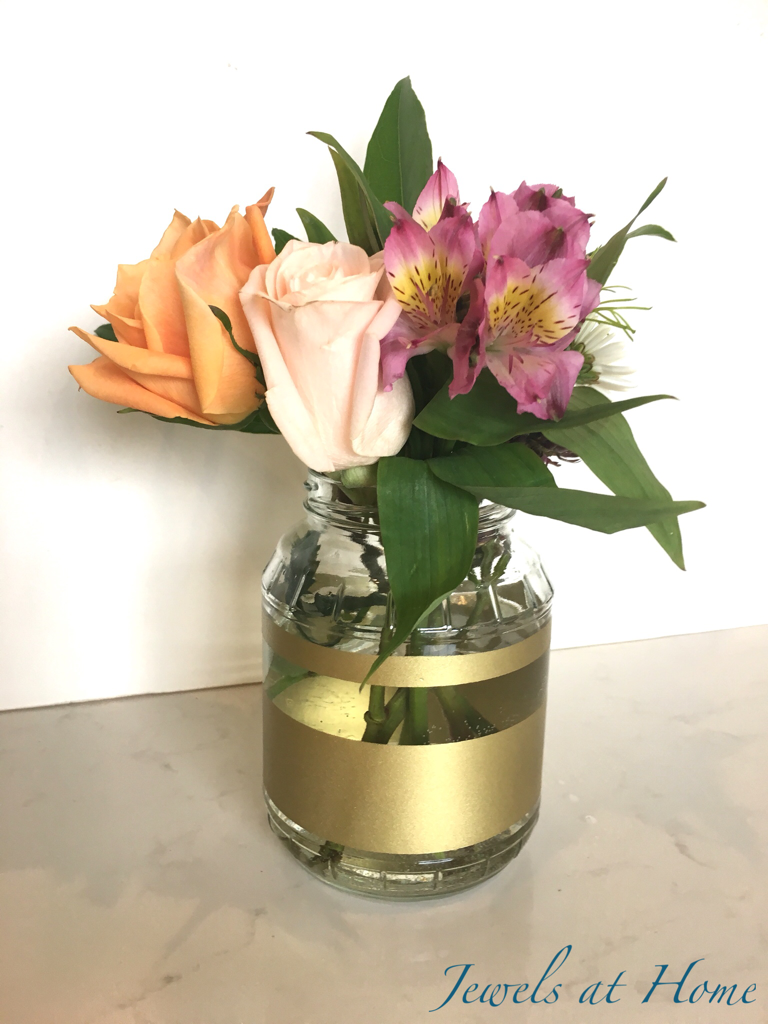
  • Spray with gold spray paint and ta-da!

DIY gold-painted vases | Jewels at Home

I love how this textured jar turned out. I think it was a sauerkraut jar.

DIY gold-painted vases | Jewels at Home

At the shower, I grouped vases together, so these small arrangements made a big impact.

DIY gold-painted vases | Jewels at HomeDIY gold-painted vases | Jewels at HomeDIY gold-painted vases | Jewels at HomeDIY gold-painted vases | Jewels at HomeDIY gold-painted vases | Jewels at Home

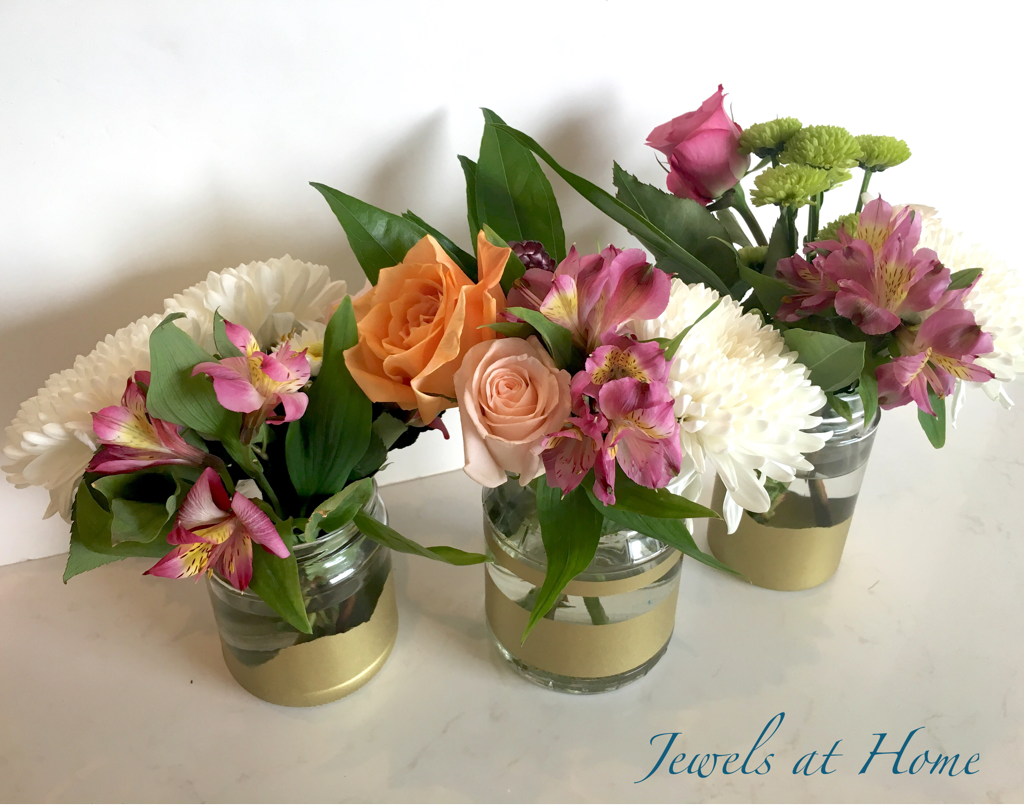
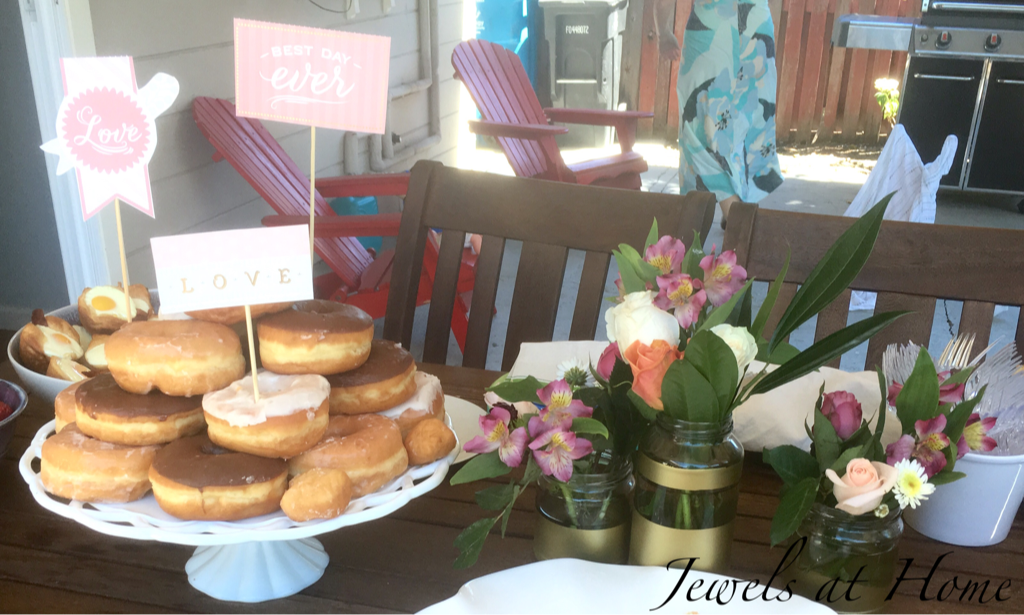
From “trash” to treasures!DIY gold-painted vases | Jewels at HomeDIY gold-painted vases | Jewels at Home

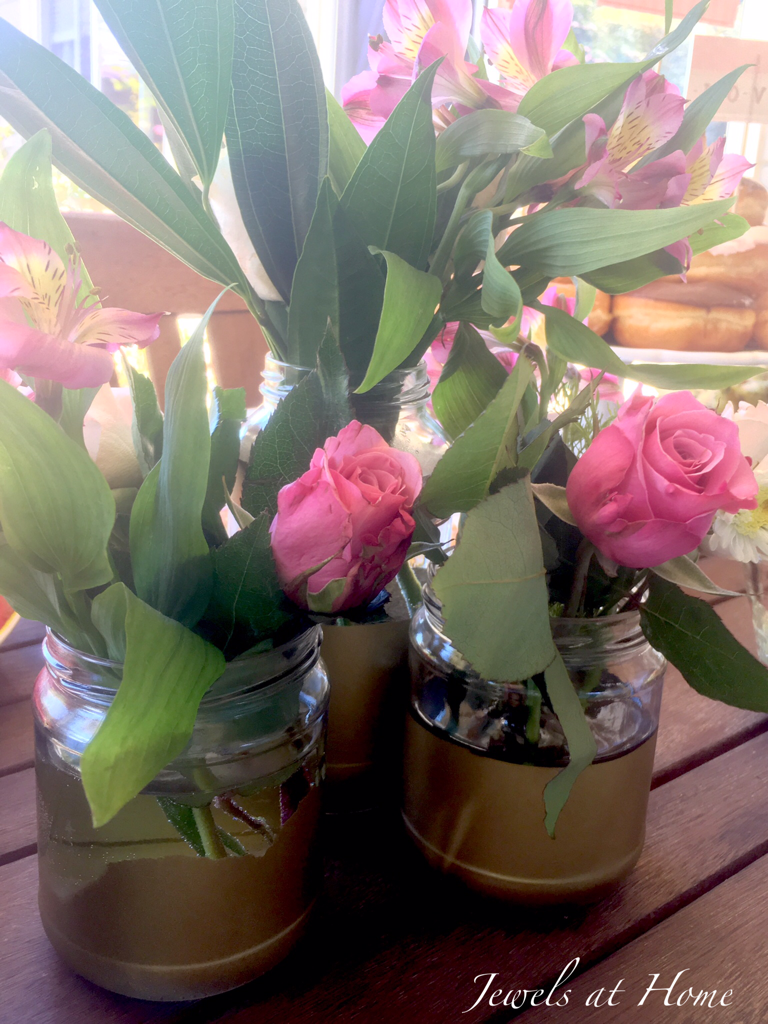
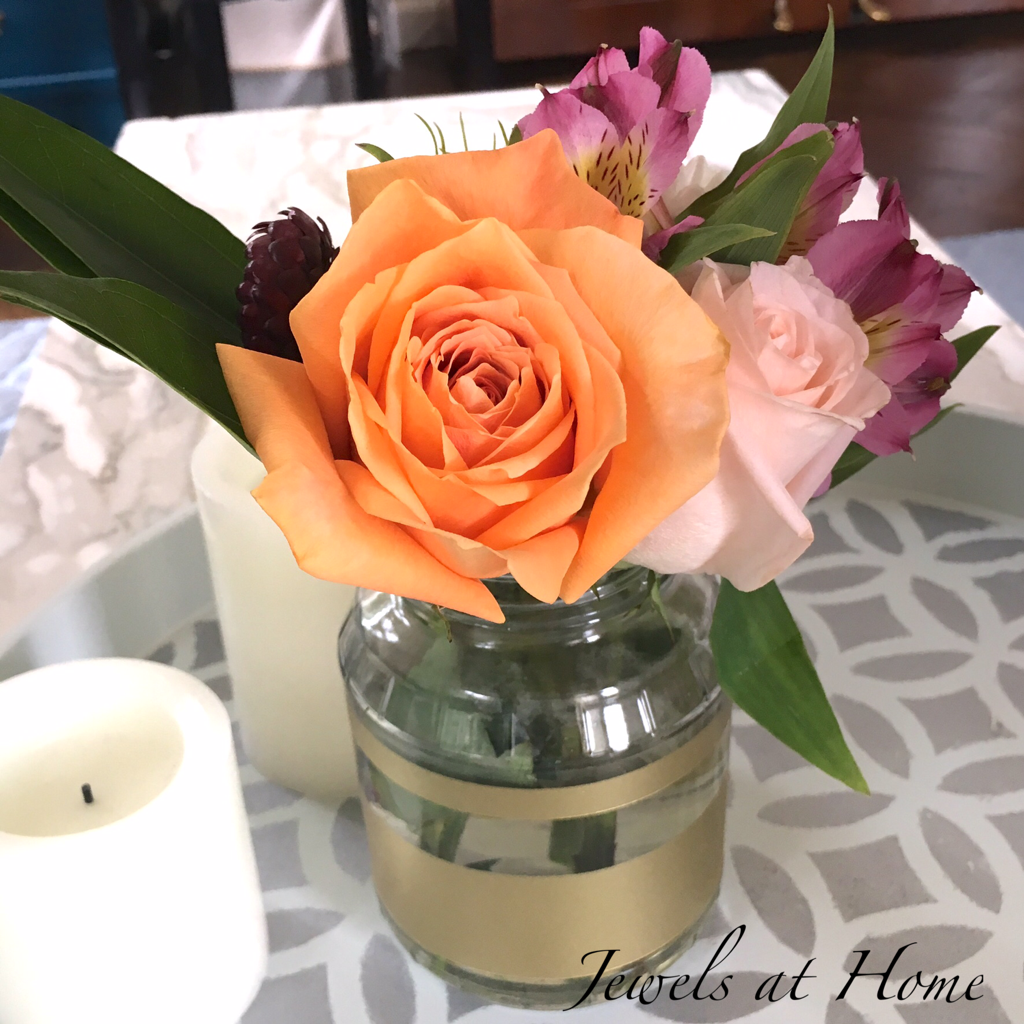
I gave most of the vases away as party favors, so the is the only picture I have of one of the diagonal geometric designs (far right).DIY gold-painted vases | Jewels at Home

Of course, now I am seeing beauty throughout my pantry and already have plans for another set of vases!

“Jewels”


DIY Paper Rosettes

I was putting together a photo booth background for my old boss’ retirement party, and I wanted to try to make these pretty paper rosettes I had seen. It turns out they are very easy, and I love them in these retro-inspired prints. I’m now making more for an upcoming bridal shower photo booth. Fun! Fun! Fun! Paper just makes me so happy.

img_3237

Materials:

  • Two sheets of matching scrapbook paper for each rosette
  • Tape
  • String

Directions:

I think the pictures are pretty easy to follow, but here’s how I figured out how to make the rosettes.

  • Stack the two pieces of paper together and fold in half, printed side facing in
  • Fold into quarters by folding the to edges down
  • Using the fold lines as a guide, pleat the paper into 12 one-inch sections. Separate the two sheets of paper
  • Tie them together in the middle
  • Spread out the pleats and tape the sheets of paper together from the back
  • Voila!

img_3235

Next project is some oversized paper flowers to add to our photo backdrop for next weekend!

“Jewels”

Hudson Bay Stripe Throw Cushions

I planned this project a while ago and got motivated to finish in time for our ex-pat Canada Day party.

While it was fun going a bit over-the-top with Canadiana for the party, I appreciate classic Hudson Bay stripes for providing a more sophisticated touch of Canadian culture. This iconic pattern has a great retro homey feel.

I used cloth napkins with Hudson Bay stripes for the front of the pillows and denim for the back. You can find my favorite throw pillow pattern back in this post.


Happy Canada Day, eh!

“Jewels”

(Ex-pat) Canada Day Party

Canada Day is coming up this Friday, July 1. My ex-pat friends and I had the pleasure of celebrating a little early today. “What is a Canada Day party?” some of our American friends asked. Well, a regular Canada Day party is a nice summer picnic or barbecue, but when you are an ex-pat, you have to go over-the-top to assert your Canadian-ness, and today was a good example.

Setting the scene:

Red-and-white everywhere!

And some more subtle elements like these Hudson Bay striped pillows:

Music:

So much good music comes out of Canada. You will have no problem putting together a playlist with artists like Bare Naked Ladies, Sarah Mclachlan, Bryan Adams, Tragically Hip, Avril Lavigne, Alanis Morisette, and so many more!

Food and drink:

You can find Canadian beers, wines, and soft drinks at specialty stores like BevMo. We also enjoyed Nanaimo bars, smoked salmon, “Timbits” (donut holes), and other treats.

Be sure to add these adorable igloo ice cubes!

Games:

Falling in July, Canada Day is not typically celebrated with snowball fights, but that didn’t stop us from having a ball with Snowtime Anytime.

Happy Canada Day to my friends at home and all over the world!

“Jewels”

Book Review: The Design Cookbook

I love books. Not just the stories in them, but the feel of hefty printed pages in your hands. I especially love looking at used books stores and book sales. There’s something about the combination of a good deal on a newer book mixed in with the curiosities of vintage books that makes for such an enjoyable browsing.

I was recently in Chicago, where I met up with some friends from high school to do the Avon 39 Walk to End Breast Cancer. On our last day, having walked 39 miles through the beautiful city and shopped our hearts out at the fashion outlets, a friend and I hunted down a big used bookstore: after-words in River North.

I found some fun books for souvenirs for the boys, and my personal pick was The Design Cookbook by Kelly Edwards. Even in this day of Pinterest, I find there is something special about browsing glossy images in a book or magazine.

Kelly Edwards really captures my style goals in this book – the rooms all have an eclectic combination of classic, modern, and whimsical elements. This can be a hard look to pull off, because the room is much more than a sum of the parts, so the “cook book” format is especially helpful. Kelly shows a series of rooms and then breaks them down into a list of features, like a painted lamp and dark walls. I like how this step-by-step approach to decorating can help you with recreating any room you see. The book also includes a handful of DIY projects.

Here are a few of my favorite vignettes from the book.

I am definitely feeling inspired, and I hope you are too!  For the “recipes” for these rooms and more, check out The Design Cookbook by Kelly Edwards.

“Jewels”

Chinoiserie Chic Living Room

Our living room has evolved over the years. Here’s a look at some of our latest additions, including the color block drapes and these pretty turquoise chairs from Article (formerly Bryght). I have to admit I was pretty nervous when the intense color showed up in my living room, but I am so glad I took a risk!

Over on the other side of the room, I have a little bar set up next to the dining area:

I recently moved this painted Chinese screen over the bar area when I was rearranging our art. I really like how it brings the eye up and emphasizes the tall ceilings.

And here are two paintings by my mom that I recently added to the living room. These remind me of De Gournay wallpapers and add an authentic bit of Chinoiserie to our home.

Hope you enjoyed the details in our living room!

“Jewels”

Stitch Fix #2 Review

So, I believe in writing up Stitch Fix reviews, because the mystery element in this styling service is both appealing and nerve-wracking. Unfortunately, Fix #1 was a bust, but I diligently gave tons of feedback, tweaked my style profile and I was pretty excited when Fix#2 arrived!

I’ll show you all the goodies, but here’s a picture of the two items I kept: a pretty lace blouse from Pixley and these super-comfy Liverpool jeans.

  1. Market & Spruce Juli Lasercut Detail Blouse. I really like the elements of this blouseL the navy and pink, the polka dots, pleats, and details on the hem. However, when put all together, this top was just a bit too cutesy for me. The fabric is a bit shiny-cheap, too.
  2. Nine West Onlee Pointed Toe Flats – I was actually excited to see the striped ballet flats, since flats are the staple of my shoe wardrobe, and I have been eyeing cute striped shoes. However, the finish on these is super-shiny and plasticky feeling, and I just didn’t like them enough to keep.
  3. Donna Morgan Sunni Dress. Not really sure what happened here. I do like the color navy and the geometric print, but I noted in my style profile that I do not like high necklines or dresses with fitted bottoms, so this was really a miss for me overall. Too bad!
  4. Pixley Yuli Lace Cap Sleeve Blouse. I fell in love with this blouse as soon as I saw it! The color is actually a light light peachy-pink, but it is neutral enough to go with everything. The lace is pretty and feminine, and there are beautiful details in the collar trim and the seaming. The top hangs very nicely for a flattering but not clingy fit. Yay! Being introduced to something new and beautiful like this is exactly why I joined Stitch Fix!
  5. Liverpool Collen Straight Leg Jean. When I first saw these jeans, I thought they were a bit blah. I had actually asked for special items and no basics, so I was disappointed. However, I did try them on, because I wanted to be able to give feedback on the fit. And these jeans are SO comfortable. I kept thinking I should return them, because I don’t really need jeans, and these have a pretty basic look – but I seriously could not bring myself to take them off! The material is 81% cotton, 17% polyester, and 2% elastic, and they feel like wearing stretchy comfy yoga pants. Happy I kept them!

If you are counting, you’ll see I kept two items and returned three. Not a home run, but I am pretty excited and definitely ready to try Stitch Fix again! I’ve scheduled my next fix for a couple of months right now and look forward to reporting back!

If you are thinking of trying Stitch Fix, you can use my referral code. Thanks!

“Jewels”


Stitch Fix #1 Review

After admiring some lovely and fresh looks on a few friends who’ve tried Stitch Fix, I decided to take the plunge!

While part of the appeal of Stitch Fix is the element of surprise and the idea that your stylist could introduce you to something new and fabulous, it’s a bit scary to let go of control.

I poked around to look at some other reviews to see what kinds of clothes other people were getting, and that helped me feel a bit better. In that spirit, I’m going to share my first Stitch Fix review. Here’s what was in my box!

  1. Donna Morgan wrap dress. First up was this wrap dress. I love wrap dresses, because they are so flattering and classic. I have several in my closer already, and I did not find this one special enough to keep.

2) Penny Loves Kenny flats. So, I admit these shoes got me pretty inspired about the idea of Oxfords. This was my hope with Stitch Fix – that I would be inspired to try new styles. Unfortunately, I did not like the fake leather or the pointy toe on this particular pair. The material feels really cheap.


3) 41 Hawthorn Irsia blouse. This was my favorite item in my first fix. I really like navy, and I like the texture of the fabric and the feminine scallops. However, the shirt is a little bit too boxy and long for me. It catches on my hips and then bunches up. I wish this had fit better!


4. Creative Commune Kalina blouse. I asked for an ivory sleeveless top that I could wear layered with blazers and cardigans for work. I like the color of this top and the lace on top. However, it is too boxy, and the synthetic material feels cheap.

5. Kut from the Kloth boyfriend jeans. These were nice jeans that fit well. They were the right length and fitted but not clingy. However, I did not need another pair of basic jeans, so I sent them back.

In the end, I didn’t end up keeping anything from my first fix, but I give a lot of feedback which my friends recommended. I’m a little wary, based on the quality of items I received, but I’m going to give them another try and report back to you!

If you are ready to give Stitch Fix a try, I’ve got a referral code for you, and thanks for checking it out!

“Jewels”

“I Love You” Collage

Here’s a fun DIY art project that you can customize so many ways. I added names to ours.

And for my sister-in-law’s wedding, I put the bride and groom and their wedding date:

You can get creative and use not just letters but pictures of objects or patterns. Can you spot the keys I used for the letter “I” or the clock for the letter “o”? Depending on the space, I switched up the wording. Variations include:

  • I love you
  • Love you
  • Love
  • I love u
  • etc.

What other ways would you customize this?

“Jewels”

Kids’ Upcycled Easter Garland

We had a great time celebrating Easter with my sister’s family last year. I had wanted to make a garland with the kids, and a stack of drawings was the perfect starting point! Why leave all those creations hidden in a pile when we could hang them up to enjoy?

Kids' Upcycled Easter Garland | Jewels at Home

I made two templates out of cardboard: an egg and a bunny face. With older kids, you could add more shapes, but our three- and four- year olds barely managed with the egg, so this was perfect for us.

J and his cousins chose drawings and created some new ones. We traced the shapes and then cut them out. I made two small vertical slits at the top of each egg or bunny, and we threaded some ribbon through.

It was great to see these preschoolers practicing their fine motor skills and helping each other to put together our Easter decorations.

Kids' Upcycled Easter Garland | Jewels at Home  Kids' Upcycled Easter Garland | Jewels at Home

Hoppy Easter!

“Jewels”