DIY Felt and Pom Pom Mistletoe

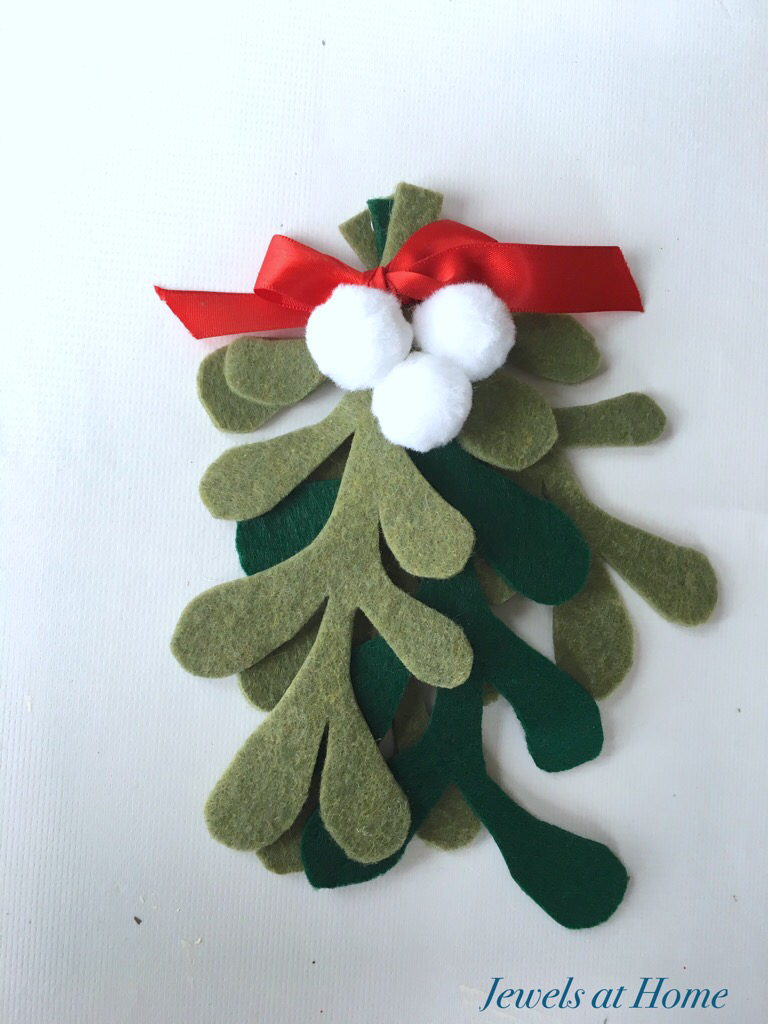
Mistletoe is a classic Christmas item. I haven’t hung mistletoe before, but I was playing around with felt (for our monogrammed ornaments and retro ornament Christmas tree skirt) and pompoms (for our pom pom wreath), and I realized I had all the supplies to make a cute felt mistletoe decoration.

DIY Felt and Pom Pom Mistletoe | Jewels at Home

I had some regular craft felt, but it was too thin to really give a good three-dimensional feel, so I got the idea to fuse two layers together using Heat’n Bond Ultra Hold Iron-On Adhesive. This turned out really well and looks and feels like a heavy art felt.

DIY Felt and Pom Pom Mistletoe. You can make regular craft felt look thick and chunky by fusing two layers together! | Jewels at Home

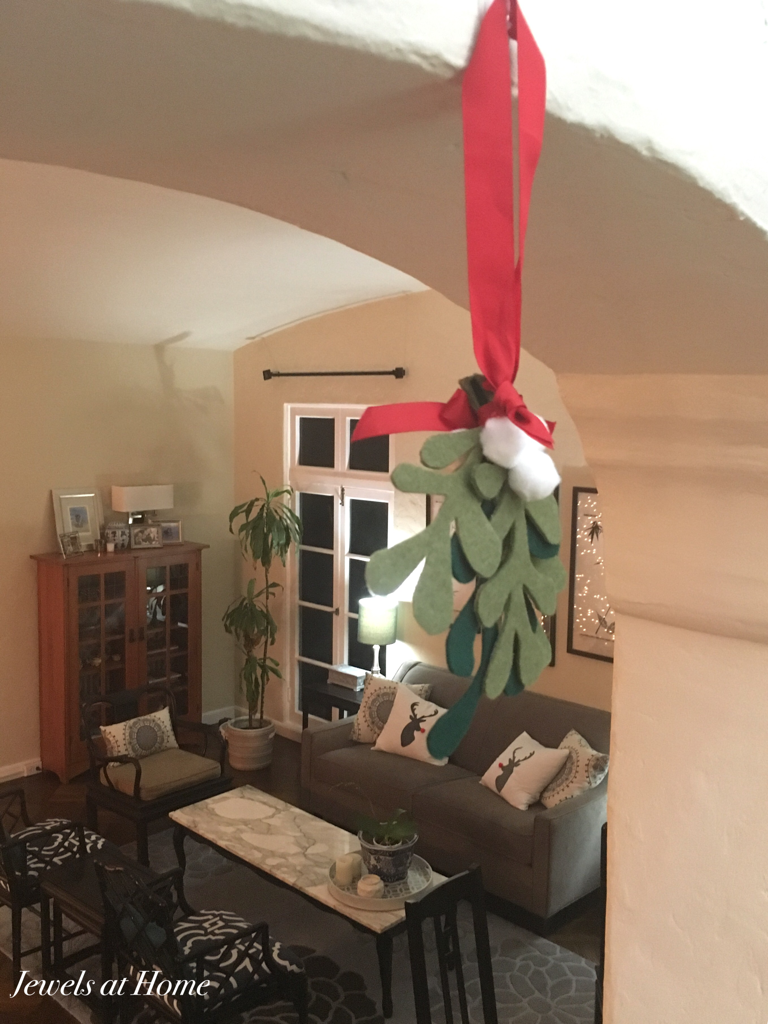
I added some pom poms and ribbon I had in the house already to make this simple and pretty decoration, which I look forward to using for many years to come.

DIY Felt and Pom Pom Mistletoe | Jewels at Home

DIY Felt and Pom Pom Mistletoe | Jewels at Home


DIY Felt and Pom Pom Mistletoe | Jewels at Home
And to finish, a gratuitous picture of our Christmas tree, because it makes me happy!
IMG_8790-2

Felt Retro Monogram Christmas Ornaments

For the last few years, I have had a different theme for Christmas decorating each year. Of course, that doesn’t mean that I need to change all my decorations! I’ve gotten creative about re-purposing and adapting our ornaments and other decor to fit each theme. When I did my white Christmas two years ago, I bought lovely white felt stockings from West Elm. They worked just as well for last year’s white and red Christmas. For this year’s nostalgic retro Christmas, all I had to do was change out the initials on the stockings.

Felt Retro Monogram Christmas Ornaments | Jewels at Home

I used felt in our Christmas colors of red, pink, and blue and added white felt monograms. I attached them to the stockings with safety pins, so it will be easy to change them again, when needed! It’s amazing how this small project completely transforms the look of our stockings and mantel!

Here’s a look at last year:

Simple white and red Christmas mantel | Jewels at Home

And this year:

Felt Retro Monogram Christmas Ornaments | Jewels at Home

Felt Retro Monogram Christmas Ornaments | Jewels at Home

While we’re enjoying this year’s cheerful nostalgic Christmas, I’m already thinking about themes for the future – Scandinavian Christmas or a metallic Christmas – and it’s good to know I’ll be able to re-use these stockings again!

“Jewels”

Paper and Washi Tape Globe Ornaments

My passion for pretty papers goes way back, but I confess that when washi tape first became popular, I didn’t immediately fall in love – it’s not too late, though! I had so much fun combining patterns and colors to make these pretty ornaments. These lovely decorations are quick to make, and I will be bringing this project to work for our holiday party. I also made a personalized version of these ornaments with kids’ names inside.

Paper and Washi Tape Globe Ornaments | Jewels at Home
To make these ornaments, I used

The process is very simple:

  • I then cut out two circles in matching paper and glued then back-to-back
  • I then added washi tape or other paper scraps to decorate the ornament
  • These circles fit perfectly into the ornaments, which snap together
  • Add a ribbon for hanging and you’re done!

Paper and Washi Tape Globe Ornaments | Jewels at Home
Paper and Washi Tape Globe Ornaments | Jewels at Home  Paper and Washi Tape Globe Ornaments | Jewels at Home
Paper and Washi Tape Globe Ornaments | Jewels at Home

Go crazy with the paper (I did!) and have fun!!

“Jewels”

Desktop Magnet Board Frames Part Two

This year’s holiday gifts for our teachers and friends are these desktop magnet boards with coordinating glass cabochon magnets. I love seeing all the colors and patterns come together with the inspirational quotes. You can find the supply list and instructions in the first post. There are so many ways to combine the papers and quotes that I wanted to show you some more in this post!

Hope you are settling into a lovely holiday season!

Desktop magnet boards with coordinating glass cabochon magnets | Jewels at Home
Desktop magnet boards with coordinating glass cabochon magnets | Jewels at Home  Desktop magnet boards with coordinating glass cabochon magnets | Jewels at Home
Desktop magnet boards with coordinating glass cabochon magnets | Jewels at Home

“Jewels”

Easy Custom Fleece Christmas Stockings

I made the first of these stockings more than a decade ago, and how our little collection of stockings has grown over the years! I made the first ones when our oldest was born, and back then, it was just Steve, me, baby K, and our old dog Cooper. Over the years, I added extended family for the Christmases we hosted, two more babies, and now, I am very excited to add the stockings for my twin nieces!

Materials:

  • fleece fabric (less than 1/2 a yard per stocking)
  • cuff fabric (only about 7″ long x about 20″ wide – I find scraps for this)
  • ribbon for hanging (5″ long; I also used scraps)
  • iron-on applique letters for name

Instructions:

Make a template for your stocking. I’ve included a half inch seam allowance on my pattern

Use the template to cut out two pieces of fleece.

With the right sides together, sew around the sides and bottom of the stocking, leaving about 7″ open at the back top. Clip the seam allowance around the curves.

Pattern for Easy Custom Fleece Christmas Stockings | Jewels at Home

Cut a cuff that is about 6.5″ tall and 10″ wide. Hem the cuff.

Sew the cuff to the top of the stocking, with the right side of the cuff facing the wrong side of the stocking, as shown.

Pattern for Easy Custom Fleece Christmas Stockings | Jewels at Home

Flip the cuff over as shown. I found it helped to pin it in place for the next step.

Pattern for Easy Custom Fleece Christmas Stockings | Jewels at Home

Line up the edge of the cuff and the stocking and slip your ribbon in, too, with the ends tucked into where you’ll see. Now sew up the last 7″ of the back of the stocking, sewing through the stocking, cuff, and ribbon.

Easy Custom Fleece Christmas Stockings | Jewels at Home

Flip your stocking right side out and iron on the letters!

Easy Custom Fleece Christmas Stockings | Jewels at Home

Easy Custom Fleece Christmas Stockings | Jewels at Home

Ho Ho Ho! Merry Christmas!

“Jewels”

Personalized Globe Christmas Ornaments 2015

Every year, I create personalized ornaments for our family and friends. Usually, I keep it simple with some store-bought ornaments that I personalize with markets or fabric paint. Tip: the felt ornaments are great for mailing!

This year, I wanted to make globe ornaments that would fit with our retro mid-century theme and colors of red, pink, and turquoise.

Personalized Globe Christmas Ornaments | Jewels at Home
To make these ornaments, I used

The process is very simple:

  • I started by printing labels with the kids’ names and the year on them. I was able to fit two names on each label and then cut the labels into 2″x 2″ squares.
  • I then cut out and stuck each label onto scrapbook paper and punched out a circle around it. I punched a second blank circle in matching paper and glued them two pieces together.
  • These circles fit perfectly into the ornaments!
  • Add a ribbon for hanging and you’re done!

Personalized Globe Christmas Ornaments | Jewels at Home
Personalized Globe Christmas Ornaments | Jewels at Home  Personalized Globe Christmas Ornaments | Jewels at Home

Personalized Globe Christmas Ornaments | Jewels at Home
Personalized Globe Christmas Ornaments | Jewels at Home Since these ornaments would have been hard to mail, I also made some similar ones that are flat, for our friends who live out-of-town.

Scrapbook Paper Christmas Ornaments | Jewels at Home
“Jewels”

Come Out On Top: Desktop Magnet Boards with Glass Magnets

After a few years of pretty much running out of holiday spirit by the holidays, I have slowly learned to plan early with my holiday crafts. This year, I’ve started getting in the mood by putting together these projects so far:

Holiday preparations always include gifts for our teachers and my “work family.” I love creating something handmade to show our appreciation, and I try to make a few extra for hostess gifts throughout the year. A round-up of past holiday gifts/ hostess gifts is at the bottom of this post.

For this year’s gift, I knew that I wanted to do a project using scrapbook paper. I have a little (tiny, really) bit of an addiction to pretty papers, and I wanted a way to share them. After looking through lots of ideas on Pinterest, I decided to make these desktop magnet boards with coordinating glass cabochon magnets. My inspiration included similar boards from Papemelroti in the Philippines and Leanne from Organize and Decorate Everything.

These magnet boards can be used for notes or as picture frames, and they even make lovely decorations on their own. I added some favorite quotes as appreciation and inspiration for the hard-working teachers and friends in our lives.

Materials:

Instructions:

  • Cover the magnet board with scrapbook paper using a glue stick. Cynthia shared a helpful tip, which was using a plastic card (I used an expired gift card) to smooth the paper.
  • Add a quote or piece of art to the center
  • I’m not sure if I’d recommend this step… I brushed on a coat of clear polyurethane. I wanted to protect the paper, but the moisture made some of the edges peel. I managed to glue them back, but it was a bit of a pain. Maybe
  • Cut circles of paper and glue to back of cabochons.
  • Add magnet to back of cabochons using the E6000

Desktop Magnet Boards with Glass Magnets | Jewels at Home

This is a simple project, but I love that there are infinite ways to personalize it. There were so many variations on the boards that I will include some more in a second post!

Desktop Magnet Boards with Glass Magnets | Jewels at Home
Desktop Magnet Boards with Glass Magnets | Jewels at Home  

Desktop Magnet Boards with Glass Magnets | Jewels at Home  Desktop Magnet Boards with Glass Magnets | Jewels at Home
Desktop Magnet Boards with Glass Magnets | Jewels at Home

Looking for more ideas of great gifts to make? Check out these from years past:

Hope you are getting into the spirit of the holidays!

“Jewels”

Vintage Photo Garland

As you know, this year’s Christmas has a vintage theme, and I thought it would be great fun to share some old Christmas pictures with this simple and pretty photo garland.

To start, I collected old pictures, including some of from my childhood and from my parents before I was born! Once I got into the project, I added some more recent pictures of our kids. I edited all of the pictures using an iPhone app called Instants, which makes them look like vintage Polaroids.

I used ric rac ribbon from my mom’s stash to make the garland, so this is authentic vintage! I hung the photos from the ric rac using clothes pins decorated with scrapbook paper in this year’s colors of pink, turquoise, and red.

This was an easy project, and it’s simple enough that I’m going to leave it up, even though I won’t be decorating the rest of the house until after Thanksgiving.


A Simple Fabric Tote Bag for Halloween, Shopping, and Beyond

It seems like you can never have enough bags – we use them for groceries, toys, books, snacks, whatever! And a nice fabric tote bag is a simple sewing project to display your favorite fun prints.

I made these bags for the boys to go with their superhero costumes.

Materials:

  • 20″ long x 34″ wide piece of fabric
  • Ribbon for strap (21″ long x 3.5″ wide)

Instructions:

I folded the fabric in half lengthwise, with wrong sides together, and sewed down the length to make a tube. I flipped the tube so that the right sides were together and then sewed another seam to create a neat hidden French seam.

Quick tote bag pattern - perfect for Halloween and beyond | Jewels at Home

Quick tote bag pattern - perfect for Halloween and beyond | Jewels at Home


Next, I sewed the bottom of the bag closed.

At each bottom corner, I folded the fabric and sewed across the corner to make a flat bottom for the bag:

Quick tote bag pattern - perfect for Halloween and beyond | Jewels at Home


To attach the handle, I ironed a hem at the top and tucked the ribbon for the strap under the hem.

Then, I sewed down the top hem, with extra stitching around the handles.

Quick tote bag pattern - perfect for Halloween and beyond | Jewels at Home


And here are the finished bags! Now, Batman and Superman can be stylish and practical!

Quick tote bag pattern - perfect for Halloween and beyond | Jewels at Home

Quick tote bag pattern - perfect for Halloween and beyond | Jewels at Home


“Jewels”

Sew a Travel Jewelry Case

This travel roll for jewelry is a quick and easy project, proven by the fact I made it the night before we left for family vacation!
Sew a travel jewelry case | Jewels at Home My jewelry roll is perfect for packing necklaces and bracelets, which is what I usually wear.

To make your own, you’ll need

  • 10″x23″ quilted fabric
  • 14″x27″ coordinating fabric for the outside
  • 3/8″ wide grosgrain ribbon, about 42″ total
  • 1″ wide grosgrain ribbon, about 1 yard
  • Thread and sewing machine

I cut the narrow grosgrain into four-inch sections to make the loops.

Next, I lay the small quilted material on the wrong side of the outer material. I folded over a border on all sides, and tucked the loops under the hem, pinning them in place.

Tutorial for a jewelry travel case | Jewels at Home

I stitched down the border, which also secured the loops.

Tutorial for a jewelry travel case | Jewels at Home

To make the outside tie, I folded the wide grosgrain in half and sewed it to one end of the roll, on the outside.

Tutorial for a jewelry travel case | Jewels at Home

And that’s it!

Easy and pretty!

Tutorial for a jewelry travel case | Jewels at Home
Tutorial for a jewelry travel case | Jewels at Home  Tutorial for a jewelry travel case | Jewels at Home
Tutorial for a jewelry travel case | Jewels at Home  

Happy travels!

“Jewels”