Faux Birch Branches

They say, there’s a fine line between genius and insanity… I think I got a deeper understanding of this when I took on this faux birch branch project.

I saw these a year or two ago in a department store, and I’m not sure what possessed me, but I decided to make them for our house. It’s the kind of fantastic paper creation you might see at Anthropologie, which always has the best art in their store displays… It makes me want to buy a cute sweater… Now! But I digress.

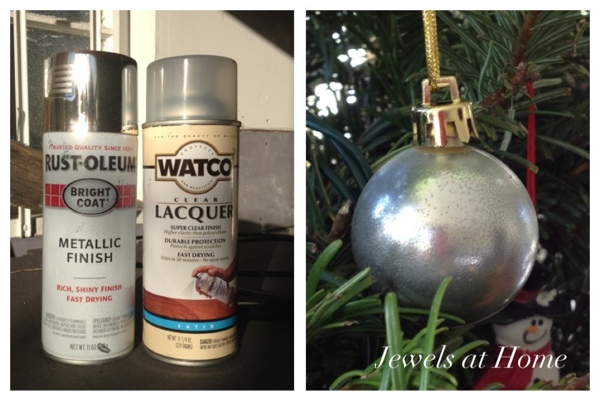
I’m working on creating outdoorsy and white-themed Christmas decorations this year, like these felt poinsettia ornaments and homemade clay ornaments.  I had several large cardboard tubes left over from buying fabric, and I got inspired to transform them into a little homemade forest.  I have to say that I was super-excited when I started, and by the end, I was going blind from visions of decoupaged tissue paper, but I think it was worth it in the end.

So cool!  Transform cardboard and paper into faux birch branches for a beautiful display | Jewels at Home

Materials:

  • Cardboard tubes.  The “trunks” are made from large tubes for rolling fabric.  The “branches” are smaller tubes, including toilet paper and paper towel rolls.
  • Brown paper
  • White tissue paper
  • Mod Podge or glue for decoupage
  • Embroidery floss in black and gray
  • Patience

To get started, created the shapes of the trees.  I used brown paper and Mod Podge to join some long tubes together, so that the lengths would vary.  I also used the same technique to add branches to some of the trunks (pictured below).

So cool!  Transform cardboard and paper into faux birch branches for a beautiful display | Jewels at Home

Next, I started creating the look of birch bark, inspired by instructions on making fake birch bark over at Kitsch Designs.  The first step is to cut the tissue paper into strips – I made a variety ranging from about two to four inches wide.  Then, paint some Mod Podge on the cardboard and wrap strips of tissue paper around the tube (pictured below).  I overlapped the paper in places and left gaps in other places, to give a textured look to the branches.

So cool!  Transform cardboard and paper into faux birch branches for a beautiful display | Jewels at HomeIt looks cool when you tear the wet paper and get a rough edge like this!

So cool!  Transform cardboard and paper into faux birch branches for a beautiful display | Jewels at Home


Keep adding layers of paper, overlapping them, so the “bark” is textured and natural-looking (right two pictures below).  I estimate I used a total of about 4 layers.  On the top one or two layers, add some short strips of embroidery floss (left picture below).  I cut this into different lengths and also separated some into strands, so there was a lot of variety.  The floss stuck well to the paper using the Mod Podge.


So cool!  Transform cardboard and paper into faux birch branches for a beautiful display | Jewels at Home


I “planted” the finished birch branches in a pot wrapped in fabric in our font hall.  I think it would look great with the addition of some greenery and/or ornaments, so I’ll fiddle with that a bit more, but so far, I’m excited with these wintery additions to our foyer.

So cool!  Transform cardboard and paper into faux birch branches for a beautiful display | Jewels at Home

So cool!  Transform cardboard and paper into faux birch branches for a beautiful display | Jewels at Home

So cool!  Transform cardboard and paper into faux birch branches for a beautiful display | Jewels at Home

So cool!  Transform cardboard and paper into faux birch branches for a beautiful display | Jewels at Home

So cool!  Transform cardboard and paper into faux birch branches for a beautiful display | Jewels at Home

So cool!  Transform cardboard and paper into faux birch branches for a beautiful display | Jewels at Home

So cool!  Transform cardboard and paper into faux birch branches for a beautiful display | Jewels at Home

So cool!  Transform cardboard and paper into faux birch branches for a beautiful display | Jewels at Home

After the hours that went into this project, I’ll be keeping these faux birch branches around.  I haven’t decided if I’ll keep them long for next Christmas or maybe cut them short to display in the fireplace.  Let me know what you think!

“Jewels”

Felt Poinsettia Ornaments

I grew up in Canada, so Christmas was associated with cool temperatures, bare branches, and as often as not, snow on the ground. Even my kids, who grew up in California, ask for snow at Christmas. So, I decided to create a snowy Christmas for us at home.

I pared down my decorations to focus on the white and silver. I also made several new projects in a white and woodsy theme.  So far, I’ve finished a sleek new gray and white Christmas tree skirt, and I also made some new pillow covers in white and gray with outdoorsy appliques of reindeer, polar bears, and trees.

Since I kept our colorful ornaments packed up for this year, I needed to add some more decorations to our tree.  The kids helped me make these sweet clay ornaments, and I am adding these white felt poinsettia ornaments to fill in the branches.

DIY felt poinsettia Christmas decorations to use as ornaments, gift toppers, or around the house | Jewels at Home

I looked at lots of pictures of real and felt flowers, and I read a lot of tutorials, trying to find felt poinsettias that would have a natural look.  My final project was a combination of the felt poinsettia pin by Cheryl at her Tidy Mom blog, Kate’s felt poinsettia’s at her Centsational Girl blog, and my own innovation, as I wanted to make the flowers a bit more natural-looking and just right for my tree!

The thing I liked best about Cheryl’s flowers was how she cut the petals.  It’s much faster and easier than using a template, and it allows you to make each petal a little bit unique.  I used different dimensions, which I’ll list below, and I also cut my petals with a bit of a wave on the edge, to give them more dimension.

I washed and dried my felt before using it, to make it a bit thicker.  To cut the petals, first cut rectangles of felt in the specified dimensions, and then trim them to look like petals.  It’s very quick to cut the rectangles, if you cut the felt into strips first (left side of the picture below) and then cut the strips into rectangles (middle of the picture below).  I was also able to trim the petals three at a time, so it was all much easier than I expected!

DIY felt poinsettia Christmas decorations to use as ornaments, gift toppers, or around the house | Jewels at Home

Each flower is constructed the same way, and I’ll give the exact measurements for my two sizes below.

The basic parts of the felt poinsettia are

  • a round circle base (top left picture below)
  • a layer of large petals (top right and bottom left pictures below)
  • a layer of small petals (bottom right picture below)
DIY felt poinsettia Christmas decorations to use as ornaments, gift toppers, or around the house | Jewels at Home

Start with a round base, add a layer of large petals, and top with a layer of smaller petals.

To finish the flower, I sewed all the layers together while sewing on some pearl beads to decorate the center of the poinsettia.  I then used hot glue to attache the flower to a metal alligator clip.

DIY felt poinsettia Christmas decorations to use as ornaments, gift toppers, or around the house | Jewels at Home

Finish the flower by sewing the layers together while sewing on some beads for the center.

The pictures above are of the larger poinsettias.  The finished size is approximately 6.5″ in diameter.  The large flower uses:

  • 2″ diameter base circle
  • 8 large petals of 3.5″ x 2″
  • 5 small petals of 2.5″ x 1.5″
  • 7 beads
  • metal alligator clip

I also made smaller poinsettias, with a finished size of approximately 4.75″.  The small flower uses:

  • 1.5″ diameter base circle
  • 6 large petals of 2.5″x1.5″
  • 5 small petals of 1.75″ x 1″
  • 5 beads
  • metal alligator clip

Here are the large and small flowers side by side.

DIY felt poinsettia Christmas decorations to use as ornaments, gift toppers, or around the house | Jewels at Home

And here are the new poinsettias on our tree!

DIY felt poinsettia Christmas decorations to use as ornaments, gift toppers, or around the house | Jewels at Home

DIY felt poinsettia Christmas decorations to use as ornaments, gift toppers, or around the house | Jewels at Home

Christmas tree with all-white ornaments.  Link to DIY ornament ideas to trim your tree.  Jewels at Home

Hooray for a project that was even more easy and fun than I had expected!  If I get enough of these for the tree, they may start showing up elsewhere in our house!  Or that may be crazy-talk!

“Jewels”


Christmas Pillows in Simple White and Gray

I’m not even going to try to hide that I’m crazy about Christmas. I love the warm festive atmosphere, the carols, the time with family.

Over the years, I mostly had the same decorations up each year.  Last year, I tried a new color scheme of red, turquoise, and silver.  This year, I want to do as much as I can in simple gray and white.  I started with our new modern tree skirt, since that is a focal point.

Next, I wanted to make some cute Christmas throw pillows.  The idea behind the pillows is simple.  It’s all the different designs and fabrics that make them fun! The instructions for the basic pillow cover can be found in the post on our living room pillows.  The instructions for making the appliqués can be found in this post from the onesie-decorating baby shower.  Since I put some work into all these new pillows, I chose designs that would last beyond Christmas and through the winter.

Polar bear, snowy forest, and reindeer pillows in a simple white and gray color scheme for Christmas and the whole winter | Jewels at Home

Here are some of the decorations I put on my new winter pillow covers!

Reindeer pillows:

Reindeer pillows in a simple white and gray color scheme for Christmas and the whole winter | Jewels at Home

Polar bear pillows:

Polar Bear pillows in a simple white and gray color scheme for Christmas and the whole winter | Jewels at Home

A snowy forest of trees on this pillows:

Snowy forest pillows in a simple white and gray color scheme for Christmas and the whole winter | Jewels at Home

And here is our living room with the new pillows.  There’s more I’d love to do, but I like how it’s coming together so far.

Holiday decorating.  Living room with new polar bear, snowy forest, and reindeer pillows for Christmas and the whole winter | Jewels at Home

Holiday decorating.  Living room with new polar bear, snowy forest, and reindeer pillows for Christmas and the whole winter | Jewels at Home

Holiday decorating.  Living room with new polar bear, snowy forest, and reindeer pillows for Christmas and the whole winter | Jewels at Home

Holiday decorating.  Living room with new polar bear, snowy forest, and reindeer pillows for Christmas and the whole winter | Jewels at Home

Holiday decorating.  Living room with new polar bear, snowy forest, and reindeer pillows for Christmas and the whole winter | Jewels at Home

Holiday decorating.  Living room with new polar bear, snowy forest, and reindeer pillows for Christmas and the whole winter | Jewels at Home

Holiday decorating.  Living room with new polar bear, snowy forest, and reindeer pillows for Christmas and the whole winter | Jewels at Home

Holiday decorating.  Polar bear, snowy forest, and reindeer pillows for Christmas and the whole winter | Jewels at Home

I’m also planning to make a throw blanket and some pillows out of a sweater. It could be a fiasco or an amazing project. If it’s the latter, you’ll see it here!

Are you feeling our snowy white Christmas theme?!

“Jewels”

Homemade Clay Ornaments with the Kids

I love decorating for Christmas, and this year, I wanted to create a white and outdoorsy theme.  I love our collection of ornaments from over the years, but just for a change, I only put up the white ones this year, leaving our tree a little sparse.

Thanks to the kids for doing a quick and fun project with me to make some new decorations for our Christmas tree!

Christmas ornaments to make with the kids.  These are simple and beautiful!  Jewels at Home

I used this DAS Air Hardening Modeling Clay, and it worked fine, but the dried ornaments are quite fragile, so I’m going to try the next round with this AMACO Cloud Clay. The kids have used it at school, and it seems to be more durable, though it doesn’t look like the shapes come out as cleanly. We’ll let you know!

This project was quick and simple – all you need is some clay, a rolling pin and cookie cutters, and some beads and/or rubber stamps for embellishing the ornaments.  Oh yes, and some string for hanging the ornaments.  I used embroidery floss.

All the kids were able to do the project pretty much on their own.  I did help the younger ones with rolling the clay flat, but even little J did the cookie cutters and beads on his own!

Here are the boys at work:

Christmas ornaments to make with the kids.  These are simple and beautiful!  Jewels at Home

Christmas ornaments to make with the kids.  These are simple and beautiful!  Jewels at Home

And here are the ornaments we made:

Homemade clay Christmas ornaments to make with the kids.  These are simple and beautiful!  Jewels at Home

These are the ornaments I made. I used beads and rubber stamps to decorate the clay.

Homemade clay Christmas ornaments to make with the kids.  These are simple and beautiful!  Jewels at Home

L made the three wise men.. actually, I believe he called them an “army of snowmen”…

Homemade clay Christmas ornaments to make with the kids.  These are simple and beautiful!  Jewels at Home

Little J made these stars himself! I had to take them away from him as soon as they were done, as he wanted to roll them back into a ball like play dough.

Homemade clay Christmas ornaments to make with the kids.  These are simple and beautiful!  Jewels at Home

These are K’s ornaments. I like how he tried a lot of different designs.

The tree looks much better now, but I’m hoping to make a few more ornaments to fill it out.

Homemade clay Christmas ornaments to make with the kids.  These are simple and beautiful!  Jewels at Home

Homemade clay Christmas ornaments to make with the kids.  These are simple and beautiful!  Jewels at Home

Homemade clay Christmas ornaments to make with the kids.  These are simple and beautiful!  Jewels at Home

Homemade clay Christmas ornaments to make with the kids.  These are simple and beautiful!  Jewels at Home

Homemade clay Christmas ornaments to make with the kids.  These are simple and beautiful!  Jewels at Home

Homemade clay Christmas ornaments to make with the kids.  These are simple and beautiful!  Jewels at Home

Homemade clay Christmas ornaments to make with the kids.  These are simple and beautiful!  Jewels at Home

Homemade clay Christmas ornaments to make with the kids.  These are simple and beautiful!  Jewels at Home

“Jewels”

20131215-125612.jpg

20131215-125622.jpg

Modern Gray and White Christmas Tree Skirt

For many years, I decorated for the holidays with the same traditional red and green Christmas color scheme.  There’s nothing wrong with that, of course – traditions become traditions for good reason!  But after more than a decade of the same style, I decided it would be fun to change up our Christmas look.  Last year, I edited and updated our decorations for a red, turquoise, and silver Christmas.  And this year, I’m in love with a simple gray and white Christmas color scheme.  It makes me feel like I’m getting back to the tranquil snowy outdoors – even if I am in California!

Like last year, when I reinvented many of our decorations with silver paint and ribbons, I wanted to work with a lot of things I had, while adding a few new items.  I’ve also been trying to keep my fabric and craft stash in check, so I pulled out all the gray and white fabrics I could find around the house and started to sew!

First up was a new Christmas tree skirt.  I sewed our original tree skirt 18 years ago, when I was more fond of a cute and country look, and I took this year’s skirt in a complete different direction, making something very sleek and calming.  I started with a grey faux suede upholstery fabric sitting in a corner.  I had bought it to upholster our dining room chairs, and then I decided to make them more whimsical with a printed fabric.

Materials:

  • Grey faux suede fabric, 60″x60″
  • White cotton fabric to make a wide bias binding (I forgot to measure, but I estimate I used a little over a yard of 42″ wide cotton)
  • Narrower white bias binding

Instructions:

  • Cut a 60″ diameter circle from the main fabric
  • Cut a 6″ diameter hole from the center
  • Cut a straight line from the perimeter to the center
Tutorial for a simple gray and white Christmas tree skirt | Jewels at Home

The basic shape for the Christmas tree skirt.

  • Make 5″ wide bias binding from the trim fabric
  • Iron the binding in half to a make 2.5″ wide strip
  • Sew the binding to the two straight edges that makes the opening of the skirt, sewing on the back side of the main fabric with the raw edges lined up
  • Wrap the binding around to the front.  Pin and sew to the front of the skirt
  • Add the binding to the outer edge of the skirt the same way, stretching the edges of the bias binding as you go.
  • Use the narrower binding to finish the inside circle
Tutorial for a simple gray and white Christmas tree skirt | Jewels at Home

Sew the doubled bias binding to the underside of the skirt. Then, wrap the binding around to the front and sew in place.

That’s all! Here’s our new Christmas skirt!

Tutorial for a simple gray and white Christmas tree skirt | Jewels at Home

Modern gray and white Christmas tree skirt.

Tutorial for a simple gray and white Christmas tree skirt | Jewels at Home

Tutorial for a simple gray and white Christmas tree skirt | Jewels at Home


Tutorial for a simple gray and white Christmas tree skirt | Jewels at Home

I’ve got a few more white Christmas ideas coming up, and you can start your holiday shopping over at Zulily:

“Jewels”

Pancake Mixes in a Jar

I made these pancake mixes in a jar to give as Christmas gifts, but they would be great for birthdays, hostess gifts, or just-because.  The hot chocolate mixes I made were very popular, but these pancakes are also a great option and come with a bit less sugar guilt.

Recipes for pancake mixes in a jar.  These make charming gifts for the holidays or all year 'round.  {Jewels at Home}

I made three variations: banana, banana chocolate chip, and blueberry pancakes.  I used pasta sauce jars, which hold about 2 1/2 cups.  The baking powder does lose effectiveness over time – they are best used within three months – so it’s best not to make these far ahead.

Ingredients:

Layer in a jar

  • 1/2 cup of whole wheat flour
  • 1 1/2 cups all-purpose flour
  • 1 1/2 teaspoon baking powder
  • 1/2 teaspoon kosher salt
  • 1 tablespoon sugar
  • Optional: 1/3 cup of freeze-dried bananas (not banana chips which are too crunchy), freeze-dried blueberries (not regular dried blueberries which are too hard and chewy), and/or chocolate chips.

It helped to use a clean sheet of cardstock folded into a funnel for getting the ingredients neatly into the jars:

Pancake mixes in a jar make great gifts. Recipes and instructions from Jewels at Home.

Provide the following instructions with your jar.  I printed labels and stuck them to decorative paper and tied it all on with a colorful ribbon.

Instructions:

  •  Shake the jar to mix contents thoroughly
  • Mix contents of jar gently with 2 beaten eggs beaten, 2 cups milk, 4 tablespoons oil
  • Cook in a hot greased pan

Here’s proof that a gift can look as good as it tastes!

Blueberry pancake mix in a jar.  More recipes from Jewels at Home.

Banana chocolate chip pancake mix in a jar.  More recipes from Jewels at Home.

Banana pancake mix in a jar.  More recipes from Jewels at Home.

These worked out so well for our Christmas gifts to teachers and neighbors – how will you use yours?

“Jewels”

Home for the Holidays 2012

Christmas is sneaking up on us this year. The kids just finished school yesterday, on the 21st, and I had a packed day at work. Now, we are in full holiday mode, wearing pajamas and lounging by the fire. Just in time, I thought I’d share a peek at how Christmas decorating came together this year with a little house tour. I introduced a lot more silver and turquoise than in years past, and if I get time, I’ll post details on how to recreate the smaller details.

Come on in… starting with the front door, dressed up with a silver wreath and ornament door mat.

Silver wreath welcomes you home.  Christmas house tour from Jewels at Home.

Silver wreath and a holiday doormat welcome you home.

Silve wreath gives an elegant look to the front door.  Christmas house tour from Jewels at Home.

Silve wreath gives an elegant look to the front door.

The mantel, repainted this summer, is also a centerpiece. I made many of the trees on the fireplace in this post and this one.

Christmas mantel filled with homemade trees.  Christmas house tour from Jewels at Home.

Christmas mantel filled with homemade trees.

Christmas mantel filled with homemade trees.  Christmas house tour from Jewels at Home.

On the other side of the living-dining room, I added a tray with some candles and sprayed silver pine cones.

Simple winter coffee table decor. Christmas house tour from Jewels at Home.

Simple winter coffee table decor.

Simple winter coffee table decor. Christmas house tour from Jewels at Home.

Another little Christmas vignette with trees and a wooden Santa puzzle my mom gave me years ago.

Christmas vignette with trees and a vintage wooden Santa puzzle.  Christmas house tour from Jewels at Home.

Christmas vignette with trees and a vintage wooden Santa puzzle.

Christmas color is also in our foyer, with a wreath on our closet door and some accessories on top of the bookcase.

Simple magnolia and pomegranate wreath dressed up with silver ribbon. Christmas house tour from Jewels at Home.

Simple magnolia and pomegranate wreath dressed up with silver ribbon.

Silver, turquoise, and red Christmas accessories.  Christmas house tour from Jewels at Home.

Silver, turquoise, and red accessories set the color scheme for this year’s Christmas.

Silver, turquoise, and red Christmas accessories.  Christmas house tour from Jewels at Home.

The wreaths over the big french doors  in our family room connect the space to the outdoors, but the new fireplace keeps us cozy and warm.

SImple Christmas mantel in silver, turquoise, and red.  Christmas house tour from Jewels at Home.

SImple Christmas mantel in silver, turquoise, and red.

This wreath over a big french door can be enjoyed from the inside and out.  Christmas house tour from Jewels at Home.

This wreath over a big french door can be enjoyed from the inside and out.

This wreath over a big french door can be enjoyed from the inside and out.  Christmas house tour from Jewels at Home.

Finally, here’s our tree, with the DIY mercury glass look-alike and animal silhouette ornaments.  I think it’s a bit small for the space but it really looked bigger at the lot, I promise!  Steve and I have a gift-wrapping session/ movie night planned, so there will be lots more under the tree soon!

Christmas tree with red, silver, and turquoise.  Christmas house tour from Jewels at Home.

Christmas tree with red, silver, and turquoise.

Christmas tree with red, silver, and turquoise.  Christmas house tour from Jewels at Home.

I hope you are also starting to unwind and enjoy being home for the holidays!

“Jewels”

Mercury Glass Look-alike Ornaments

This post should be subtitled “The Accidental Artist.” When I set out on this project, I just meant to repaint some old ornaments I had. Along the way, some of them turned out with a lovely mercury glass look that was an unexpected and pleasant surprise, since I have been coveting those baubles but holding off on buying them, since glass and toddlers do not mix. I wouldn’t normally have bothered painting these inexpensive plastic ornaments at all, but since I had the supplies already, I thought I might as well, and it turned out to be a good thing!

This mercury glass look-alike finish is easy to create with spray paints and makes charming Christmas ornaments.  {Jewels at Home}

I had a lot of simple red and gold ornaments left over from the Chinese “Red Egg and Ginger” party I organized for J a couple of years ago. I’ll have to blog about that later! This year, I’m trying for a red, turquoise, silver, and white -themed Christmas, so I decided to repaint some of the gold and red balls to turquoise and silver. I had plenty of other red ones.

I taped the balls upside down on some scrap cardboard with painter’s tape, sprayed a coat of primer and then a few coats of paint. The turquoise paint was initially intended for an old wooden chest. This color was actually too bright for the chest, but it came in useful here. The silver (soon to be “mercury glass”) ornaments were painted with Rustoleum metallic paint in “chrome.” I’ve been in the lookout for Krylon’s “Looking Glass” paint, and I have yet to find it in a local store, but the Rustoleum metallic chrome seems similar and has a very reflective silver finish. I would have been happy to leave the ornaments silver, but I thought I would do a clear topcoat to help protect them from chipping. The clear spray I happened to have in the garage is a lacquer, which might have more solvent in it than a regular spray paint. In any case, it left tiny dull spots on the chrome, and for a split second, I was disappointed, but I’m now as pleased as (Christmas) punch, because they have a great faux mercury glass look!

Here’s how I painted the ornaments:

Tutorial on repainting your Christmas ornaments for a fresh look, including a faux mercury glass technique!  {Jewels at Home}

An easy combination of these two spray paints will give you a beautiful faux mercury glass look for your Christmas ornaments or other projects!  {Jewels at Home}

An easy combination of these two spray paints will give you a beautiful faux mercury glass look for your Christmas ornaments or other projects!

Here are some more pictures of the “mercury glass” ornaments. They are not perfect, and I’m eager to try more of the faux mercury glass techniques out there, but as accidents go, this one was very happy (much happier than some of the mishaps that have not ended up on the blog!).

Create this mercury glass look-alike finish using spray paints. {Jewels at Home}

Create this mercury glass look-alike finish using spray paints. {Jewels at Home}

Create this mercury glass look-alike finish using spray paints. {Jewels at Home}

I’m definitely getting that festive holiday feeling! How about you?

“Jewels”

Clothespin Wreath Advent Calendar

My brain has been whirling with all the creative advent calendar ideas out there. I grew up with a beautiful felt advent calendar my mom made, and I want to recreate something like that for our boys. While I’m still mulling over all the options for the long term, it is the end of November, so for this year, I’ve decided to make a clothespin wreath using Christmas wrapping paper and scrapbook papers to hold 24 cards with activities we can do together through the month.

Clothespin wreath advent calendar with an activity for each day {Jewels at Home}

Clothespin wreath advent calendar with an activity for each day.

The instructions for the wreath are detailed in the previous post. The only changes were that I made this wreath a bit bigger (13″ diameter) to accomodate 24 pins, and I added numbers to the pins for each day. The numbers are stickers on punched out circles, and I used removable tape to stick them on the clothespins, in case we use this wreath for pictures or cards in the future.

Clothespin wreath for Christmas makes a lovely advent calendar or card display {Jewels at Home}

Clothespin wreath for Christmas makes a lovely advent calendar or card display.

Numbers for a clothespin advent calendar {Jewels at Home}

Numbers for a clothespin advent calendar

Clothespin wreath advent calendar {Jewels at Home}

For the activity cards, I printed 2″x4″ shipping labels with 24 different activities, one for each day. There are lots of options – here are some I thought would be fun to do with the kids this year. I’d love to hear what you are planning, too!

  • Get a Christmas tree
  • Decorate the Christmas tree
  • Write Christmas wish list
  • Make ornaments
  • Holiday Faire at school
  • Make a gift for a friend or family member
  • Give a homemade gift
  • Drink hot chocolate
  • Go see Christmas lights
  • Wrap presents
  • Make snowflakes
  • Read How the Grinch Stole Christmas
  • Read The Polar Express
  • Prepare Christmas “thank you” cards
  • Donate food
  • Donate toys
  • Decorate a gingerbread house
  • Visit reindeer at the zoo
  • Watch “Rudolph the Red-nosed Reindeer”
  • Watch “Frosty the Snowman”
  • Make a snowman pizza
  • Bake Christmas cookies
  • Write cards for teachers
  • Deliver gifts to teachers
  • Family game night
  • Snowman pancakes for breakfast
  • Mail Christmas cards
  • Brunch with Santa (like family photos, this is a strange torture I cannot resist!)
  • Call relatives and sing carols to them
  • Movie night (this is a Christmas Eve tradition for us)

I stuck the labels on cardstock in Christmas colors and patterns and then clipped them to the wreath, with the labels facing the back. We can turn over one each day!

Clothespin wreath advent calendar with a special activity for each day {Jewels at Home}

Clothespin wreath advent calendar with a special activity for each day.

Maybe I’ll come up with a new advent calendar next year, or maybe this wreath will become our tradition. I think I’m at least as excited as the boys for the countdown to Christmas!

“Jewels”

I shared this project at:
Somewhat Simple