DIY Upcycled Metallic Planters – Being Green is Golden!

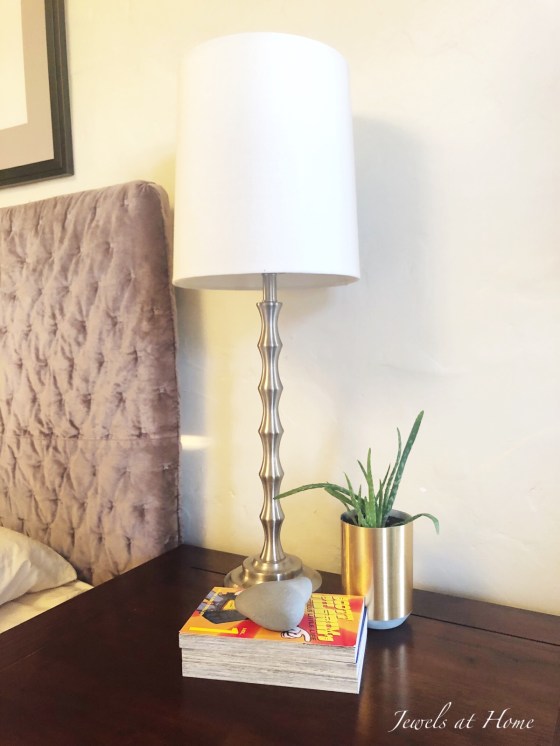
Today’s project is a great way to reuse – or “upcycle” items around your house, while creating something beautiful to feed your plant problem… I mean plant addiction… I mean plant projects! If you are a crazy plant lady like me, you are always looking for new ways to display your plants. I’m definitely not opposed to going shopping for some pretty planters, but it’s also amazing what you can do with things around your house.

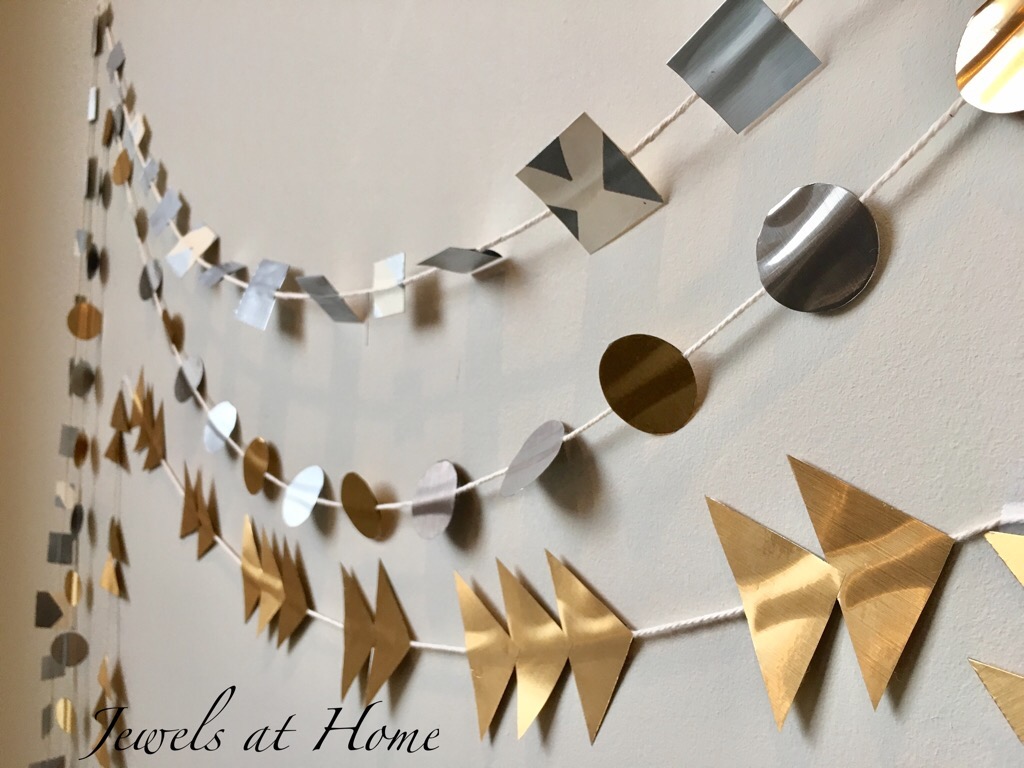
A while ago, I showed you the faux marble planters I made from empty yogurt containers. The marble paper works well for sloped containers, because the pattern is random. But if you can find some containers that have straight sides (hint, eat a lot of Talenti Gelato- you know, for the cause!), then you have got to try out the same trick with metallic contact paper!

Here’s what you will need:

Here’s how to make the planters:

  • Wash out your container. For the shampoo and body wash containers, I roughly trimmed off the top – the final trimming will happen at the end
  • Measure the height and circumference of your container and cut out a piece of metallic contact paper that is the desired height and about a centimeter longer than the circumference
  • Carefully apply the contact paper
  • For the shampoo and body wash containers, I finished trimming the top after I put on the paper, so that it was exactly flush with the contact paper
  • That’s all!

You can put in drainage holes, if you want. If you use the containers without drainage holes, make sure to put a layer of rocks and some agricultural charcoal at the bottom and be careful not to overwater.

I think these pictures prove that being green can be completely golden!

“Jewels”

DIY Faux Mercury Glass Vases

You’ve probably seen the popular mercury glass accessories out there as well as the DIY tutorials. I have been waiting to try this out, and it was really fun!

I made these for a party we have coming up, and – excitement!! – I am also helping a friend plan wedding decorations, so there will be more to come. Enjoy some tips and pictures:

I found quite a few different variations in instructions, which I will discuss a bit.

  • Types of paint: the most popular seems to be Krylon Looking Glass. It took several coats to get this finish, and I think I could actually have done even more, but I want to be able to put votive candles inside and still have some light shine through. I also added one coat of gold paint in the middle to warm up the color a bit.
  • Spraying water-vinegar mix before painting or after painting: I preferred to spray the water-vinegar mix on before spraying, which blocks the paint from sticking to the glass. I did still rub it off a little after, but I think you would have to rub a lot harder, if you sprayed the water on after the paint.
  • Spraying inside or outside: Looking Glass paint is intended to be sprayed on the inside, so the glass itself adds to the reflective finish. However, to make the vases more useful (ie able to hold things inside), I chose to paint on the outside.

img_8182img_8181

Here’s how one of my vases looks in front of some mercury glass candlesticks I bought from Pier 1. It makes me want to warm up my colors more next time by adding more layers of gold paint.

I’d also like to try again with some rose gold or copper paint!

“Jewels”

Metallic Geometric Garlands

For our Mod Metallic Christmas, I wanted to make garlands for the tree and beyond. I love how these turned out, and I love that they are neutral enough to use for any occasion!


To make the garlands, I used beautiful metallic contact papers and simple twine to create a variety of garlands. You can find twine and white contact paper at a lot of local hardware stores, and here are the links buy the metallic contact paper:

I made three different garlands – squares, triangles, and circles – by cutting out shapes from the contact paper and sticking two sides together with twine sandwiched in between.

For the circle garland, you could also buy pre-cut circle stickers which would make the project even faster!

Here are the finished garlands, ready for when we put up our Christmas tree and for many celebrations to come!

Cheers,

“Jewels”


Home for the Holidays 2012

Christmas is sneaking up on us this year. The kids just finished school yesterday, on the 21st, and I had a packed day at work. Now, we are in full holiday mode, wearing pajamas and lounging by the fire. Just in time, I thought I’d share a peek at how Christmas decorating came together this year with a little house tour. I introduced a lot more silver and turquoise than in years past, and if I get time, I’ll post details on how to recreate the smaller details.

Come on in… starting with the front door, dressed up with a silver wreath and ornament door mat.

Silver wreath welcomes you home.  Christmas house tour from Jewels at Home.

Silver wreath and a holiday doormat welcome you home.

Silve wreath gives an elegant look to the front door.  Christmas house tour from Jewels at Home.

Silve wreath gives an elegant look to the front door.

The mantel, repainted this summer, is also a centerpiece. I made many of the trees on the fireplace in this post and this one.

Christmas mantel filled with homemade trees.  Christmas house tour from Jewels at Home.

Christmas mantel filled with homemade trees.

Christmas mantel filled with homemade trees.  Christmas house tour from Jewels at Home.

On the other side of the living-dining room, I added a tray with some candles and sprayed silver pine cones.

Simple winter coffee table decor. Christmas house tour from Jewels at Home.

Simple winter coffee table decor.

Simple winter coffee table decor. Christmas house tour from Jewels at Home.

Another little Christmas vignette with trees and a wooden Santa puzzle my mom gave me years ago.

Christmas vignette with trees and a vintage wooden Santa puzzle.  Christmas house tour from Jewels at Home.

Christmas vignette with trees and a vintage wooden Santa puzzle.

Christmas color is also in our foyer, with a wreath on our closet door and some accessories on top of the bookcase.

Simple magnolia and pomegranate wreath dressed up with silver ribbon. Christmas house tour from Jewels at Home.

Simple magnolia and pomegranate wreath dressed up with silver ribbon.

Silver, turquoise, and red Christmas accessories.  Christmas house tour from Jewels at Home.

Silver, turquoise, and red accessories set the color scheme for this year’s Christmas.

Silver, turquoise, and red Christmas accessories.  Christmas house tour from Jewels at Home.

The wreaths over the big french doors  in our family room connect the space to the outdoors, but the new fireplace keeps us cozy and warm.

SImple Christmas mantel in silver, turquoise, and red.  Christmas house tour from Jewels at Home.

SImple Christmas mantel in silver, turquoise, and red.

This wreath over a big french door can be enjoyed from the inside and out.  Christmas house tour from Jewels at Home.

This wreath over a big french door can be enjoyed from the inside and out.

This wreath over a big french door can be enjoyed from the inside and out.  Christmas house tour from Jewels at Home.

Finally, here’s our tree, with the DIY mercury glass look-alike and animal silhouette ornaments.  I think it’s a bit small for the space but it really looked bigger at the lot, I promise!  Steve and I have a gift-wrapping session/ movie night planned, so there will be lots more under the tree soon!

Christmas tree with red, silver, and turquoise.  Christmas house tour from Jewels at Home.

Christmas tree with red, silver, and turquoise.

Christmas tree with red, silver, and turquoise.  Christmas house tour from Jewels at Home.

I hope you are also starting to unwind and enjoy being home for the holidays!

“Jewels”

Silver Spray Paints – DIY Apothecary Jar and Painted Screen

Spray paint itself is an amazing product – goes on quickly and evenly for a smooth finish. Metallic spray paint takes the level of wonder a step higher. I have been experimenting with two paints from Krylon’s Special Purpose Metallics line that I found at our neighborhood hardware store, and I think I’m addicted!

Dull Aluminum (1403) is what I used on the little box from the rummage sale. Despite its name, I don’t find it dull. It gives a cool grey/silver finish that looks like it’s painted – okay, I know that sounds obvious, but I mention it in contrast to the Bright Silver (1401), which looks more like a real metal finish.

metallic spray paints

Projects using Krylon “Dull Aluminum” and “Bright Silver” paints.

Here are some projects I’ve tried with each, and I’m already thinking about what to do next. Let me know if you have suggestions!

Bright Silver Paint
I’ve been trying to find more projects that reuse old things. Recycling is great, but it still uses a lot of energy and produces waste. Reusing is good for our planet and our pocketbooks, too! The challenge is to find projects that reuse old items but don’t look like a preschool art project!

This idea for a DIY apothecary jar is not original to me. I’ve seen it in several places, including Parties for Pennies.

DIY apothecary jar

DIY apothecary jar made from a used jar, a cabinet knob, and metallic spray paint.

You will need:

  • glass jar with lid
  • cabinet knob with bolt
  • washer
  • drill
  • sandpaper
  • spray primer
  • metallic spray paint
  • clear finish spray

1. Sand the lid to roughen it up for the paint to stick.

2. Drill a hole in the center of the lid

3. Insert the the bolt and washer from under the lid and screw on the knob

4. Spray primer, then paint (2 coats), and seal with a clear finish. Let each coat dry before continuing.

20120507-182007.jpg

Another view of a DIY apothecary jar made from a used jar, a cabinet knob, and spray paint.

It’s such a creative and satisfying project. We use jars all the time, and I have a ton of knobs leftover from replacing the dated brass and black ones in our kitchen, so I’m thinking of making lots of these as gifts!

Dull Aluminum Paint

I used this paint on a couple of projects recently. This is actually a pretty silver-colored paint; I don’t like the word “dull” in it’s name! The first was for painting this box I picked up for five dollars at a rummage sale:

side table styling

This dull old box was painted silver with Krylon Dull Aluminum paint and looks beautiful in our living room!

I also used this more muted (I refuse to call it dull!) metallic paint to finish off a screen I was painting to hang in our master bathroom. This was an example of “the third time’s a charm.” I started with the bare wood screen, and hoped to use it that way, but it was just too rough and unfinished. Next, I painted it a pale blue (Swept Away by Benjamin Moore), which I had leftover from painting our kids’ bath and also used to paint another screen. The blue paint was an improvement, but it still felt unfinished, so I masked off the center and sprayed the border in silver. Sometimes, it takes a few tries to get the look you want, but it was worth it!

painted screen

It took a few tries to get the look I wanted for this screen. The silver spray paint really makes it feel elegant and finished!

painted blue and silver screen

A closer view of the finished screen in blue and silver.

These metallic paints are really so easy to use for a spectacular effect. Some other great uses I’ve seen and would love to try are:

  • spray branches for a vase arrangement
  • spray a decorative tray
  • spray ceramic vases or bowls for display
  • make pendants out of clay – thumbprints, engraved words, etc. and spray with silver, so they look like stamped metal
  • more DIY apothecary jars for sure!

“Jewels”

This project is shared at:

New Powder Room from Top to Bottom – Wallpaper!

Our powder room facelift is going slowly… but surely!  Unfortunately, I started taking apart the space and then developed some inertia about getting the wallpaper up, as I hadn’t done wallpaper in a long time, so the sad state of this space got sadder before it started getting better.  Today, I put our toddler in daycare for an extra day, so I could go to Kindergarten Spring Sing at kids’ school without distraction.  After the performance – which was adorable! I took full advantage of the rare stretch of several hours “off” from both my office job and my mom job by having a lunch date with hubby and pledging to get this wallpaper up!

Vanity area before

BEFORE: The whole room was very white – blah – with dated gold-tone fixtures and a pedestal sink that has no room for storage or even the soap!

A powder room is a perfect place to use wallpaper – it makes a beautiful statement, without overwhelming you visually, financially, or logistically, as you only need a small amount.  I splurged big-time on the Imperial Trellis wallpaper in silver.  It was pricey, but I had enough to do the powder room, as well as line the backs of our living room bookcases.  I love the glow of the silver to brighten up our dark spaces.

Imperial Trellis wallpaper in silver by Schumacher. Click the picture to go their website for more information and colors.

I hung wallpaper once many years ago, so I remembered the basics, but I quickly refreshed myself with these instructions from This Old House.  Some of the planning steps did not apply to me, since I was doing such a small area.  I’m only hanging it above the (future) chair rail on one wall, because the ceiling slopes on the other walls (the powder room is under the stairs), and I thought the wallpaper on those walls would just draw attention to the changing ceiling line.

Here’s an overview of what I did:

Tools for wallpaper

TOOLS: From left, you’ll need
1. Squeegee: they make ones specifically for wallpapering, but a regular shower squeegee worked well for me.
2. Ruler or putty knife: to keep a straight line when trimming
3. Utility knife: for trimming paper at corners. Make sure it’s very sharp!
4. Pencil: for marking a plumb line.
5. Brush or roller: for applying wallpaper paste.
5. Wallpaper paste: mixed from a dry powder.
6. Sponge: for smoothing paper and wiping off excess paste.
Not shown: level or plumb line to mark a plumb starting line.

Booked wallpaper

After spreading the wallpaper pasted with a brush or roller, fold the paper as shown (called “booking”) for the adhesive to set.

sponging wallpaper

Line the first piece up with a plumb line. Then, using first a damp sponge and then the squeegee, gently smooth the wallpaper from the center towards the edges to remove bubbles and excess paste.

Wow!  Wallpaper

Wow! I was amazed at how the wallpaper made the room seem brighter and bigger. The silvery glow spread the light around the room, and the lines of the pattern made the space feel wider and taller.

Once the wallpaper was up, I started adding a few accessories: a large mirror which, again, helps with spreading light around the small space, a new chrome towel bar, and some art that I pulled from a calendar (more examples of this great art in an upcoming post) and put into an frame found for a few dollars at Goodwill.  Again I used silver, to brighten up the room.

new mirror and towel bar

New mirror and towel bar added to the room. The “top” of our top-to-bottom facelift is done!

I am SO happy with the result so far.  It’s now a pleasure to enter this room that I had been avoiding!  What is the plan for the rest of the makeover?  I’m going to add a chair rail and paint the area below in a warm blue-grey, like this inspiring powder room by Sarah Richardson.  I’ve also got a new vanity going in to give us a little storage and counter space.  Hope to post the finished room here soon!

[UPDATE:  The powder room is finished!  You can see it here.]

An inspiration for our powder room. Click the image to go to the image on Sarah Richardson’s website.

And on a different note, what projects on the horizon have me all excited?  Check out these FREE chairs I am going to make over for my craft room/ office!  I can’t wait (though maybe I should finally finish the powder room first…)

Queen Anne Chairs - before

Sneak preview: A glamorous makeover is in store for these Queen Anne chairs I got for FREE through Craigslist.

“Jewels”