DIY Personalized Felt Pennants

I recently made these vintage-style pennants to celebrate special places in our family. It was so fun that I went on to make personalized name pennants for my nephew and niece.

Here’s what you’ll need:

  • Felt for pennant, lettering, and trim
  • Iron
  • Scissors
  • Paper for templates
  • Sewing machine or needle and thread

Here’s how to do it:

  • Create a template for your pennant – mine is on two sheets of scrap printer paper. It is 7.5″ high x 21″ long.
  • Cut out the pennant from a large piece of felt
  • Choose your felt colors for the letters and images and fuse Heat ‘n Bond to one side
  • Cut out your letters and images
  • Arrange on the pennant and iron in place
  • Cut strips of felt for the binding (optional) and ties and sew in place

Here’s how the pennants turned out. I love all the color variations!

Julie aka “Jewels”

DIY Felt Pennants – Travel Themes

About once a year, my friend Ariana (of Act 2 Decor) and I get up early go to the Alameda Point Antiques Fair to browse and look for treasures.

I’ve been working hard to clean out the house this year, so I kept my shopping restrained, but I was looking for a vintage felt pennant to finish up a new gallery wall in JJ’s room. I found the perfect piece, and it was definitely meant to be, because it was sold by the family of a former coworker!

When I got home, I was inspired to make some more pennants of my own. I made one for my home town, Toronto, and one for my sister-in-law’s family in New Jersey.

Here’s what you’ll need:

  • Felt for pennant, lettering, and trim
  • Iron
  • Scissors
  • Paper for templates
  • Sewing machine or needle and thread

Here’s how to do it:

Create a template for your pennant – mine is on two sheets of scrap printer paper. It is 7.5″ high x 21″ long.

Cut out the pennant from a large piece of felt

I sketched the images freehand in reverse on the paper side of the Heat ‘n Bond

For the script lettering, create a word processing document, print out the words, and trace them in reverse onto the paper side of the Heat ‘n Bond

Choose your felt colors for the letters and design and fuse Heat ‘n Bond to one side

Cut out your letters and designs

Arrange on the pennant and iron in place

Cut strips of felt for the binding (optional) and ties and sew in place

Here are my finished pennants. I should make one for San Francisco next!

Here’s a picture together with my vintage find:

And here’s how JJ’s new gallery wall came together!

I had so much fun! What city do you want to celebrate and what image would you use?

Julie aka “Jewels”

Valentine’s Day Pennant Banner

I’m not usually a big Valentine’s Day person, but then again, a holiday built around chocolate can’t be all bad! Anyway, a couple of weekends ago, I got the urge to make something – anything! – and I put together … Continue reading

Easy Customizable Birthday Banners

I often see beautiful birthday banners customized for a theme party. I love having something that matches the rest of the event and makes the birthday boy feel all the more like the day is made just for him. On the other hand, I don’t love the idea of something that can be used just once.

So, I’m very happy that I realized that you can adapt any banner to a theme… And then just as easily change it for the next party.

I can’t resist poking around the clearance shelves at Target and was excited to recently find a colorful birthday banner in red, yellow, and blue. The colors were perfect for our upcoming firefighter birthday, but the circus animals were not. But for just $1.54 (!!), I knew I couldn’t make anything like it myself, and it wouldn’t be a big project to cover up the circus animals with something new.

Here’s a picture of the original banner (top) and then the way it looks after I simply added yellow cardstock and a picture of a fire truck (bottom). I used painter’s tape to attach the new decorations, so they can be removed easily without damaging the banner underneath.

You can easily change the theme of a party banner to reuse it!  Why didn't I think of this before?  From Jewels at Home.

You can easily change the theme of a party banner to reuse it! Why didn’t I think of this before?

Firefighter birthday party decorations.  So easy to reuse this banner by changing from a circus theme to a firefighter theme.  Jewels at Home.

Firefighter birthday party decorations. So easy to reuse this banner by changing from a circus theme to a firefighter theme.

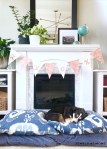
Once I changed the new banner, I got the idea to update another one I’ve has for years. It’s a very simple design that would go with anything. The original banner had stars between the letters didn’t have a lot of space for customization, so I decided to make extra pennants to add on the ends. I just cut triangles out of blue cardstock to match the rest of the banner and glued smaller triangles of a patterned paper. I covered the triangles with clear contact paper, so that things could be taped on the surface and then removed. I punched two holes in the top of the pennant and used a simple brad (an office supply “brass fastener”) to join it to the existing pennant.

Making pennants for a birthday banner.  Cover the paper with clear contact paper, so decorations can be switched out according to the party's theme.  Jewels at Home.

Making pennants for a birthday banner. Cover the paper with clear contact paper, so decorations can be switched out according to the party’s theme.

Add extra pennants to a ready-made banner, to give you more room for customizing your theme.  Jewels at Home.

Add extra pennants to a ready-made banner, to give you more room for customizing your theme.

For baby J’s party, I added firetrucks again, but these can be taken off and switched to something new for our next party!

Customize a plain banner with removable decorations.  This banner can be used over and over again!  Jewels at Home.

Customize a plain banner with removable decorations. This banner can be used over and over again!

A plain banner customized for a firefighter birthday using removable decorations.  This banner can be used over and over again for different parties!  Jewels at Home.

A plain banner customized for a firefighter birthday using removable decorations. This banner can be used over and over again for different parties!

Yes, this is a simple idea, but it’s a great addition to our party repertoire that I can now re-use and customize at the same time!

I’ll put together the rest of the firefighter party pictures to post soon.

“Jewels”