So, I know I’m not the only one who loves the ficus lyrata, or fiddle leaf fig. My post on how to propagate fiddle leaf fig plants from cuttings is by far one of the most popular topics on the blog!
It’s my second year of growing these magnificent plants, and I thought I’d try my hand at shaping one into a tree. The two most common shapes for fiddle leaf fig plants are a column, often planted in groups of twos or threes, and a tree shape. Even though they look very different, these two shapes are the same plant, and you can actually make a tree by carefully pruning and shaping your plant!
The best time to prune is spring or summer, when your plant is growing most actively.
Here is a tree-shaped fiddle leaf fig I bought from Sloat Garden Center about a year ago. It has grown three-to-four times in size, and I’ve pruned it several times already. As it grows, I study the shape and look to see where it may be getting lopsided. Then, I cut the branch including two-to-three leaves off of that area, and this encourages the plant to branch out in new directions. The more you cut, the more side branches the plant will grow.
Why? The plant hormones – auxins – that promote upward growth also inhibit branch growth. The auxins flow from the tip down, so when you cut off the tip, you lower the level of auxins, which allows branching. The more you cut, the lower the concentration of auxins, and the more branching you’ll get.

These are examples of a traditional column shape, and the one in front is actually a plant I propagated off of the one in back! I was able to cut off the tip of the column-shaped plant with just one leaf, and it grew back just one bud, keeping its vertical form without branching. The benefit of doing this, besides getting a new plant from your cutting (!), is that it slows down the vertical growth and lets the trunk get stronger.
Of course, you don’t have to be traditional! I bought this plant from Flowercraft last Mother’s Day, when it was just the lower section. It grew two side branches, and I just let it continue that way. I pruned one of the side branches once, so you can see there is yet another small branch coming off of it. This plant now has a very unique shape which I’ve grown to love.
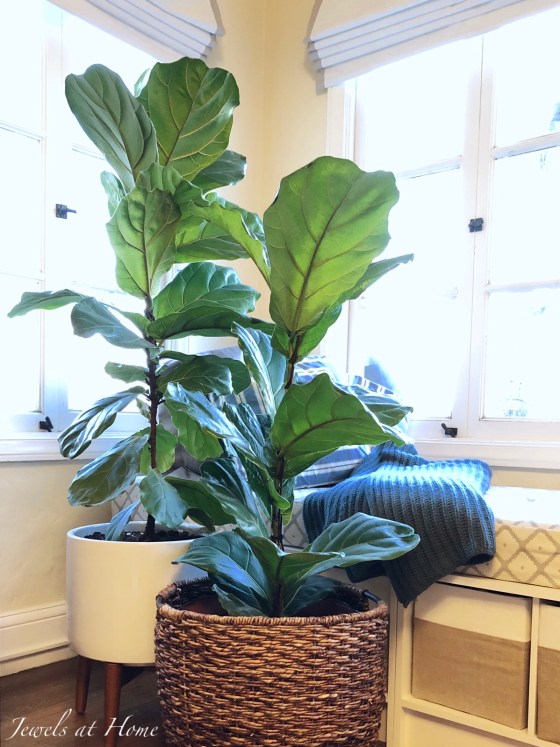
 Back to my latest fiddle leaf fig project! I had this smaller fiddle leaf fig plant that I actually purchased online, when I was eager to get my hands on one and was having trouble hunting one down at a nursery. It grew a bit slowly at first, but it did eventually take off, and now it is ready for an adventure!
How to shape your fiddle leaf fig plant into a tree:
- In spring or summer, cut off a large section from the top of the column. I cut off the top of the stem with six leaves, in two sections of three leaves, so I could root both of them into new plants. Make sure you have some rooting hormone on hand and read my other tips for propagating a new plant. The more you prune a plant, the more it will branch, and I was hoping to get about three side branches.
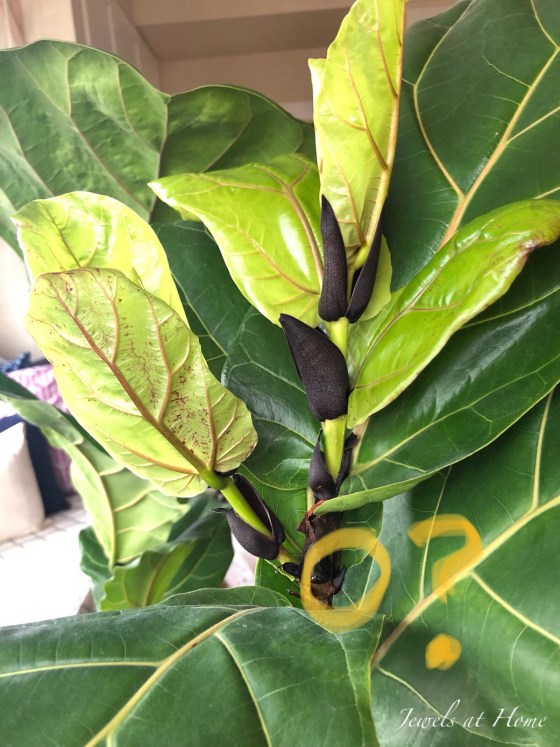
2. About a month later, I was rewarded with three new buds! Each of these will grow a new branch, and we’ll be on our way to a pretty new tree shape!

3. When it grows enough, I will start taking the leaves off the bottom section of the trunk. It is good to wait a while to do this, as each of those leaves is helping provide energy for the plant. I also have never been able to propagate a leaf without the stem section, though I think I might as well try when I cut those leaves. More to come!
I’ll keep updating this post with progress and tips, so come back and see how this beauty is doing!
Update at 1.5 months:
So, I have good news and bad news…. good news is that two of the buds have totally taken off into branches… bad news is the third bud hasn’t grown much. I’ll give it some more time, but I know that the plant hormones – auxins – that promote upward growth also inhibit branch growth, so I may try trimming the top of the new branches when they get mature, to try to allow that third little bud to grow.
“Jewels”