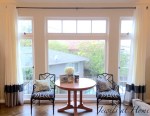
I recently decided to change out our living room drapes. Or, more accurately, I wanted to change my drapes for a long time and recently finally got around to it! The result of this overly drawn-out process is these custom … Continue reading
I recently decided to change out our living room drapes. Or, more accurately, I wanted to change my drapes for a long time and recently finally got around to it! The result of this overly drawn-out process is these custom … Continue reading
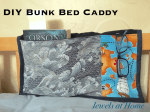
The little boys just moved into a bunk bed, and L needs a place to stash his book and glasses at the end of the day. I let him pick some favorite fabrics out of the stash, and I like … Continue reading

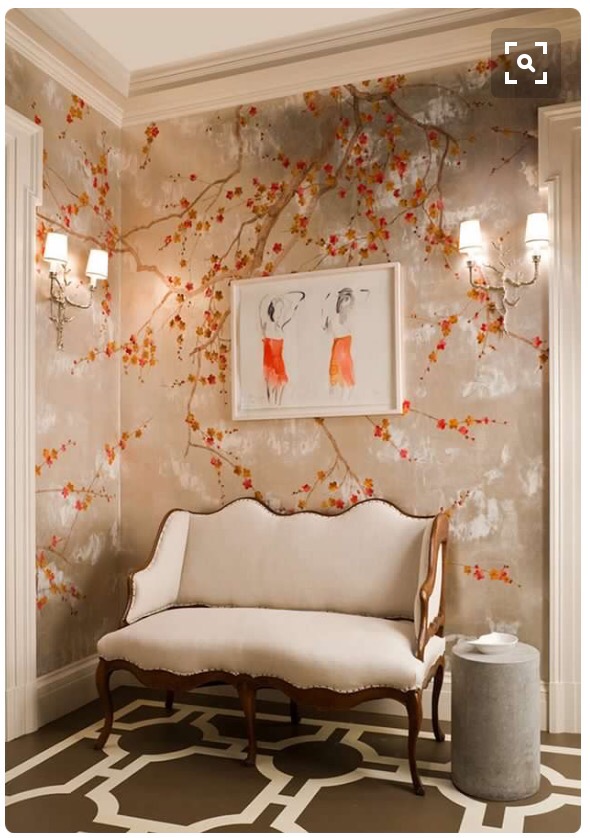
I’m often amazed how small changes can make a big difference, and this is one of those times! Our foyer is a good size, but it tends to be rather dark. On top of that, I have a bit of … Continue reading
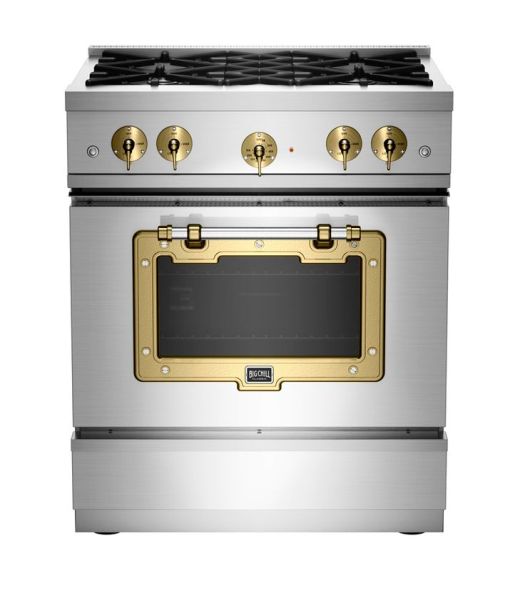
When I recently learned about Big Chill, I was inspired to design a kitchen around one of their stoves. I ended up falling head over heels for two of their stoves, so I just had to design two kitchens!
The first was a retro cottage kitchen designed around a charming blue stove.
The other stove that made me swoon was the Classic Stove in stainless and brushed brass. This is such a unique piece that sets my heart a-flutter with the mixed metallic finishes. Here’s how kitchen design #2 came together…

First, a close-up of this industrial kitchen’s superstar, the Classic Stove in stainless steel and brushed brass. Irresistible. And this is where I should state that I’m not getting paid to say any of this. I just love this stove.
Next up in the kitchen, I tied in the brushed brass finish with the faucet and the cabinet pulls. The faucet is the Delta Single Handle Pull-Down Kitchen Faucet.


While I love this stove’s strong industrial vibe, I chose to soften the look with some warm colors and natural materials.
The shaker cabinets from Ikea have a painted grey finish that pairs smartly with the brass pulls.

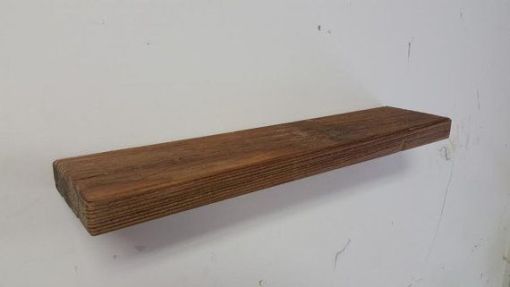
And above these sleek cabinets, I included floating shelves made from reclaimed wood. The organic material against the steel is a pairing that evokes industrial loft living.
These carrara marble subway tiles made an appearance in the retro cottage kitchen, too. I love how versatile they are.

The final accents in this kitchen bring in some warm color and pattern to liven up the space. Orange is a strong statement, but it works well with the warm colors in the brass, and these accent pieces will be easy to replace, if you ever want to change up the look.
This is Braemore’s Big and Bold Ikat that could be used for a valance, cushions, or tea towels.

And finally, Tabouret Tangerine Counter Stools. These stools come in a rainbow of colors, and I love this one.
So, another kitchen inspiration for you! Bon Appetit!
“Jewels”

I mostly blog for myself – as motivation to finish projects and to put something pretty out into the world. As the blog has grown, it has one of the best experiences to connect with other people all over the world who … Continue reading
Happy New Year!
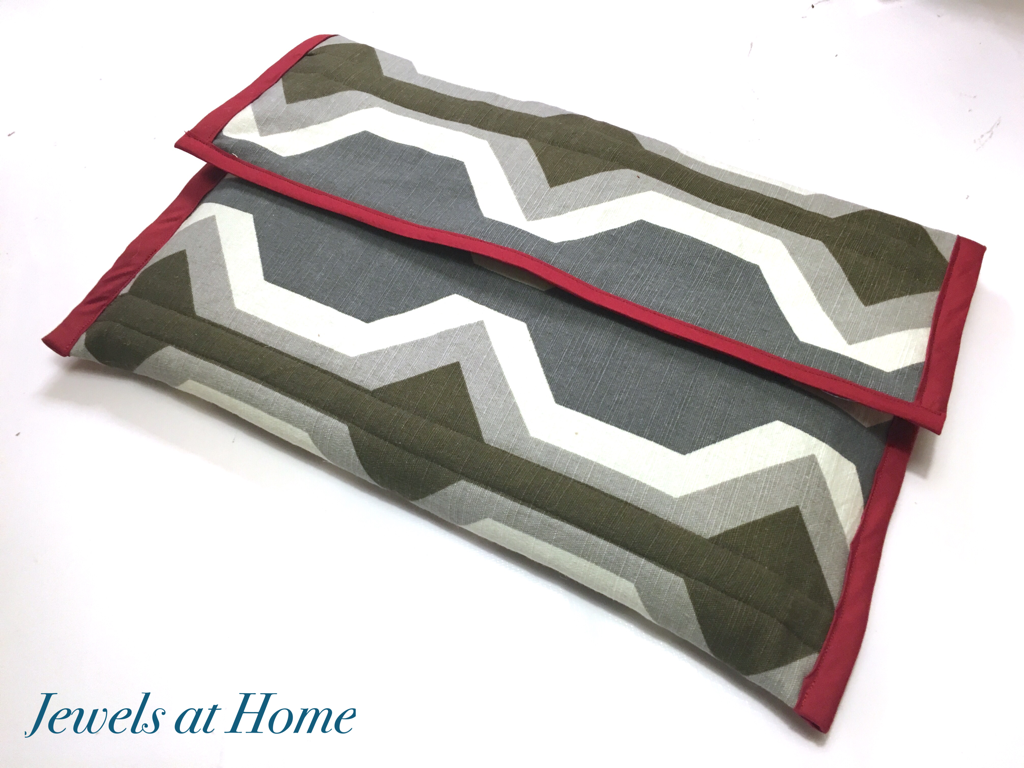
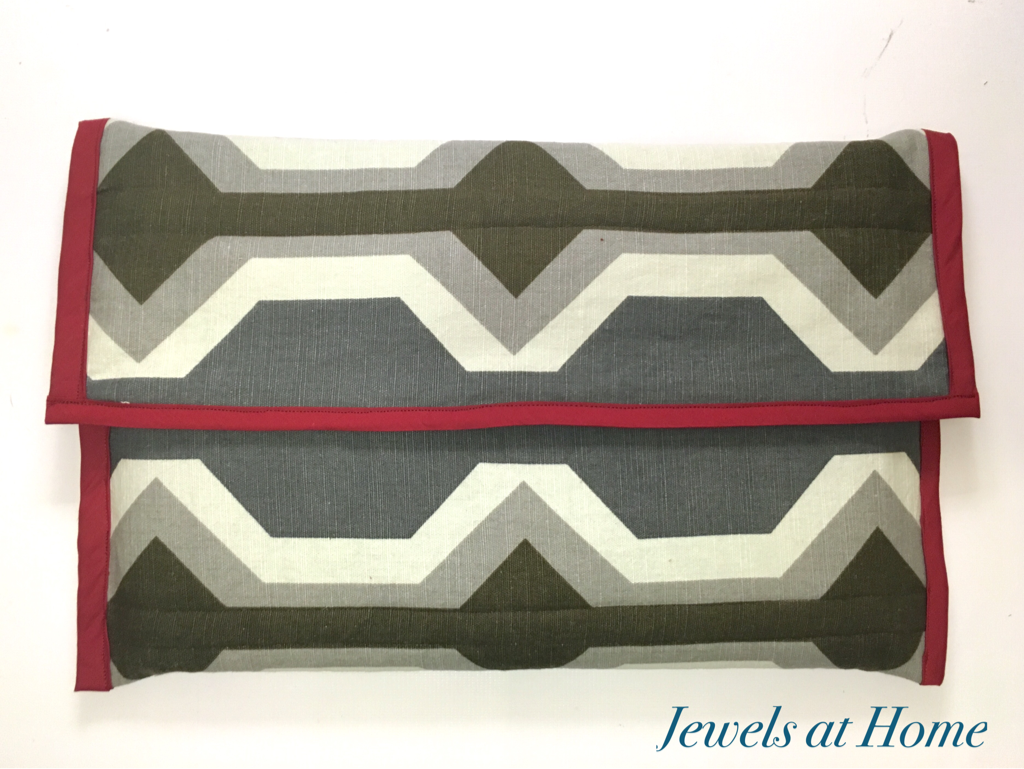
I am feel super-stoked about work this year. I have my long-time work “family,” and we have added some strong new staff as well. We are moving to new offices, and I am part of building a new clinic, which is a bit daunting but mostly exciting. To help kick off the new year at work, I decided to make myself a cute laptop sleeve.
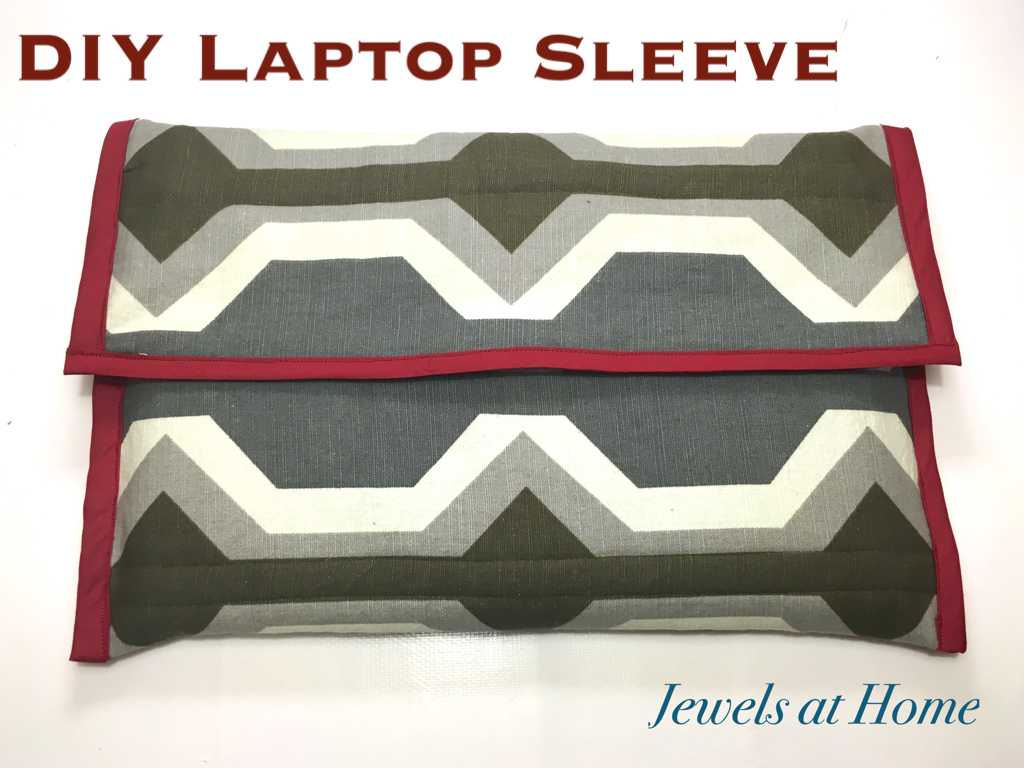
I was inspired by this pattern from Mandi at A Beautiful Mess. I made a few adaptations, like a velcro closure, a sewn-in name tag, and a rectangular flap.
To make your laptop sleeve, you’ll need
Start by cutting rectangles out of all three materials. For the width, the fabric should be 1 3/4 inches wider than your laptop on either side. For the length, wrap the fabric around your laptop and add about 6 inches for the flap. I’m lucky the print on my fabric worked out perfectly to line up… I mean I carefully planned and lined up the pattern on my fabric!
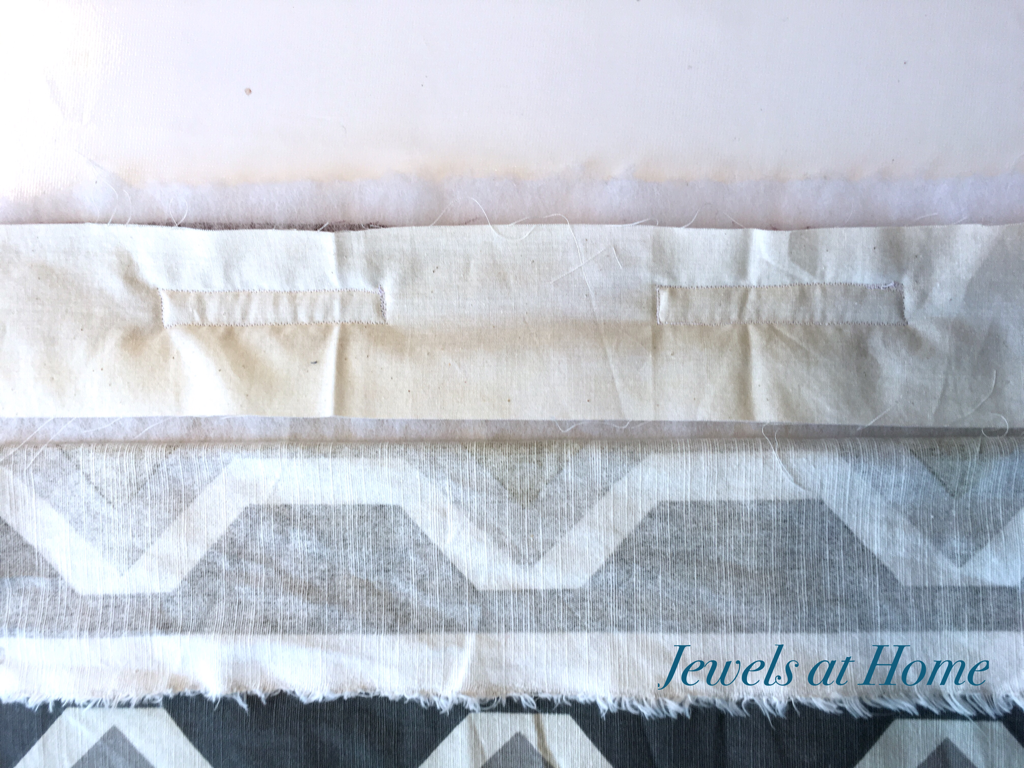
I made a label out of scrap muslin and put my name and contact information on it, in case I should ever be so unfortunate as to lose my laptop by fortunate enough to have someone host find it… I sewed this onto the lining fabric, as show below.

Next, I laid all three layers together and pinned them to keep them in place. I sewed quilting lines through all three fabrics for most of the sleeve, but I did want to sew across my name tag, so for the top section, I used some scrap fabric for backing and just sewed the outside fabric and batting to the scrap fabric, also shown below (folded over).

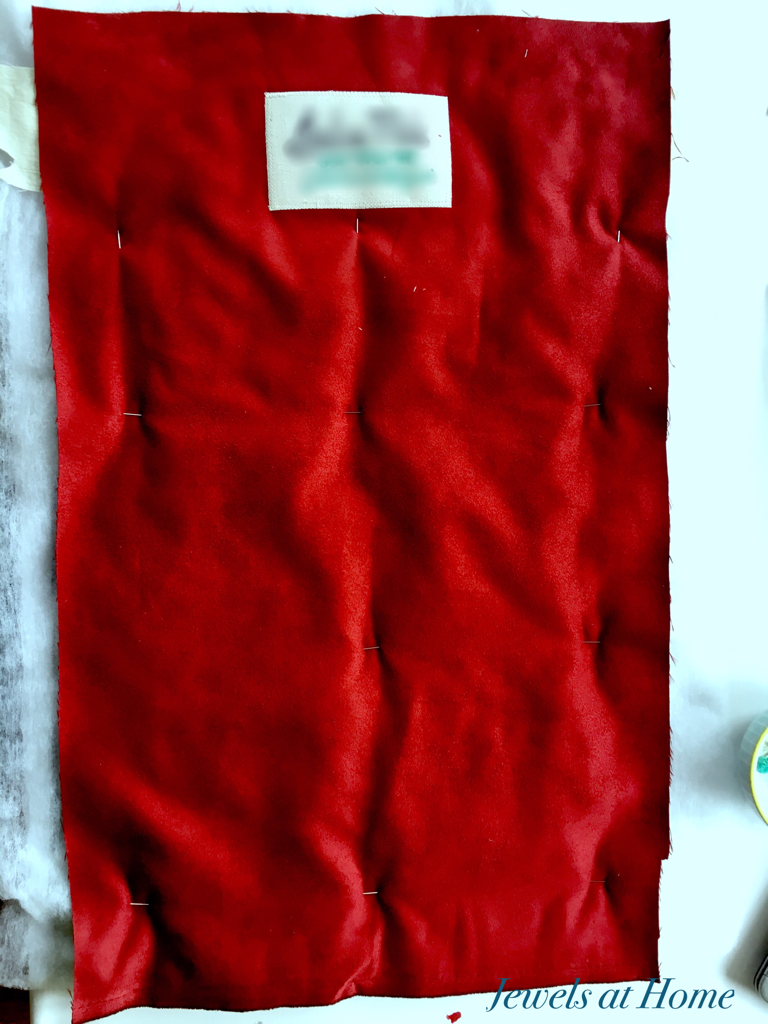
Next, I added the velcro. For the velcro on the body of the bag, I sewed all the way through, since the velcro is on the outside fabric, and I didn’t mind having stitching on the inside. However, for the velcro on the inside of the flap, I didn’t want the stitching to show on the outside, so I used more scrap fabric for backing, and I sewed the velcro to the inside fabric, batting, and scrap fabric, as shown below.
You can see the sleeve taking shape now! I finished one short end of the rectangle with bias binding (shown bel0w) and folded the entire piece to make the sleeve and trimmed some excess from the sides for a snug fit. I pinned the fabric in place to form the shape of the sleeve.

I sewed the sides together with a zig zag stitch and then added bias binding to the sides of the sleeve and top of the flap.
This was a pretty quick and easy project, and I love how it turned out. I think Steve is eyeing the laptop sleeve, and I offered to make one for him, but he does work from home most days and so he has turned me down so far…
Here are some pictures of the finished product!
Looking forward to many adventures both at work and “at home” in 2016!
“Jewels”
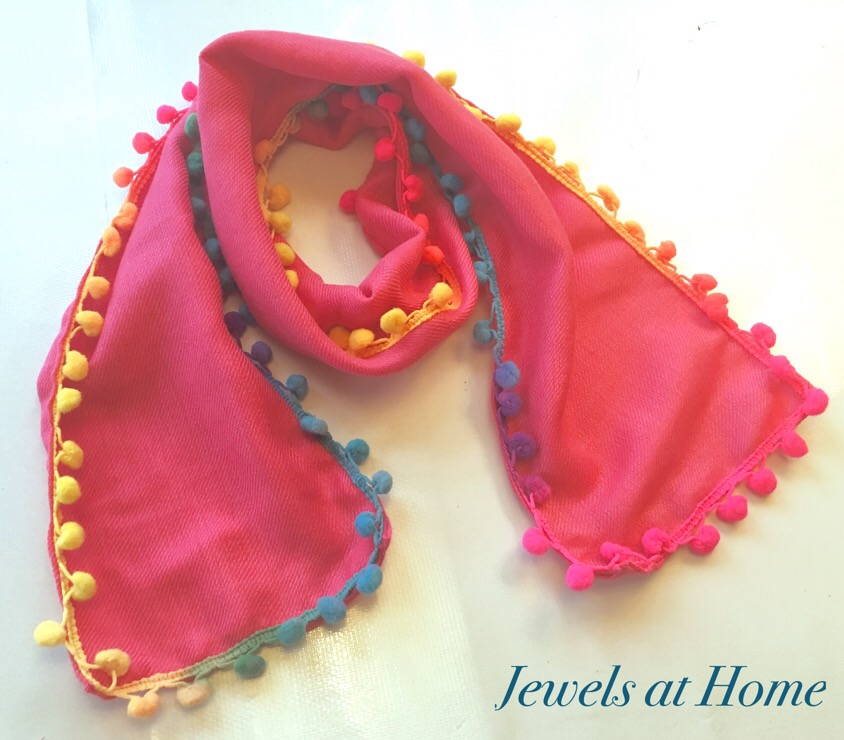
Sometimes I get into little craft obsessions. For a while, I couldn’t stop sewing appliqués on things, and then there was felting… Ever since I made the pom-pom wreath for our retro mid-century Christmas, I’ve been obsessed with pom-poms. It feels like there isn’t anything that wouldn’t be improved by some pom-poms!
At K’s soccer game, I saw one of our friends had a cute scarf with pom-pom trim, and I thought it would be fun to make my own! Of course, it would not be a true obsession if I made just one… The first set of scarves I made were for my nieces for Christmas. These are pink wooly scarves with rainbow pom-pom trim. So cute! I have enough trim left over to make myself an infinity scarf after Christmas, if I’m feeling bold enough for these colors.
Living in California, I don’t need a lot of warm scarves, but the girls live on the East Coast, so I wanted to find them something cozy. After looking at a lot of different fabrics, I decided to buy these inexpensive solid-colored scarves to use as a base for this project.
The scarves are much bigger than I needed, and they’re also very thin, so I cut off the fringe and doubled the thickness. For the girls, the finished size is 6.5″x49″. Adding the fringe was pretty quick. I recommend using the zipper foot for your sewing machine. 
Off to add pom poms to something else!
“Jewels”
‘Twas the night before Christmas… And here’s the last post for our retro pastel Christmas!
I started our modern white Christmas village last year, and it’s easy to adapt to a new theme.


A few years ago, I made felt Christmas trees and yarn and feather boa trees, so it was easy to add a few in pastel shades. 
Wishing you a happy Christnas season,
“Jewels”
Now that our boys are getting bigger, I finally feel like I can reclaim a few spaces in the house that are grown-up zones. One of these spaces is our living-dining room. Now that the toys are out of there, I am getting inspired to do more decorating.
One design feature I’ve been swooning over are fantastic wallpaper murals, epitomized by De Gournay. Let’s take a moment to swoon together…
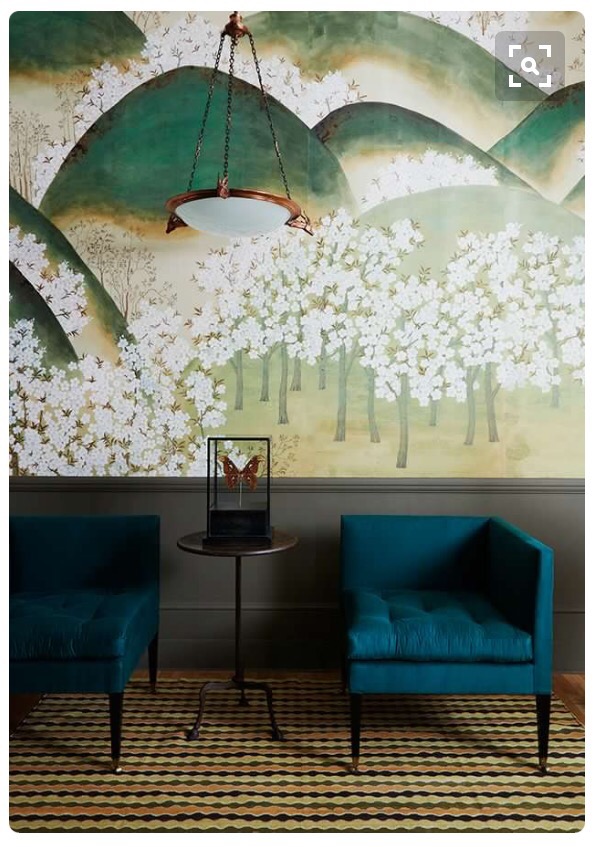
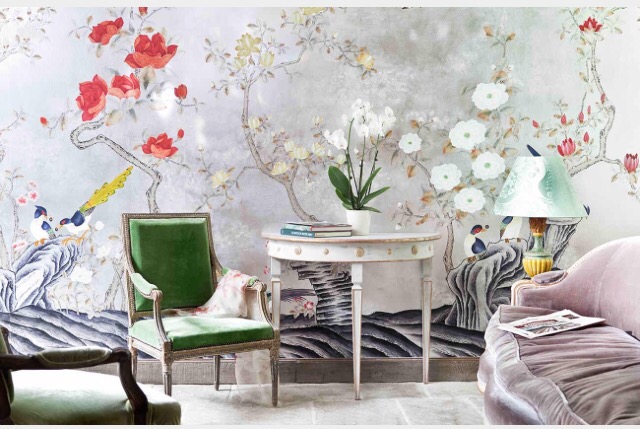
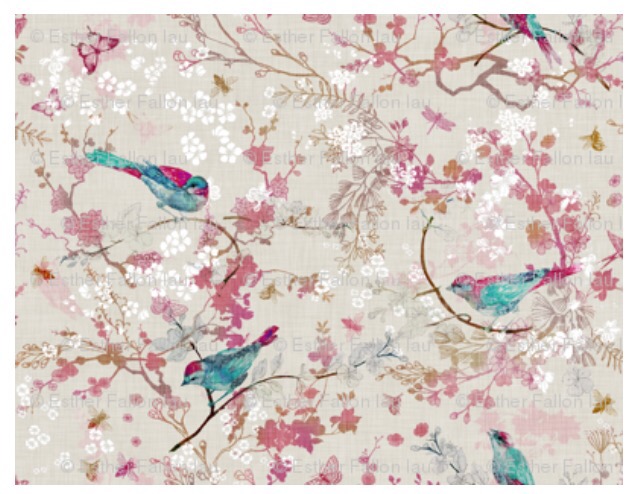
I’m not ready to commit to a mural, but I’m thinking of incorporating something like this into a standing screen/ room divider. I’ve been researching fabric options, and here’s what I’ve focused in on. Let me know your favorite!
I found several gorgeous options by Nouveau Bohemian on Spoonflower, and I’m especially drawn to the Birds and Bees pattern in aqua or rose: 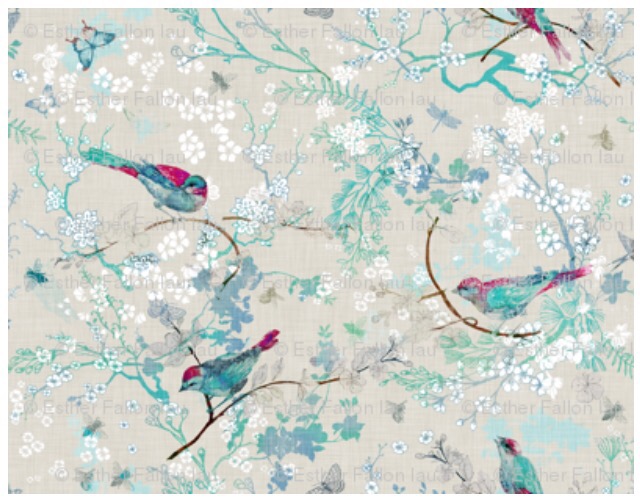
The closest fabric I found to the mural wallpapers is the series Jenny Peony, Jenny Cherry Blossom, and Jenny Kumquat by Domesticate on Spoonflower. 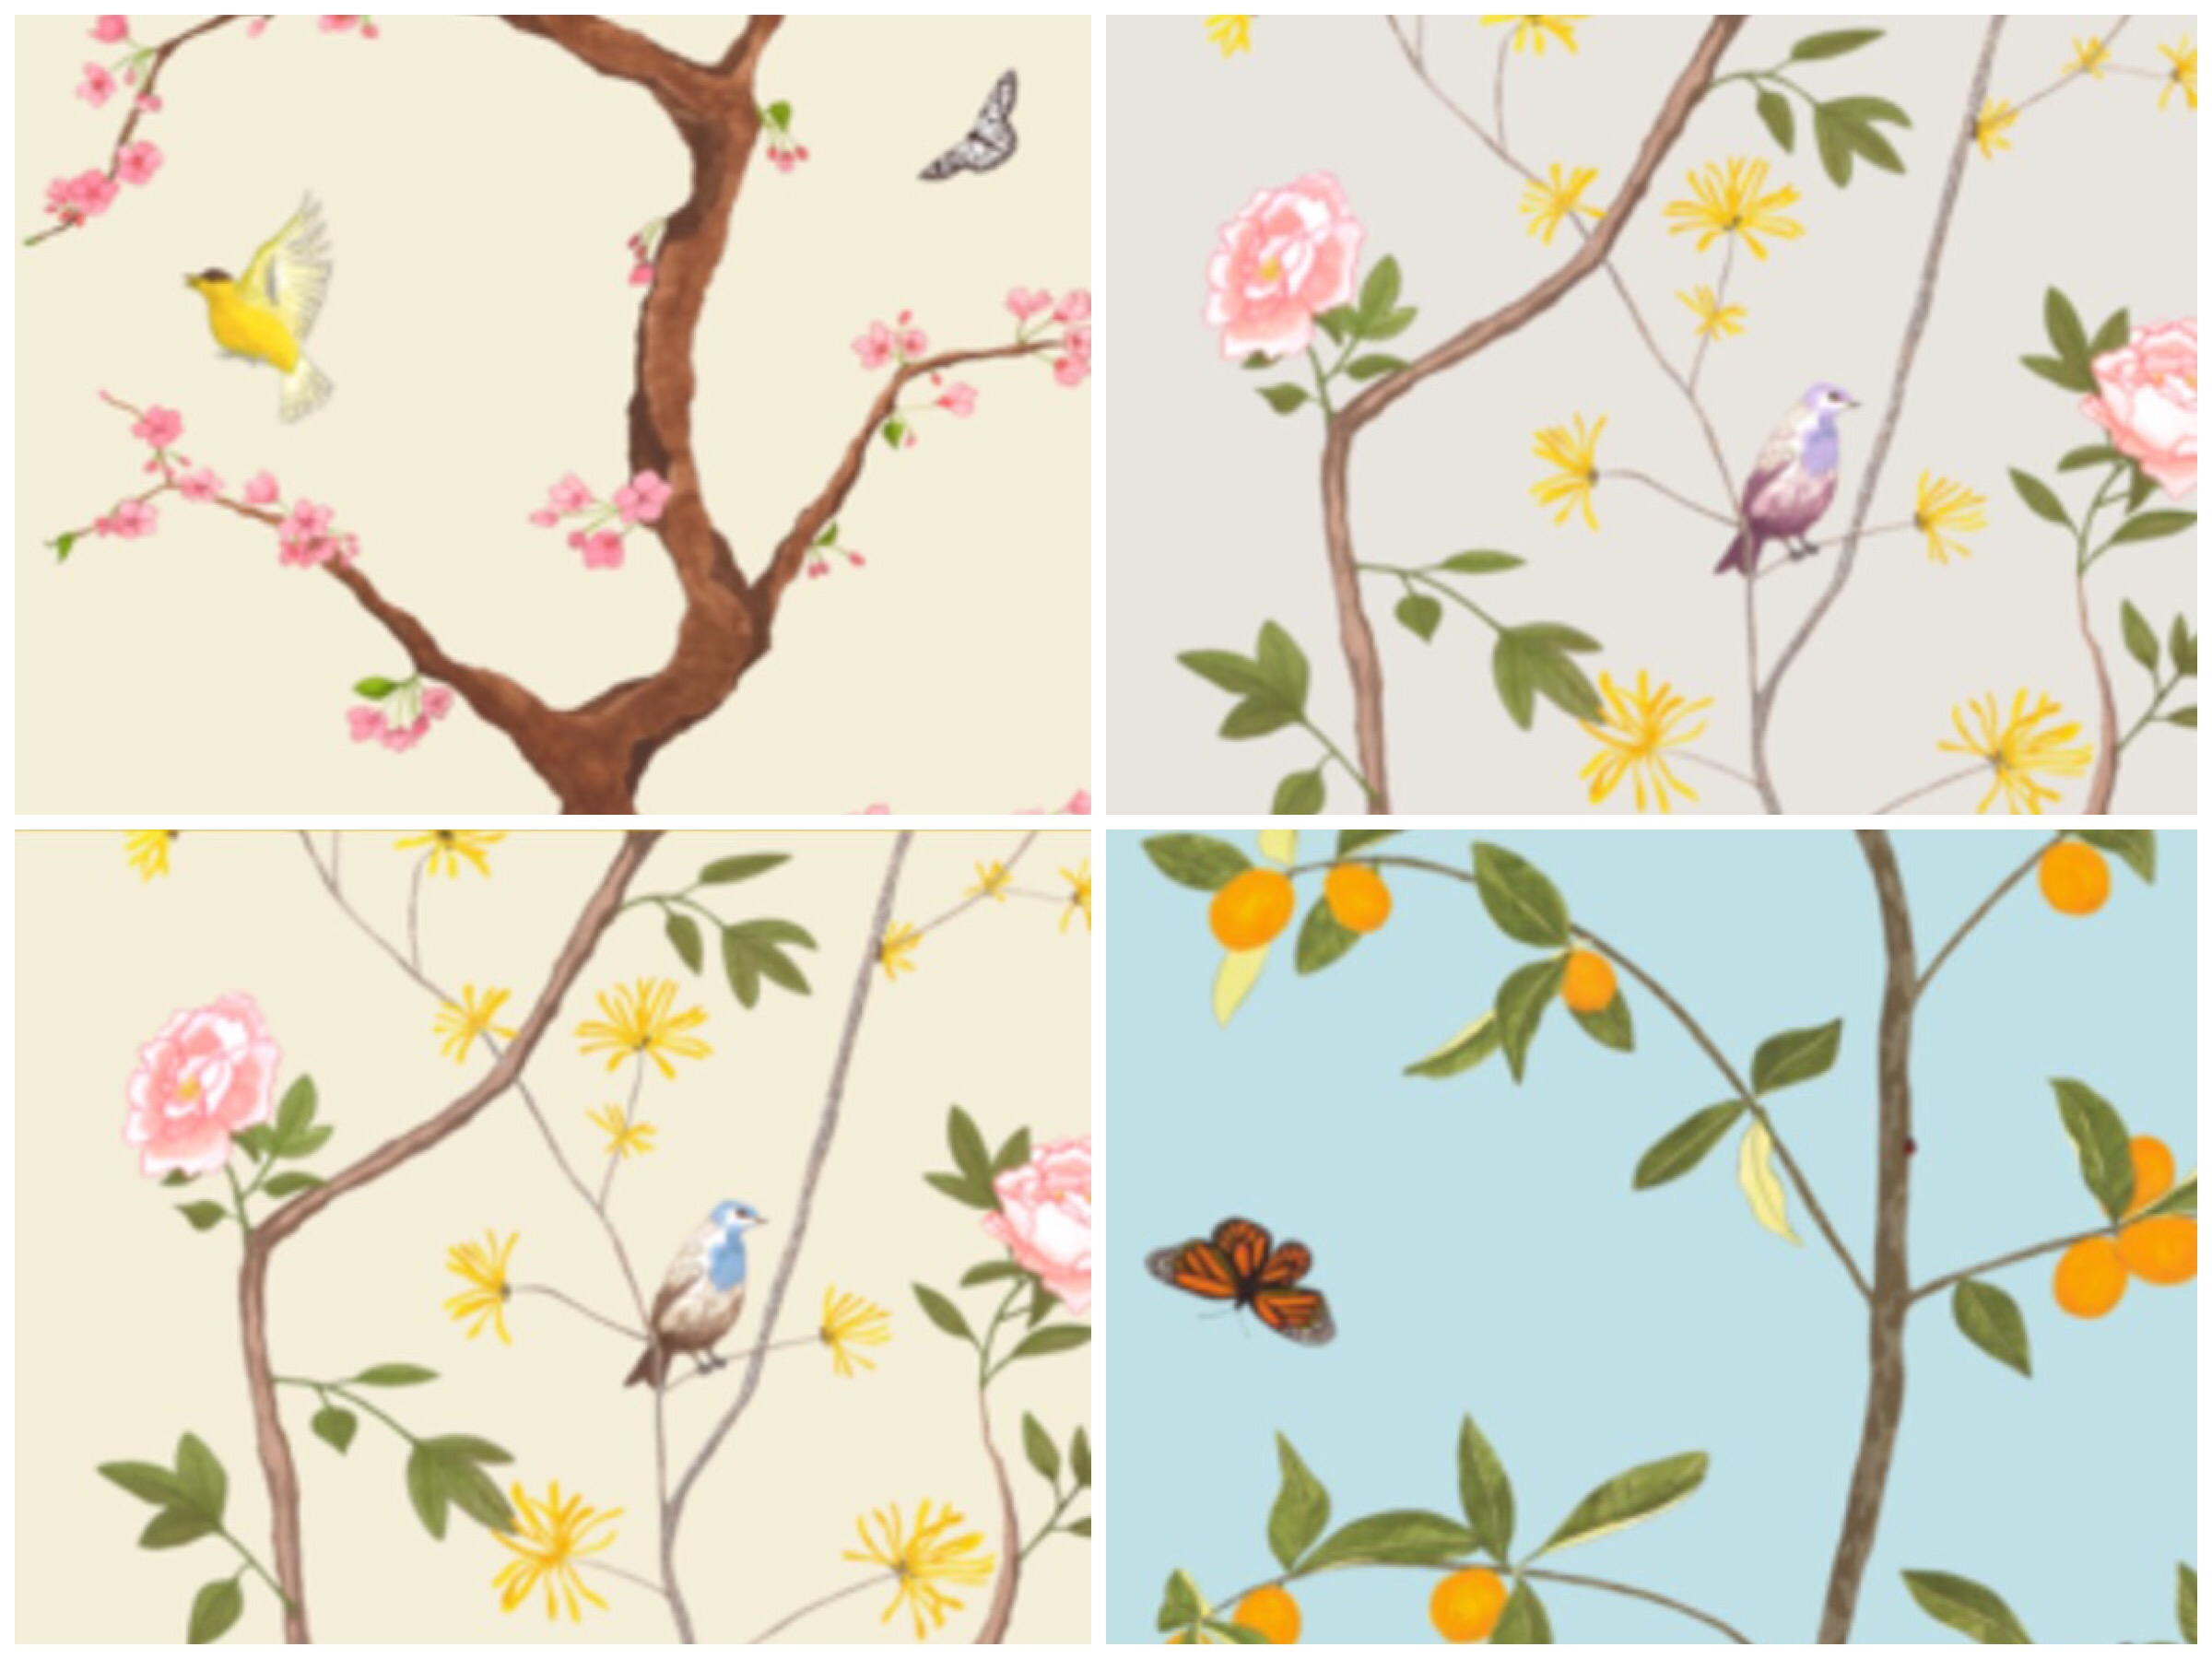
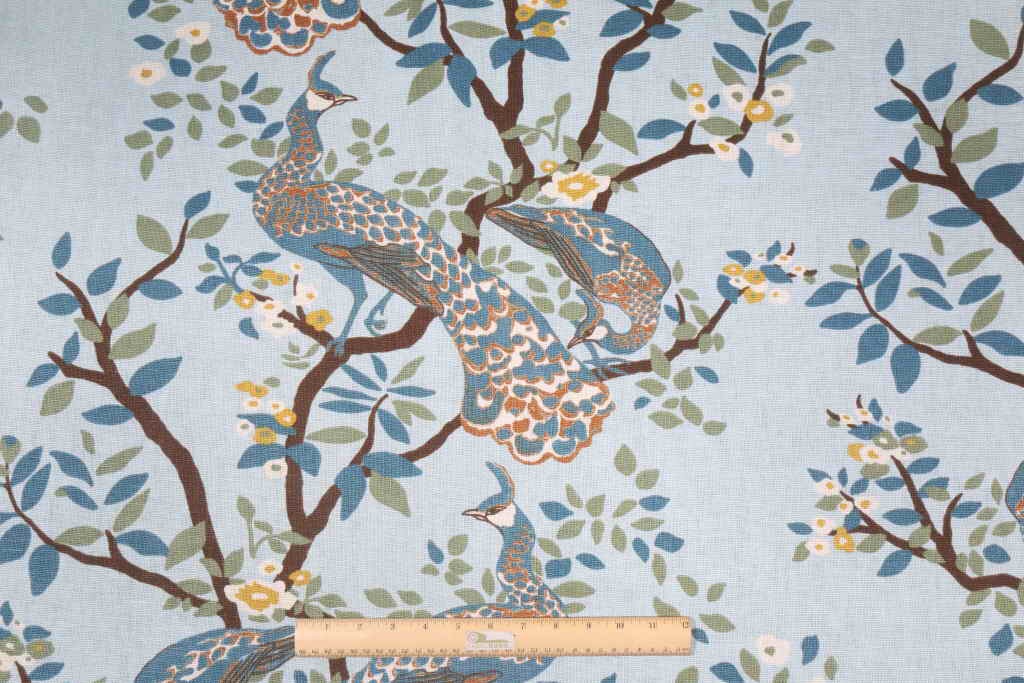
Another print that I love is Robert Allen Vintage Plumes for Dwell Studio.
This pattern is available in yardage in jade:
Or as bedding in dove from Dwell Studio:

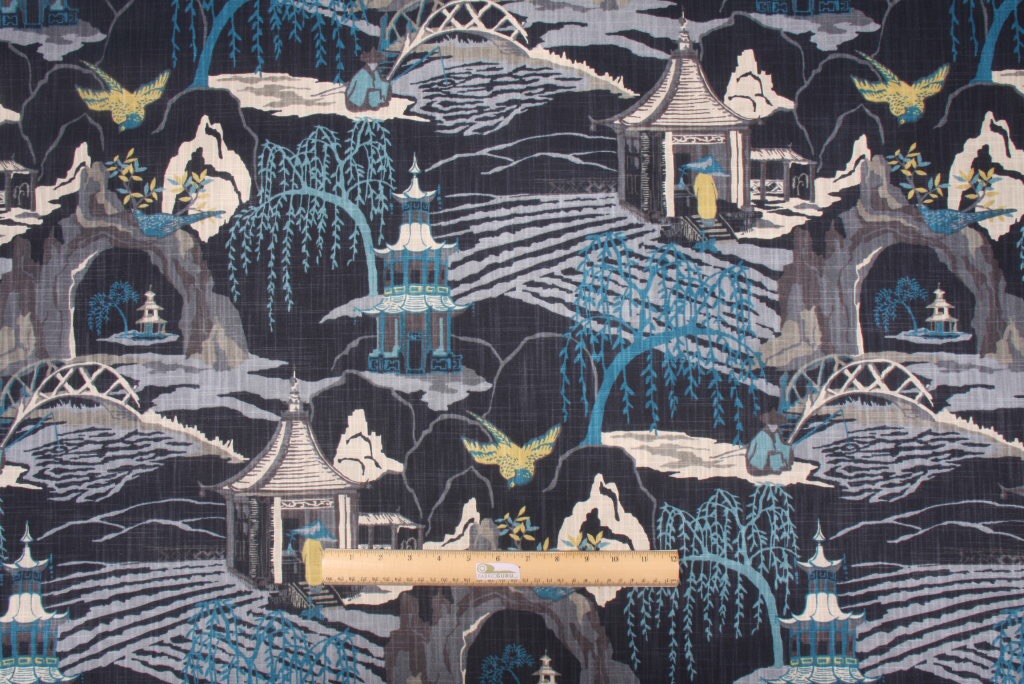
Or how about Robert Allen Neo Toile? I made need to make five screens! I found this and the Vintage Plumes on fabricguru.com, one of my favorite sources for decorating fabric, because it’s easy to search and has great choices. 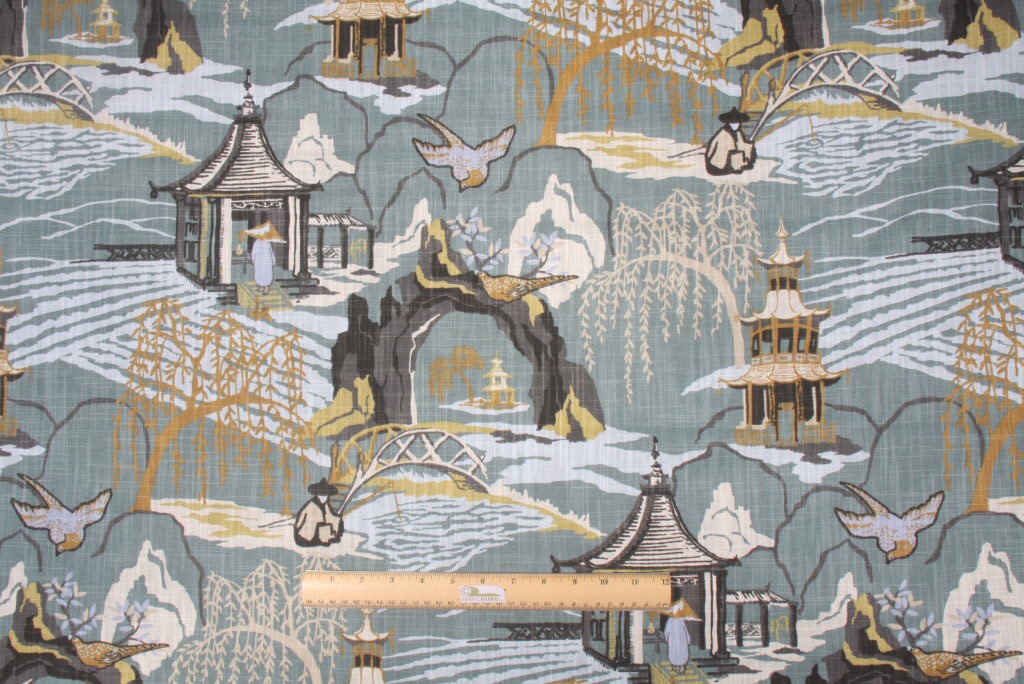
One more idea I have is to adapt some of my mom’s old paintings and print them on Spoonflower! That would be so special, if I can get the technology worked out.
“Jewels”
As you know, this Christmas, I’m decorating with a retro mid-century theme. Our tree is trimmed with globe ornaments in red, turquoise, and pink, including these scrapbook paper and washi tape globe ornaments.
I was looking for the perfect tree topper and saw this fabulous atomic topper from Over the Top Finials on Etsy. They have lots of fun products!!

Since I had all the supplies in the house already, I thought I’d try a DIY version, and I’m pretty excited with how it turned out!
Here’s what I rounded up to make the tree topper:
Here’s how to put it together
Ta-da!


And here’s how the tree has come together, including the retro Christmas Ornament tree skirt!

I think our Christmas tree looks far-out and groovy with its new topper!
“Jewels”
