Stenciled Linen Table Runner

Remember when I painted our Gold Feather Table Runner? It was one of a pair of linen table runners that I am making for our Thanksgiving dinner this year. I am so excited to host my coworkers and their families!

The design was inspired by a design by Jesse Breytenbach. She makes gorgeous stamped fabrics, and this flower (thistle? artichoke??) really captured the natural and elegant look I wanted for our Thanksgiving table. I used sharpie to draw the the design which satisfied my grown-up coloring needs.

img_6146

Here’s a close-up of the finished flowers.

And here’s the runner with a preview of our Thanksgiving table!

I like the simple colors that evoke the season while still blending into the rest of our home.

Wishing you a happy holiday with your friends and family!

“Jewels”

Recipe for a Stylish Boy’s Room

We have two rooms for the three boys: one big shared room and a small bedroom that was J’s nursery and is now our tween’s.

The big room has been slow to come together. Little boys interests change so often, not to mention that they are tornadoes that leave a mess in their wake.

I’m now ready to make a push to polish their space. As I discussed in this post on my steps for designing a room, and inspired by the Design Cookbook, here’s my recipe for the little boys’ room.

  1. Main color palette of navy and light neutrals
  2. Natural materials like wood, metal, and leather
  3. Whimsical accents like bunting in red and other fun colors
  4. Eclectic gallery wall with elements like a paper mache bust, kids art, and quotes
  5. Hideout area
  6. An unexpected sophisticated touch such as wallpaper or a luxurious fabric

I developed this recipe by collecting my favorite images on a Pinterest board.

Here are some of my favorite inspiration rooms:

Photo by Julia Lynn design by Jenny Keenan

From Design Sponge

From New York Cottages and Gardens

And here’s a list of projects I’ve already done for our boys’ room:

I’m looking forward to showing you the latest updates soon!

“Jewels”

Metallic Geometric Garlands

For our Mod Metallic Christmas, I wanted to make garlands for the tree and beyond. I love how these turned out, and I love that they are neutral enough to use for any occasion!


To make the garlands, I used beautiful metallic contact papers and simple twine to create a variety of garlands. You can find twine and white contact paper at a lot of local hardware stores, and here are the links buy the metallic contact paper:

I made three different garlands – squares, triangles, and circles – by cutting out shapes from the contact paper and sticking two sides together with twine sandwiched in between.

For the circle garland, you could also buy pre-cut circle stickers which would make the project even faster!

Here are the finished garlands, ready for when we put up our Christmas tree and for many celebrations to come!

Cheers,

“Jewels”


Recipe for a Mod Metallic Christmas 

You know decorating for Christmas is a serious thing in our house, and to keep my sanity, I usually try to start planning early. This fall, though, every spare moment outside of work and basic survival has been consumed with stuff for the boys’ school and birthdays! Now, I’m starting to feel a bit of breathing room – or I’m forcing myself to maintain some sanity.

I honestly had so much fun with last year’s retro Christmas that I thought about recreating it. I’ve decided, however, to try a new variation I’m going to call a “Mod Metallic Christmas.”

Here is an inspiration photo (source):

Three years ago, I did simple white and grey Christmas theme, and I’m excited to add some glitter and glam this time around!

Taking inspiration from The Design Cookbook, I created a “recipe” to help me focus my vision for this project and keep it on track:

  • Color scheme: white, grey, black, gold, silver
  • Natural elements like branches
  • Glam/ mod touches, such as clean lines, geometric shapes, and faux fur

Some projects I’d like to work on include:

Metallic garland (source):

diy-gold-triangle-garland

Tin can luminaries (source):

Dip-painted wooden ornaments (source):

Painted pine cones (source):

Felt garland (source):

And here are some more inspiration photos (source):

img_5929

What do you have in mind for holiday decorating?

Cheers,

“Jewels”


Bridal Shower Photo Booth

I mentioned that Nicola recently hosted a bridal shower for one of our friends from work, and I helped out with some decorations. Over the past few years, I have gathered the elements for a DIY photo booth, including props, a tripod, and a Canon SELPHY Photo Printer.

In the past, I’ve adapted the backdrops and props for Christmas, a retirement party, and a Star Wars birthday party. This latest theme would be great for a wedding as well as a bridal shower. Want to do this yourself, here’s what you will need:

  1. Backdrop. I hung a graphic striped shower curtain and then added these giant paper flowers.

2. Seating. I used a piano bench

3. Display. It is so fun to display and enjoy the photos during the party, before everyone takes theirs home. I hung some pom-pom trim on the fence and added some paper rosettes and clothespins covered in scrapbook paper to make a pretty gallery.

Here we are, smiling at the end of a beautiful afternoon with friends!

Say cheese!

“Jewels”

Hot Wheels Birthday Party

Vroom! Vroom! When JJ turned four, we celebrated by playing with Hot Wheels!

Decorations: To set the theme, I decorated our house with balloons and a Hot Wheels birthday banner. IMG_2889.PNG

Activities:

  • Car Wash: bubbles, bubbles, and more bubbles!
  • Race Course: the kids used sidewalk chalk to create their own race tracks

Food:

We managed some themed food, too:

  • Traffic light – strawberries, green grapes, and pineapple
  • For the cake, a giant chocolate bundt cake made a great tire!

IMG_2887-0.PNG
Party favors:


IMG_2888-0.PNG

Happy birthday, big boy!

“Jewels”

Stitch Fix #3 Review

So, I feel like I have come to peace with Stitch Fix and am a happy customer. I started out thinking that I would have to love all five pieces to make it a success. After a few fixes, I realized it’s actually all I need (and less expensive) to get a couple of new items that I love and more importantly, that I would not have found on my own. On top of that, I get a major thrill knowing a box is on its way and opening it for that moment of surprise. There is something about the unexpected that really feels like getting a gift (though, yes, I know I am paying for it!)


Box number three arrived this week, and here’s what was inside:

  1. 41 Hawthorn Sugar Dot Print Dress. When I opened the box, I thought this would be the piece I liked the most. The fabric has a cute dot print and a nice drape. I like the feminine styling. However, when I put it on, the bottom is quite full, and it made my hips look extra-wide, which is not what I am going for! Unfortunately, this was a return.

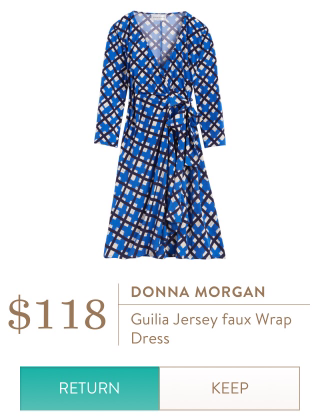
2. Donna Morgan Guilia Jersey Faux Wrap Dress. These two dresses definitely prove that you have to try clothes on to really tell what will work. I did not love this dress at first sight. The print was too much of a statement for me, and I thought I wanted something more refined-looking. However, when I put it on, it fit so perfectly, and the style and print are super-slimming. My stylist Erin suggested wearing this with a short trench coat, so I tried it with both a beige blazer and a grey cardigan. Both did a nice job of toning down the print a bit. I had to sleep on this decision, but in the end, I am excited to keep this dress. One of the main reasons I signed up for Stitch Fix was to get introduced to new styles that I would not pick out myself, and I think this dress definitely achieves this.

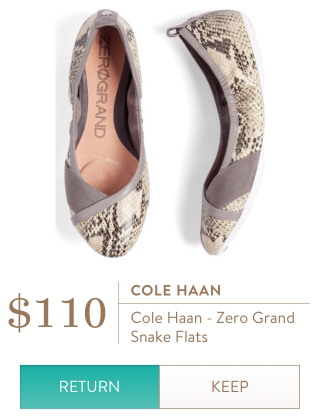
3. Cole Haan Zero Grand Snake Flats. These are actually nice shoes. Cole Haan has good quality shoes, and these are very comfortable, with a bit of a sporty sole. I like these, but I didn’t keep them, because I have a gazillion ballet flats already, and these were a bit expensive for something that is very similar to other shoes I own.

4. Margaret M. Emer Straight Leg Pant. This was the big miss in Fix #3. I has asked for a pair of interesting dress pants for work, and these really did not meet my expectations. They are very stretchy, basically like leggings, and I don’t consider them to be dressy or flattering at all. I don’t think you can call yourself work pants if you are so stretchy that you don’t need a fly to put them on. Bummer.

5. Collective Concepts Ryleigh Pintuck Detailed Silk Blouse.This blouse was the sleeper hit of the fix. Kind of like the jeans from fix #2, which I thought were kind of boring when I first saw them and have become my absolute favorite jeans. This top looked pretty plain, but when I put it on, it fit perfectly and the little details around the collar and shoulders are so pretty. The cap sleeves look great, and I can see myself wearing this a lot!


So, I kept two out of five items this time, which is the same as last time. I did like the shoes as well and would have kept them if I didn’t own so many ballet flats already. So, it is really the dotted dress and the pants that didn’t work. I think my overall impression was  initially negatively colored by the fact that I was so disappointed by the pants, since that was the only item I actually requested. However, having fallen in love with the top and the wrap dress – which is something I would never have guessed I would like, I do think that I am getting what I want out of this service, which is discovering new styles that I wouldn’t find myself, not to mention the excitement of opening a surprise picked just for me!

I’m planning on ordering from Stitch Fix again, though I haven’t put it on the calendar yet. I’ll be sure to update you when it comes! In the meantime, if you want to try them out, I’d appreciate if you use my referral link.

Thanks and enjoy!

“Jewels”


In the Clear… Acrylic Furniture Picks

Beautiful clear furniture in acrylic, lucite, or glass, has always caught my eye. It is distinctly modern but neutral enough to fit in – and add a touch of glamorous sparkle – to any room. When one of my favorite home decor sites, One Kings Lane, announced a sale on beautiful acrylic furniture, I thought it would be a good time to scout out some favorite items.

Here are my picks from this sale:

Jones Bar Cart. Ohhh I want a bar cart so badly. I love the touch of gold on this one. Sadly, I’m afraid my boys would use this as a go-cart, but perhaps you’d have more luck?


Havenhurst Coffee Table. Again, I think the touch of gold makes this modern table feel more transitional. The corners remind me of the campaign style. This clear table would feel so light and airy in a living room or family room.

Whitley Tufted Bench. This bench feels less like going out on a limb than some of the other pieces. I think it is because the top surface, which catches more of your eye, is a traditional upholstered surface. The clear legs add just the right amount of sparkle and glamour. Statement pieces are great, and so are subtle touches like this one.

Havenhurst Etagere. More clean lines and metallic touches. I guess I know what I like this mix of campaign touches on a modern acrylic etagere really set my heart aflutter!

Brigitte Floor Lamp. Here’s another piece, like the bench, where the top looks more traditional, and the acrylic legs turn the lamp into something distinctive and glamorous.

Wow, I would put any of these in my house. How about you?

“Jewels”

Giant Paper Flowers!!!

Oh, I honestly love any project that involves paper!

For a friend’s bridal shower, I offered to set up a photo booth and make some other decorations, which was the perfect excuse to try making these giant paper flowers.

Materials:

  • 12×12 Cardstock – I used 3-4 sheets for the outer petals and one more sheet for the inner petals on each flower; you can cut two leaves from a sheet of green cardstock
  • Muffin cups for the centers
  • Cardboard for the backing
  • Tacky glue or hot glue

Instructions:

  • I started with this template and tutorial for giant paper roses
  • Because my cardstock was 12×12, I used the template to cut one each of sizes 1, 2, and 3 out of each sheet of cardstock. I made a smaller size 4 and used that to cut out the inner color
  • I varied the tips of the petals to get some variety (the pink-red and purple flowers follow the template; the blue has pointed petals, and the yellow and pink-yellow flowers have heart-shaped petals)


Here are some close-ups of the flowers:

They look really impressive grouped together:

And while I was taking pictures, it was so cute that Finn came over to smell the flowers!

Here’s how the flowers looked in our photo booth. The backdrop is a striped shower curtain.

Any ideas of where to put the flowers until our next event?

“Jewels”


DIY Paper Rosettes

I was putting together a photo booth background for my old boss’ retirement party, and I wanted to try to make these pretty paper rosettes I had seen. It turns out they are very easy, and I love them in these retro-inspired prints. I’m now making more for an upcoming bridal shower photo booth. Fun! Fun! Fun! Paper just makes me so happy.

img_3237

Materials:

  • Two sheets of matching scrapbook paper for each rosette
  • Tape
  • String

Directions:

I think the pictures are pretty easy to follow, but here’s how I figured out how to make the rosettes.

  • Stack the two pieces of paper together and fold in half, printed side facing in
  • Fold into quarters by folding the to edges down
  • Using the fold lines as a guide, pleat the paper into 12 one-inch sections. Separate the two sheets of paper
  • Tie them together in the middle
  • Spread out the pleats and tape the sheets of paper together from the back
  • Voila!

img_3235

Next project is some oversized paper flowers to add to our photo backdrop for next weekend!

“Jewels”