Personalized Globe Christmas Ornaments 2015

Every year, I create personalized ornaments for our family and friends. Usually, I keep it simple with some store-bought ornaments that I personalize with markets or fabric paint. Tip: the felt ornaments are great for mailing!

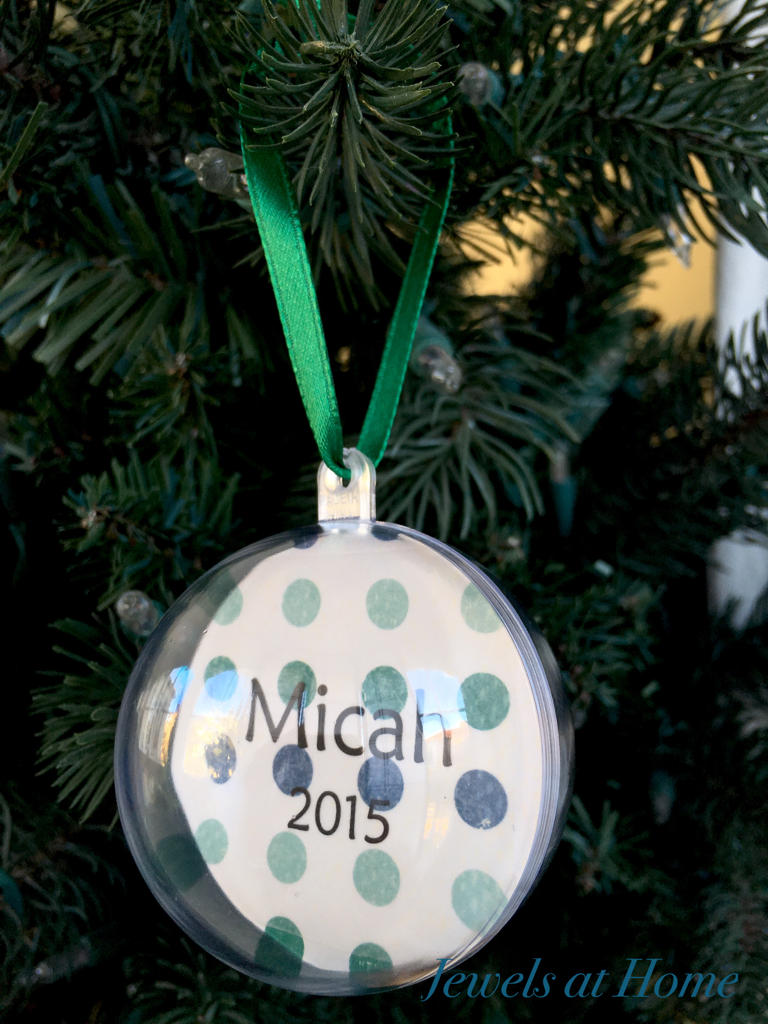
This year, I wanted to make globe ornaments that would fit with our retro mid-century theme and colors of red, pink, and turquoise.

Personalized Globe Christmas Ornaments | Jewels at Home
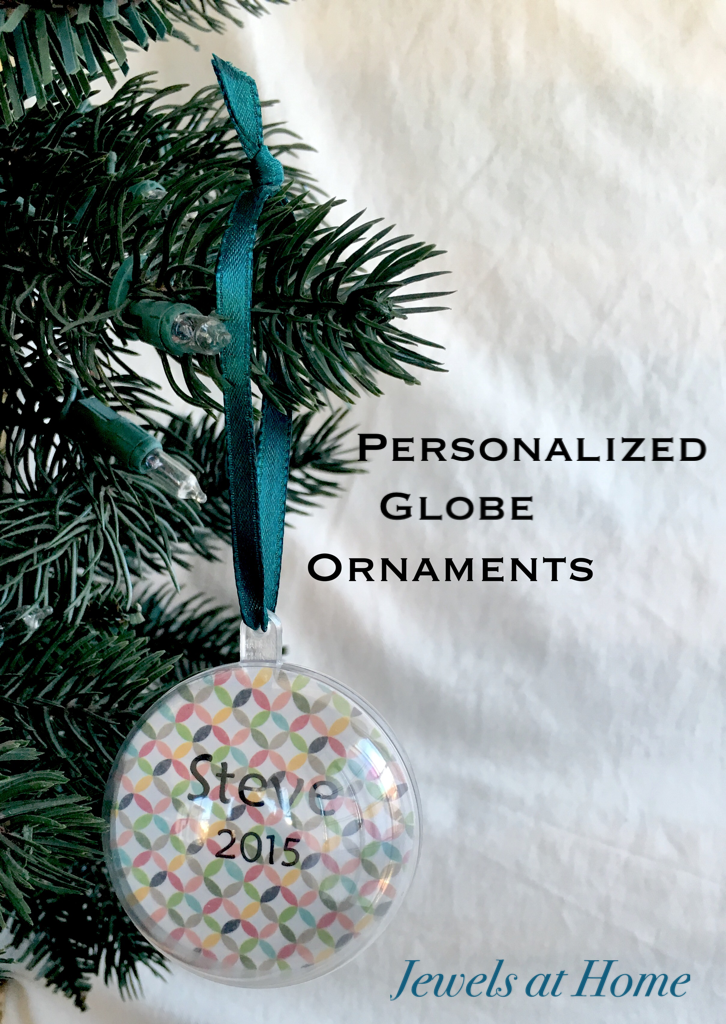
To make these ornaments, I used

The process is very simple:

  • I started by printing labels with the kids’ names and the year on them. I was able to fit two names on each label and then cut the labels into 2″x 2″ squares.
  • I then cut out and stuck each label onto scrapbook paper and punched out a circle around it. I punched a second blank circle in matching paper and glued them two pieces together.
  • These circles fit perfectly into the ornaments!
  • Add a ribbon for hanging and you’re done!

Personalized Globe Christmas Ornaments | Jewels at Home
Personalized Globe Christmas Ornaments | Jewels at Home  Personalized Globe Christmas Ornaments | Jewels at Home

Personalized Globe Christmas Ornaments | Jewels at Home
Personalized Globe Christmas Ornaments | Jewels at Home 
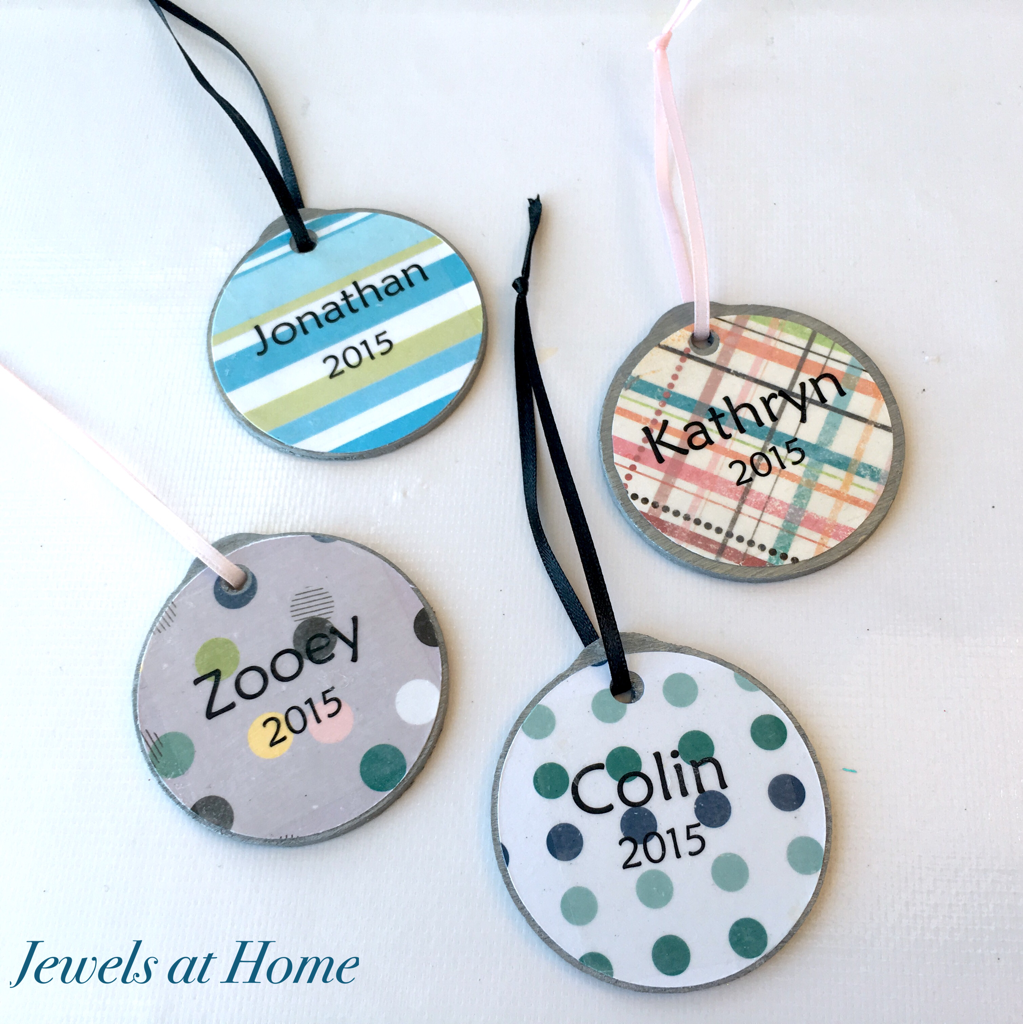
Since these ornaments would have been hard to mail, I also made some similar ones that are flat, for our friends who live out-of-town.

Scrapbook Paper Christmas Ornaments | Jewels at Home
“Jewels”

Retro Mid-Century Ornaments Christmas Tree Skirt

I know it is only November, but I am already getting excited about the upcoming Christmas season. The last few years, I’ve changed up our decorations to have a different theme each season. This year, I decided to go with a retro mid-century Christmas theme. You may remember that I am a big fan of the TV series Mad Men, and I really wanted to have a party to mark the series finale this spring, but life is way too busy, so I decided to have some Mid-Century fun for Christmas. One of my inspirations was this Christmas tree skirt that I saw advertised on mod cloth last year.
It’s sold out now, and it was also smaller than I wanted, so of course I decided to make my own. If you are feeling inspired, here’s how I did it.

You’ll need:

Instructions:

  • I sewed the skirt with the same 60″ diameter as our grey and white tree skirt
  • I then cut out and appliqued the ornaments the way I made appliqued onesies. For the print fabrics, I just did a simple silhouette. For the more solid fabrics, I cut out some shapes, taking inspiration from the Mod Cloth original
  • I sewed the ornaments and ribbons in place, and ta-da!

Retro Mid-Century Ornaments Christmas Tree Skirt | Jewels at Home
Retro Mid-Century Ornaments Christmas Tree Skirt | Jewels at Home  Retro Mid-Century Ornaments Christmas Tree Skirt | Jewels at Home

I’m waiting a few more weeks to set up our decorations, and I am so excited to see this pretty skirt under our tree!

Update: Here are some pictures of the skirt under our tree!

Retro Christmas Ornament Tree Skirt | Jewels at Home


Retro Christmas Ornament Tree Skirt | Jewels at Home
“Jewels”

Sew a Travel Jewelry Case

This travel roll for jewelry is a quick and easy project, proven by the fact I made it the night before we left for family vacation!
Sew a travel jewelry case | Jewels at Home My jewelry roll is perfect for packing necklaces and bracelets, which is what I usually wear.

To make your own, you’ll need

  • 10″x23″ quilted fabric
  • 14″x27″ coordinating fabric for the outside
  • 3/8″ wide grosgrain ribbon, about 42″ total
  • 1″ wide grosgrain ribbon, about 1 yard
  • Thread and sewing machine

I cut the narrow grosgrain into four-inch sections to make the loops.

Next, I lay the small quilted material on the wrong side of the outer material. I folded over a border on all sides, and tucked the loops under the hem, pinning them in place.

Tutorial for a jewelry travel case | Jewels at Home

I stitched down the border, which also secured the loops.

Tutorial for a jewelry travel case | Jewels at Home

To make the outside tie, I folded the wide grosgrain in half and sewed it to one end of the roll, on the outside.

Tutorial for a jewelry travel case | Jewels at Home

And that’s it!

Easy and pretty!

Tutorial for a jewelry travel case | Jewels at Home
Tutorial for a jewelry travel case | Jewels at Home  Tutorial for a jewelry travel case | Jewels at Home
Tutorial for a jewelry travel case | Jewels at Home  

Happy travels!

“Jewels”


Easy DIY Faux Marble Planters 

The climate in San Francisco is definitely unpredictable. We have our stunning sunny days, but we’re also known for the chilling fog that makes it hard to establish an outdoor garden. Luckily, our kitchen faces west, so we get some strong sun shining on this little ledge where I’m starting an herb garden.

I was looking for some easy ways to make containers for our plants, and these large yogurt containers are the perfect size and shape. Their looks, however, leave a little to be desired, so the grey marble contact paperI used on our fireplace came in handy again! I also found some grey granite contact paperthat worked well.

Easy DIY Faux Marble Planters  | Jewels at HomeMixed in with some other pots I have collected or painted, and with the way our three boys go through food, we’ll have our garden filled up in no time!

“Jewels”

DIY Wedding & Anniversary Art

It’s wedding season, which also means it is anniversary season!

A long-time friend of ours just tied the knot, and I wanted to make something special to help preserve the memories for the happy couple. It’s a perfect time to create something to celebrate Steve and my anniversary, too!

I used pictures from our friends’ wedding announcement to create this simple piece of paper art (I LOVE paper!!). DIY Wedding & Anniversary Art | Jewels at Home  DIY Wedding & Anniversary Art | Jewels at HomeThis year is the big 2-0 for me and Steve! Back in the olden days, when we got married, there were no fancy photo cards, but I combined some of my favorite pictures with more fun scrapbooking paper to create this piece of art for our room.DIY Wedding & Anniversary Art | Jewels at Home

DIY Wedding & Anniversary Art | Jewels at Home Another fun project I made using wedding invitations were these luggage tags. Nicola and her husband had stunning custom cards incorporating images of the Golden Gate Bridge and a San Francisco cable car. I repurposed some of them into these luggage tags, which are getting a lot of mileage!


You could apply this idea to other cards, too. One year, I took all the Christmas cards we received and created paper ornaments using the pictures to send back to our friends.

For now, I am looking forward to the next wedding invitation that comes to our mailbox, so I can create a memorable piece of art for someone special!

“Jewels”

Father’s Day Photo Book with the Kids

So, I’ve mentioned before that Steve’s birthday always falls close to Father’s Day. This means that I either get 1) totally overwhelmed and do almost nothing or 2) get seriously motivated and make a special project for him.

Here is an example of

1) almost nothing: simple cards – easy, but still fun!

2) special project: mugs and aprons decorated by the kids

This year, we are hosting out-of-town guests during Steve’s birthday and Father’s Day, so I want to make sure that his special days don’t get completely lost in the busy schedule.

I was browsing Pinterest – as always – for ideas, and I found pins for sweet Father’s Day photo books. Unfortunately, the ones I saw are no longer available, so I made my own.

I made photo books for Steve and the boys’ two grandfathers, with blank spaces for the boys to fill in. The questions I included were:

  • My dad is good at
  • One thing my dad taught me is
  • A fun thing I did with my dad is
  • A fun thing I want to do with my dad is
  • I drew this picture of my dad and me
  • Something I have in common with my dad is
  • I know my dad loves me because
  • I love my dad because

Here’s how our books turned out.

Father's Day Photo Book | Jewels at Home  

Father's Day Photo Books to complete with the kids | Jewels at Home    Father's Day Photo Books to complete with the kids | Jewels at Home  Father's Day Photo Books to complete with the kids | Jewels at Home  Father's Day Photo Books to complete with the kids | Jewels at Home  Father's Day Photo Books to complete with the kids | Jewels at Home


Can’t wait to fill them out with the kids and share them with the special dads in our family!

“Jewels”

Gifts Made by the Boys

The fact that I’m writing this when it is already Christmas morning in most parts of the world tells you what kind of crazy-busy December we had this year. I’m definitely looking forward to a few days of downtime with the family.

We don’t do a lot of shopping for Christmas. The adults in my family have generally agreed to not exchange gifts, and our kids get so much from their grandparents and aunts and uncles, that at most, we pick up one or two little things for them. However, on the night of December 23, I realized that I really wanted to have something to give to my dad and brother-in-law who are both celebrating Christmas with us this year. There was absolutely no way I was going to go near a mall on Christmas eve, so I wracked my brain and scoured my craft supplies to come up with a few meaningful projects that we could make at home.

We reprised the mugs that we made for Steve’s birthday and Father’s Day last year, and the boys also made these fun picture collages. We enjoyed going through old pictures to find our favorites, and I also added some extra copies of Christmas cards from the last few years. The boys did all the cutting and gluing themselves, as evidenced by the fact that there are duplicates right next to each other and other quirky touches. I think that our family is going to love these!

Gifts made by the kids: Hand-painted mugs | Jewels at Home

Gifts made by the kids: Family photo collages | Jewels at Home

Gifts made by the kids: Family photo collages using old Christmas cards | Jewels at Home

And for me, being able to stay in on December 24 was the best present of all.

Red and White Christmas | Jewels at Home
Merry Christmas!
“Jewels”

Mudroom Locker DIY: Bookcase Makeover

With our recent renovation, we finished the basement and garage – yay! The garage entry gets used quite a bit when the boys are playing out back or running in after school, so I wanted to create a little mudroom area to corral their jackets and shoes. I especially love this project, because it’s made entirely with things we had in the house already!

Mudroom locker made from a repurposed bookcase | Jewels at Home

I got the idea for turning a bookcase into a mudroom locker from Melissa at Polka Dot Chair, who did this great project using IKEA Billy bookcases. I was going to do the same thing, when I realized we had all the parts I needed at home.

I started with this big heavy bookcase I bought off Craigslist ages ago. I never want to move it again! I shifted the shelves towards the top and bottom – which was perfect, since the bookcase was already missing a shelf, and added hooks for coats and the dog leash. The hooks were from two over-the-door racks we were no longer using. I cut off the hangers and just screwed them in place.

The two baskets on top were also repurposed and fit perfectly, holding all the extra soccer cleats and other shoes waiting to be passed down from one brother to another. Finally, we’re lucky to have pretty mild weather here, so I don’t need my boots too often, and the space on top is the perfect place to store them for a rainy day – haha!

A bamboo doormat finishes off our garage entry!

Mudroom locker made from a repurposed bookcase | Jewels at Home
I’d love to spruce up this area even more by painting the back of the bookcase and the door, but if you could see all the boxes that are half unpacked upstairs, you’d believe me that I’ve got bigger fish to fry!

“Jewels”