DIY Faux Bamboo Trim Bookcase

You know how much I love faux bamboo furniture! My collection includes these Chippendale chairs and this Thomasville dresser-turned-bar cabinet. When I recently acquired an older bookcase, which I chose for its solid wood construction and low price, I noticed … Continue reading

Small Foyer, Big Results – Week Eight Spring 2023 One Room Challenge

I’m excited to wrap up the One Room Challenge. It’s such a great way to motivate yourself to work on projects, and the community is already inspiring and positive. To remind you, I took this opportunity to turn our small, plain entry into a welcoming space that added function and style. I’m happy to say, mission accomplished!

You can see details on my choices and process in the posts from previous weeks. Here are some more pictures of the finished space!

Thank you so much to the One Room Challenge team and Apartment Therapy for a great event! It’s a great motivator and the most positive community. I’m already considering a project for the fall challenge…

You can head over to the One Room Challenge site to see some more room transformations!

Julie AKA “Jewels”

Mini Mudroom Reveal – Week Six Spring 2023 One Room Challenge

It’s so satisfying when a space comes together! I knew the hall closet was not working for our family, and now we have a mini mudroom that is functional and also beautiful – I am so happy with the result!

After building the space,

  • I painted the shelves, trim, and ceiling in a semi-gloss paint that I had color-matched to the wallpaper.
  • Next, I hung the beautiful Ronald Redding Aspen wallpaper. If you’re hanging wallpaper that contrasts with your walls, prime the wall (or, if you are lazy like me, paint stripes of primer where the seams will be), so the wall color doesn’t show through at the seams.
  • Finally, I installed these brass coat hooks I found on Etsy. I wanted double hooks for more storage and was looking for something that felt traditional but not too antique, and these turned out great! I did curse the matching flat head screws a few times, because they’re much trickier than a Phillips head, but I managed to install the screws using bigger pilot holes and hand-screwing them in. Now that it’s done, I do like the more clean traditional look of the screws.

Enjoy these photos of all the details!

There’s something so luxurious about a glossy dark painted ceiling… even if it is in a closet 🙂

In

I would never have guessed that a closet could make me so happy!

Be sure to go back to the One Room Challenge site to see some more room transformations!

Julie AKA “Jewels”

Favorite Blue Chinoiserie Wallpapers – Week Five Spring 2023 One Room Challenge

Since I chose a smaller project for this challenge, I have some time to show you all the details! Wallpaper is a really popular right now, and I’m loving this new-again trend! Ever since I wallpapered an accent wall in our bedroom, I’ve been looking for my next project. The choices are nearly endless, which made picking a pattern for our mini-mudroom both daunting and fun! Here are some of my favorites, including high vs. budget options.

My criteria were:

  • Blue or green, of course!
  • A bold print – a small space is the perfect spot to try something brave!
  • A modern twist on a traditional pattern, with a nod to chinoiserie

First, I was really drawn to these patterns with metallic branches on a dark background. The “high” option on the left is Nutcracker by Juliet Travers. It’s so elegant, and the little squirrel adds a whimsical touch! The “budget” version on the right is Colby Floral wallpaper. I think either of these would be beautiful, but I decided I wanted something a littler bolder for this project.

I was really considering these next two favorites: a “budget” version is Crown Sherwood Woodland in Dark Blue on the left, and the “high” version is Rifle Paper Co. Menagerie Toile in Navy and Metallic Silver. They have a bit of a chinoiserie feel to them, and I really like how the patterns are very elaborate, but they don’t feel too busy, because of being two-toned. I was definitely tempted by the metallic finish of the Rifle Paper one, also!

I was also very drawn to this Toile pattern by Borastapeter in green or blue. Ultimately, I think the scale would be better for a bigger space. I would love this in a dining room!

Finally, I decided to go with this beautiful print, the Ronald Redding Aspen wallpaper in dark blue. I love the mix of classic and whimsical and the dark teal blue color with light brown accents that will be brought out by the wood cabinet and the brass coat hooks. I knew it was meant to be when I realized that this is the same pattern that was in the powder room of our rental house. I always loved it, and I am very sentimental , so it makes me really happy to have that connection between the two homes.

Stay tuned to see the wallpaper installed in the mini mudroom next week! In the meantime, head on back to the One Room Challenge site to see some more room transformations!

Julie AKA “Jewels”

Powder Room Reveal – Tiny Silver Gem

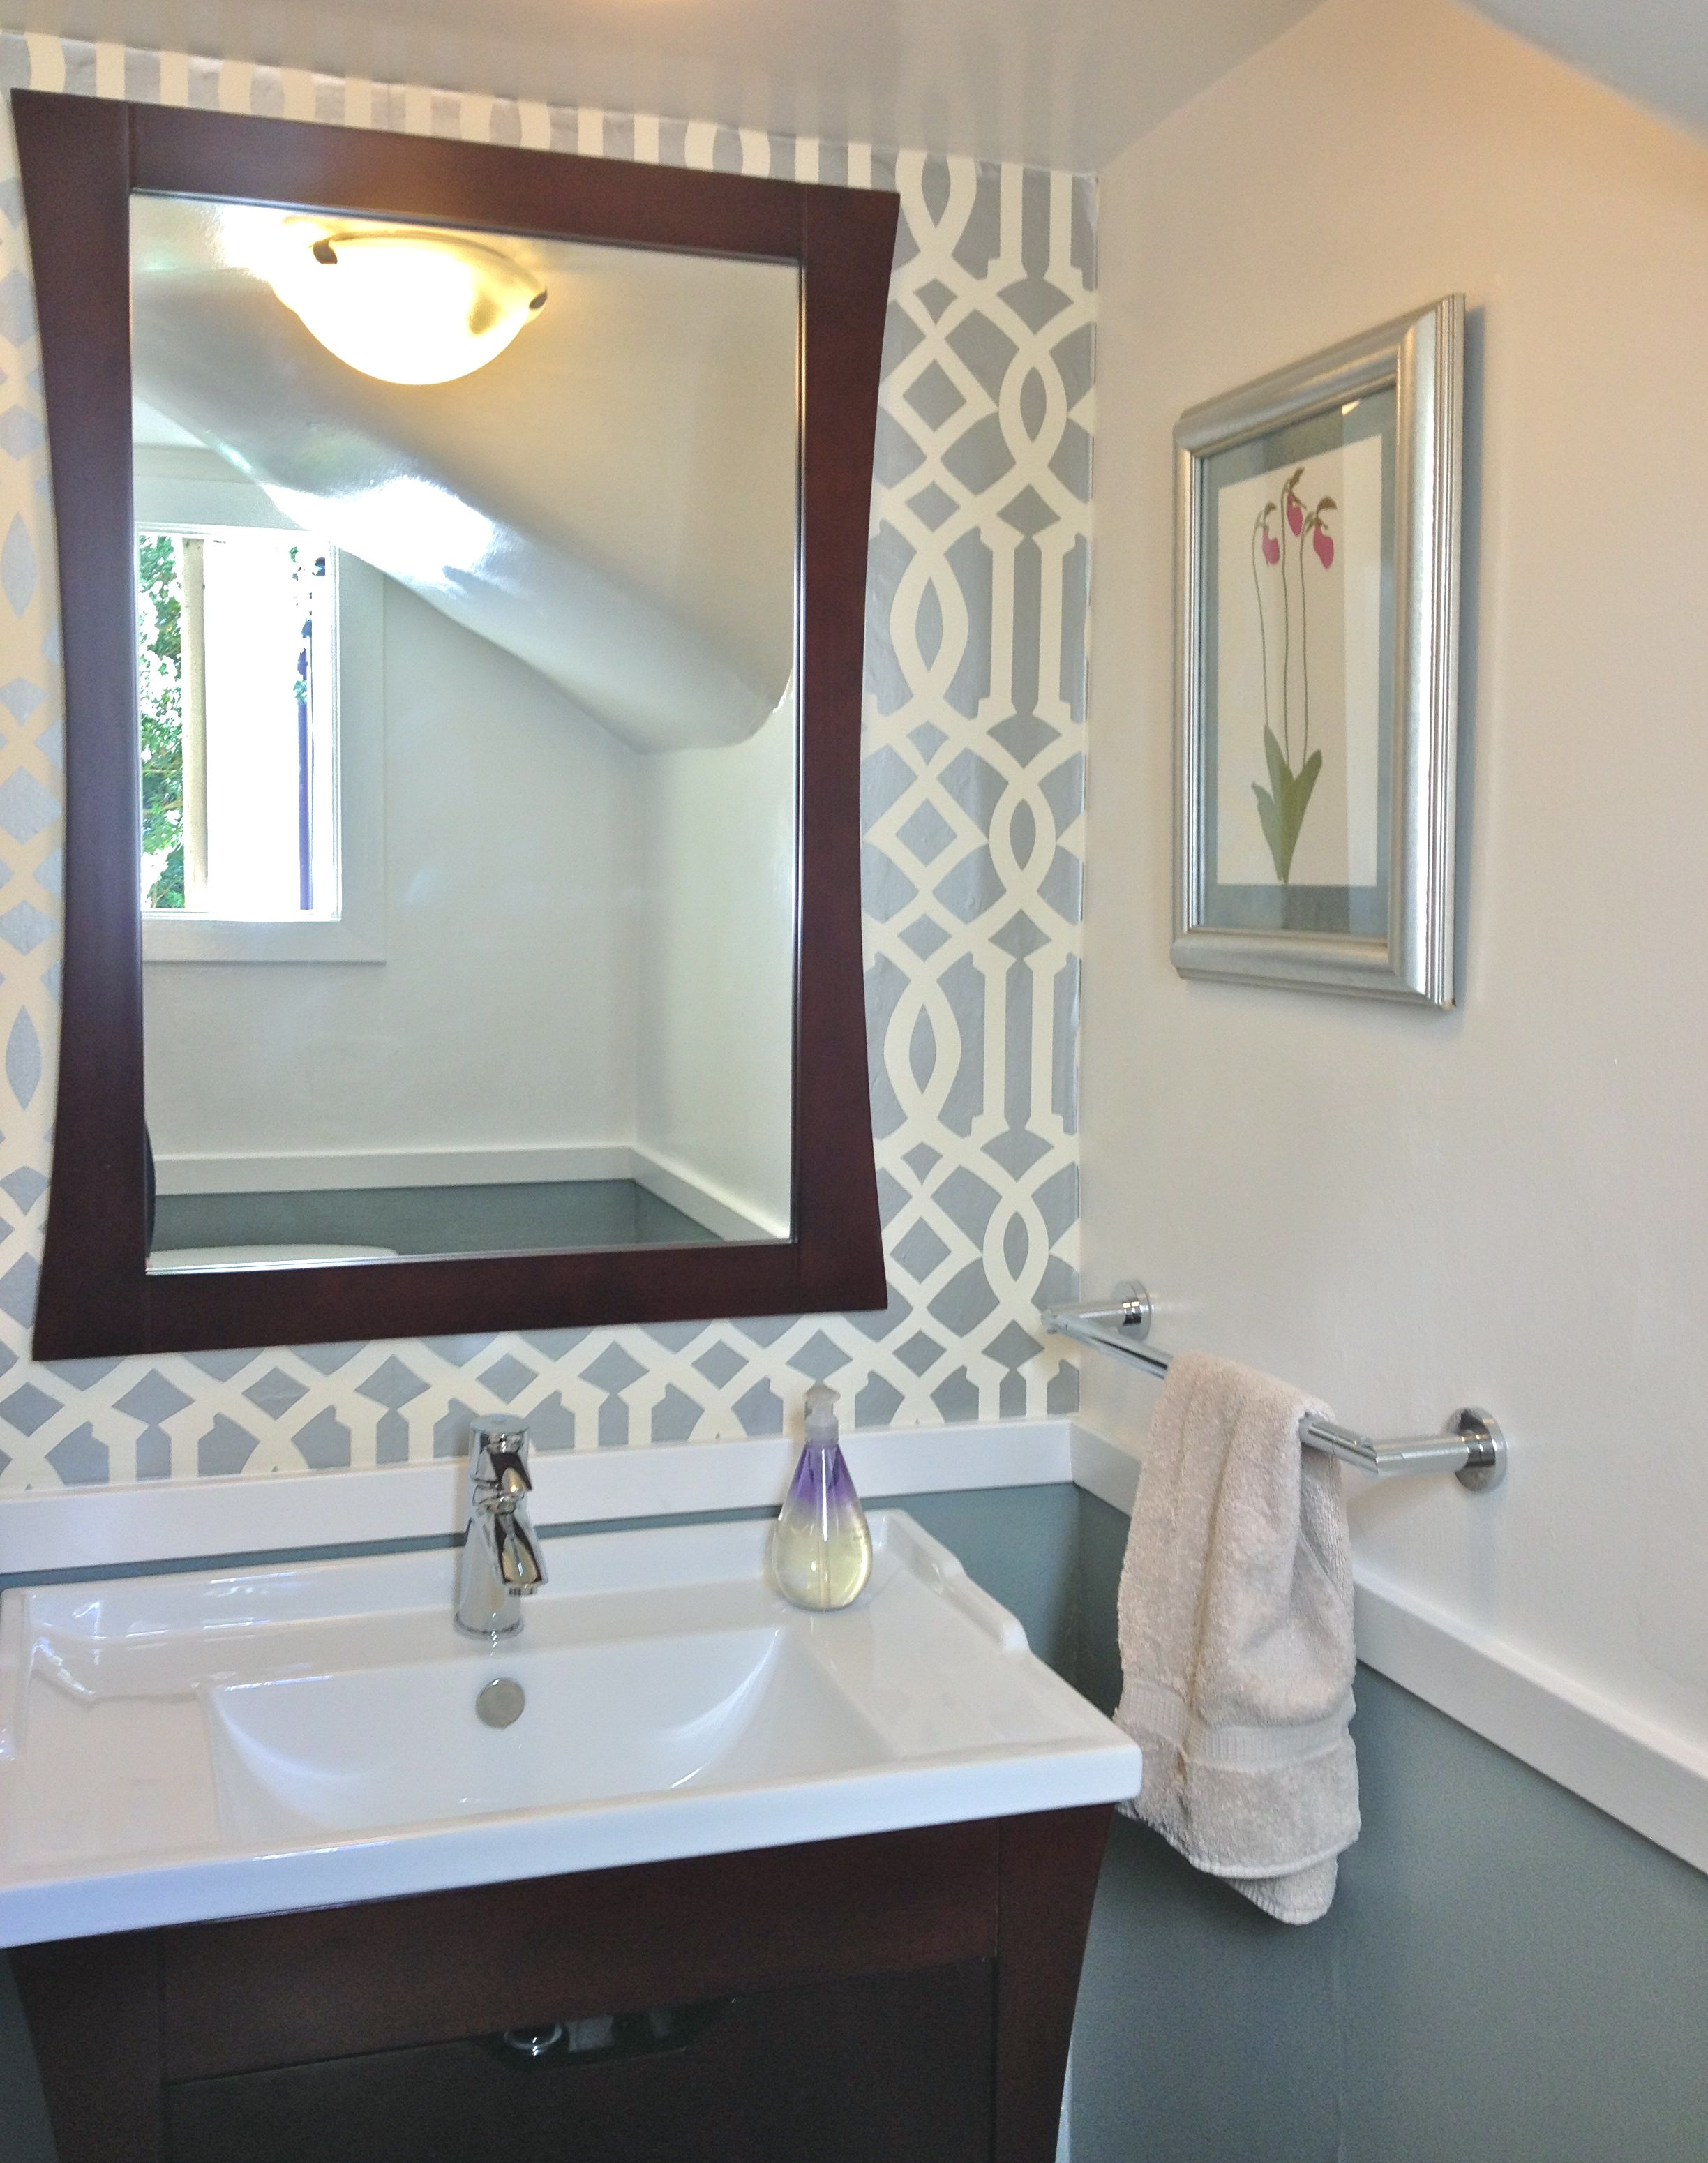
I am so pleased to finally show you our new powder room! It took longer than I anticipated, but it turned out just as I hoped. I used lots of silver in this small space, to make it feel brighter.

Powder Room by Jewels at Home 1

The finished powder room has lots of bright and elegant details, like the Imperial Trellis wallpaper and new chair rail.

We did not want the hassle or the expense of a full renovation, so I did not take out the walls or floor, even though they were far from perfect.  I worked with what we had and

I’m very happy with the result. Before, the room felt unfinished (because, as hubby points out, it was unfinished) and plain. I  would actually avoid it and go upstairs to a “real” bathroom. Now, it’s still small, but it feels polished and pretty, and I occasionally peek in just to take a look (okay, that won’t go on for long, I hope).

Vanity area before

BEFORE: The whole room was very white – blah – with dated gold-tone fixtures.

I got the help of a handyman to change out the old pedestal sink for this new vanity.  Our half bath is very small, so I looked for a long time to find a small vanity that didn’t feel undersized.  I am happy with the look and functionality of this Covus vanity found on Overstock.  The new towel bar and toilet paper holder add a shiny touch in polished chrome.  The art is a print from an Henry Evans calendar (more of those to see in upcoming posts, too).  I picked the color of the flower and picture mat to tie in the old floor colors.  The frame was a thrift store find and brings more silver into the room.

Here are some more views of the finished room:


Powder Room by Jewels at Home

Powder Room by Jewels at Home 3

Powder Room by Jewels at Home

I’m very relieved to have this powder room off the to-do list.  It was getting embarrassing!  Now, I can get on to some more fun projects that I’ll post soon.

“Jewels”

DIY Decorative Trays – Ten Great Ideas

Ten Trays

The best decorating projects combine form and function – they add beauty to your space, serve a purpose, and when you make your own, they are one of a kind! A decorative serving tray is just this kind of project. You can use them to display or transport items on a coffee table, buffet, desk, kitchen counter, and more.

My friend Ari got me excited about decorating our own trays when we were at the flea market this past weekend. I picked up an older wooden tray there for just $5, and I know I have a couple of my own lying around the house. I want to use some for display in the living and dining room, and one for the desk in my craft room. There are so many great ideas, and here are some I would love to try or adapt for myself.

Silhouette and Silver

Silver leaf tray

The botanical silhouette and silver leaf on this tray are beautiful.

Brenna at Design Sponge has a tutorial for how she made this tray from a thrift store find! You could simplify it for a similar look with silver spray paint, though the silver leaf looks amazing, and the glass makes the tray useable for serving.

Monogram

monogram tray

Lots of options to personalize a monogram tray from A Modern Style on Etsy.

This one is by A Modern Style on Etsy. I love the bright colors and graphic design contrasted against the wood.

Wallpaper and Lacquer

Lacquer wallpaper trays

Gorgeous lacquered trays with wallpaper inserts and bold colors from iomoi.

This is from iomoi and hand lacquered, so it would be very durable and stand up to washing and heavy use. The coordinating colors on the body of the tray and the gold trim are gorgeous! I could use some more of the Imperial Trellis wallpaper I have left over from our powder room and lining our bookcases.

Painter’s Tape and Paint

painter's tape tray

Use painter’s tape to mask a design on a plain tray (or paint the tray a background color first). Follow with spray paint – looks great in metallic for a striking graphic design.

Courtney Kaye of Courtney on the Brink made these trays for holding jewelry. They look bold and elegant! I’ve been using metallic spray paint for a lot of projects recently, and I love it!

Tile Mosaic

tiled tray

A tile mosaic looks beautiful inside this tray.

This beautiful example, as well as instructions for tiling the inside of a tray, are from the Martha Stewart.

Frame and Fabric

This is an idea to make a tray from a frame and cabinet handles. You can put fabric or pretty paper under the glass.

Patrice from Lemon Tree Creations had this creative idea for making a tray from a frame and cabinet handles. The glass protects the decorative fabric or paper.

Stencil

Stenciled Tray

This stenciled tray is so elegant. I love the painted grey exterior with the white and grey graphic design.

The instructions for stenciling this tray are from HGTV.  Of course, it looks so much like my Imperial Trellis wallpaper, that I could use that for the same look, but there are other great stencil ideas out there, including stenciling words.

Paper Mache

Paper Mache Tray

A sweet little tray made from paper mache and painted different colors inside and out.

Start from scratch! The instructions for making this paper mache tray are at Everything LEB. I love how she used metallic paint inside and the sweet green-blue on the outside.

Decoupage Circles

decoupaged tray

These cute circles have text from old books on them. You could do the same with all sorts of fabrics, papers, and shapes.

A fun and unique example of decoupage from iHanna. There are so many great ways to build on this idea!

Photographs

photo tray

This photo in sepia tones looks beautiful mounted inside a tray.

You could print a single large photograph or several small ones and decoupage them to the inside of a tray and/or mount under glass. This lovely example is from Merle Hillary Interiors.

All these projects would be a perfect way to re-use a tray you already have or give new life to a thrift store or garage sale find. There are also new trays that would work well for makeovers. Here are two very different examples:

Glam Base

west elm trays

These lacquered trays from West Elm are already gorgeous. You could dress them up in so many ways!

If you want a tray that is already beautiful on its own, these trays from West Elm are a great option. With a simple design and so many colors to choose from, they would also be easy to customize. Only trick I foresee is that it might be a little tricky to get things to adhere well to the lacquer.

Simple Base

For a simple unfinished wood base, try this  Walnut Hollow Unfinished Wood Serving Tray, 15-inch x 11-inch.

Well, that’s my roundup of inspirations for trays to make yourself. I hope Ari and I can find some time soon to work on ours!

“Jewels”

New Powder Room from Top to Bottom – Wallpaper!

Our powder room facelift is going slowly… but surely!  Unfortunately, I started taking apart the space and then developed some inertia about getting the wallpaper up, as I hadn’t done wallpaper in a long time, so the sad state of this space got sadder before it started getting better.  Today, I put our toddler in daycare for an extra day, so I could go to Kindergarten Spring Sing at kids’ school without distraction.  After the performance – which was adorable! I took full advantage of the rare stretch of several hours “off” from both my office job and my mom job by having a lunch date with hubby and pledging to get this wallpaper up!

Vanity area before

BEFORE: The whole room was very white – blah – with dated gold-tone fixtures and a pedestal sink that has no room for storage or even the soap!

A powder room is a perfect place to use wallpaper – it makes a beautiful statement, without overwhelming you visually, financially, or logistically, as you only need a small amount.  I splurged big-time on the Imperial Trellis wallpaper in silver.  It was pricey, but I had enough to do the powder room, as well as line the backs of our living room bookcases.  I love the glow of the silver to brighten up our dark spaces.

Imperial Trellis wallpaper in silver by Schumacher. Click the picture to go their website for more information and colors.

I hung wallpaper once many years ago, so I remembered the basics, but I quickly refreshed myself with these instructions from This Old House.  Some of the planning steps did not apply to me, since I was doing such a small area.  I’m only hanging it above the (future) chair rail on one wall, because the ceiling slopes on the other walls (the powder room is under the stairs), and I thought the wallpaper on those walls would just draw attention to the changing ceiling line.

Here’s an overview of what I did:

Tools for wallpaper

TOOLS: From left, you’ll need
1. Squeegee: they make ones specifically for wallpapering, but a regular shower squeegee worked well for me.
2. Ruler or putty knife: to keep a straight line when trimming
3. Utility knife: for trimming paper at corners. Make sure it’s very sharp!
4. Pencil: for marking a plumb line.
5. Brush or roller: for applying wallpaper paste.
5. Wallpaper paste: mixed from a dry powder.
6. Sponge: for smoothing paper and wiping off excess paste.
Not shown: level or plumb line to mark a plumb starting line.

Booked wallpaper

After spreading the wallpaper pasted with a brush or roller, fold the paper as shown (called “booking”) for the adhesive to set.

sponging wallpaper

Line the first piece up with a plumb line. Then, using first a damp sponge and then the squeegee, gently smooth the wallpaper from the center towards the edges to remove bubbles and excess paste.

Wow!  Wallpaper

Wow! I was amazed at how the wallpaper made the room seem brighter and bigger. The silvery glow spread the light around the room, and the lines of the pattern made the space feel wider and taller.

Once the wallpaper was up, I started adding a few accessories: a large mirror which, again, helps with spreading light around the small space, a new chrome towel bar, and some art that I pulled from a calendar (more examples of this great art in an upcoming post) and put into an frame found for a few dollars at Goodwill.  Again I used silver, to brighten up the room.

new mirror and towel bar

New mirror and towel bar added to the room. The “top” of our top-to-bottom facelift is done!

I am SO happy with the result so far.  It’s now a pleasure to enter this room that I had been avoiding!  What is the plan for the rest of the makeover?  I’m going to add a chair rail and paint the area below in a warm blue-grey, like this inspiring powder room by Sarah Richardson.  I’ve also got a new vanity going in to give us a little storage and counter space.  Hope to post the finished room here soon!

[UPDATE:  The powder room is finished!  You can see it here.]

An inspiration for our powder room. Click the image to go to the image on Sarah Richardson’s website.

And on a different note, what projects on the horizon have me all excited?  Check out these FREE chairs I am going to make over for my craft room/ office!  I can’t wait (though maybe I should finally finish the powder room first…)

Queen Anne Chairs - before

Sneak preview: A glamorous makeover is in store for these Queen Anne chairs I got for FREE through Craigslist.

“Jewels”

Lining Bookshelves: Decorating Inside the Box

I’m always amazed at how easy it is to beautify a bookcase by decorating the back. There are lots of great examples out there of using paint, wallpaper, wrapping paper, or fabric.

In my most recent project, I wanted to add some color and personality to our baby/ toddler’s room. I was thinking of a solid red background for his shelves, but then I lucked out and stumbled upon this fun graphic paper from nineteenseventythree.com. At four dollars a sheet, I was able to cover the entire back of the bookcase for twenty dollars and have some gorgeous paper leftover for cardmaking or another art project. The company is based in Britain, but I found the paper at a local store, Lavish, in Hayes Valley.

Red wrapping paper on bookcase

Graphic red and white wrapping paper lining a nursery bookcase.

For our first’s nursery, I spray-painted the backs of old white Ikea bookcases with blue, masking off some white “stripes” with painter’s tape, and I loved that effect, too. I was able to take the back piece off to paint, which made it a lot easier. I never took a picture of the furniture specifically, so you will have to make do with a baby pic and the shelf in the background.

Blue and white painted bookcase

Blue and white stripes painted on back of nursery bookcase.

I think the nursery projects were my favorite results, but I’ve also experimented downstairs with our living room and kitchen storage. I went through a die-hard Arts and Crafts phase, when we bought a lot of very heavy wood pieces in that style. I still love these bookcases for their classic look and incredible quality, but I wanted to brighten them up for our current decor. I chose Imperial Trellis wallpaper in Silver by Schumacher for its gorgeous classic pattern and the glow of the silver. It’s pricey, but you need so little for a project like this that I bought a single (well, it comes as double, though you can find it sold as a single with a cutting fee) roll for this project and one wall in our powder room, and I will still have some left over. I have to say that the effect was not as dramatic as I hoped, because they are still very dark and heavy, but I think it’s a move in the right direction, and I couldn’t bear to paint or alter the shelves in any other way.

Imperial trellis wallpaper on bookshelf

Imperial trellis wallpaper in silver. (The bookcase styling needs some more work.)

Finally, I also applied some fabric to the back of some glass-front shelves in our kitchen. I got the idea, because I felt that our white bowls, cups, etc. were just “disappearing” visually in the white cabinets, so I wanted to add some color for a backdrop. It was a quick fix using fabric scraps from another project, but I think it’s an improvement!

Fabric lining kitchen cabinet

Green print fabric lining display cabinet in the kitchen.

Mounting tip: In the past, I have used 3M mounting strips of various kinds for attaching fabric or paper to the back of a bookshelf. With the wrapping paper project, I was eager to get started and didn’t have time to run to the store, so I just used blue painter’s tape, and it worked fine. Since the wallpaper came in small sheets, I also used tape on the back to join the pieces as I applied them. If you are using a heavier material – such as fabric or wallpaper – or a material that you want to preserve, the 3M strips are stronger and photo-safe (not that these are photos, but I assume that means they are not acidic, etc.). I definitely wanted the photo-safe for mounting on our Arts and Crafts style bookcases, for example. However, the blue painter’s tape is an easy and inexpensive tool, if you’re in a hurry and hanging something light and not-too-valuable.

More favorite papers:

Stunning temporary wallpaper for your next DIY project!

Tempaper Self-Adhesive Gio Temporary Wallpaper in Silver

Graham & Brown Trippy Wallpaper in Orange

710UvRChlgL._SL1500_

York Wallcoverings Silhouettes Fretwork Trellis Wallpaper, Mint Green/White

Hope you enjoy making your furniture look outside-the-box by decorating inside it!

“Jewels”

This post is shared at:

Lovely Crafty Home