Urban Boutique Bathroom – Week Three – Spring 2025 One Room Challenge

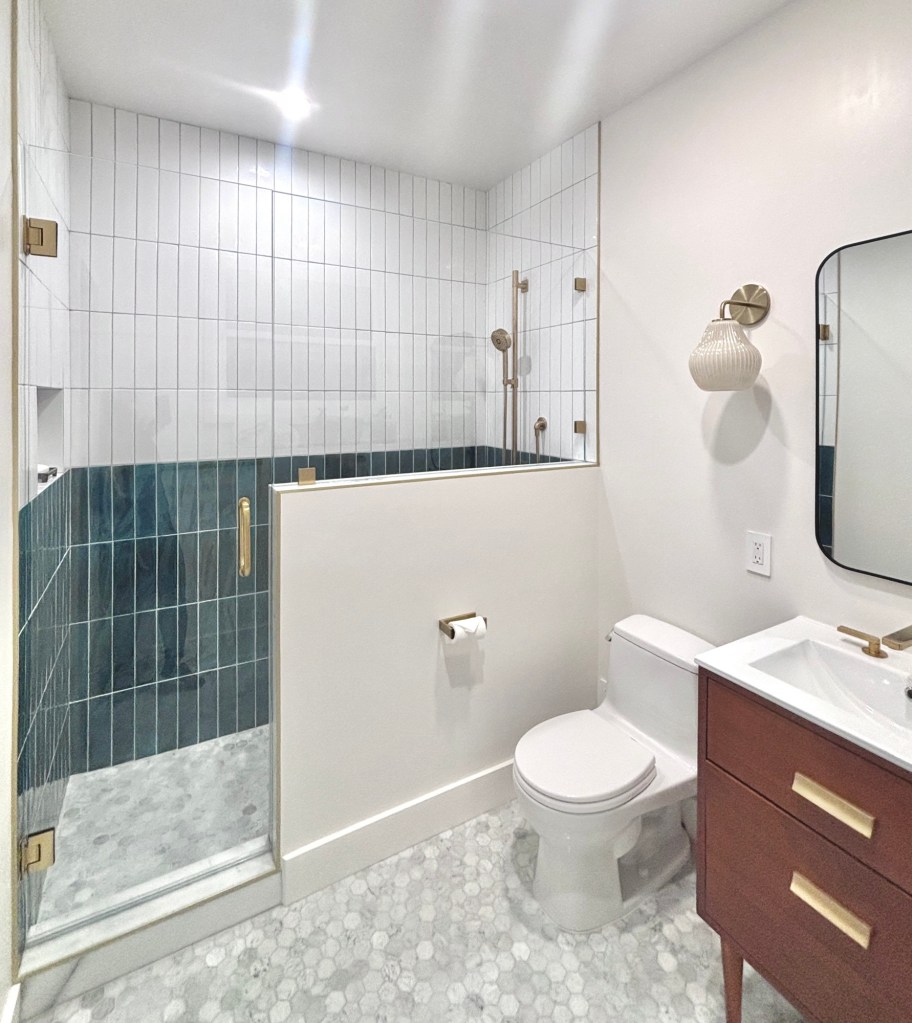
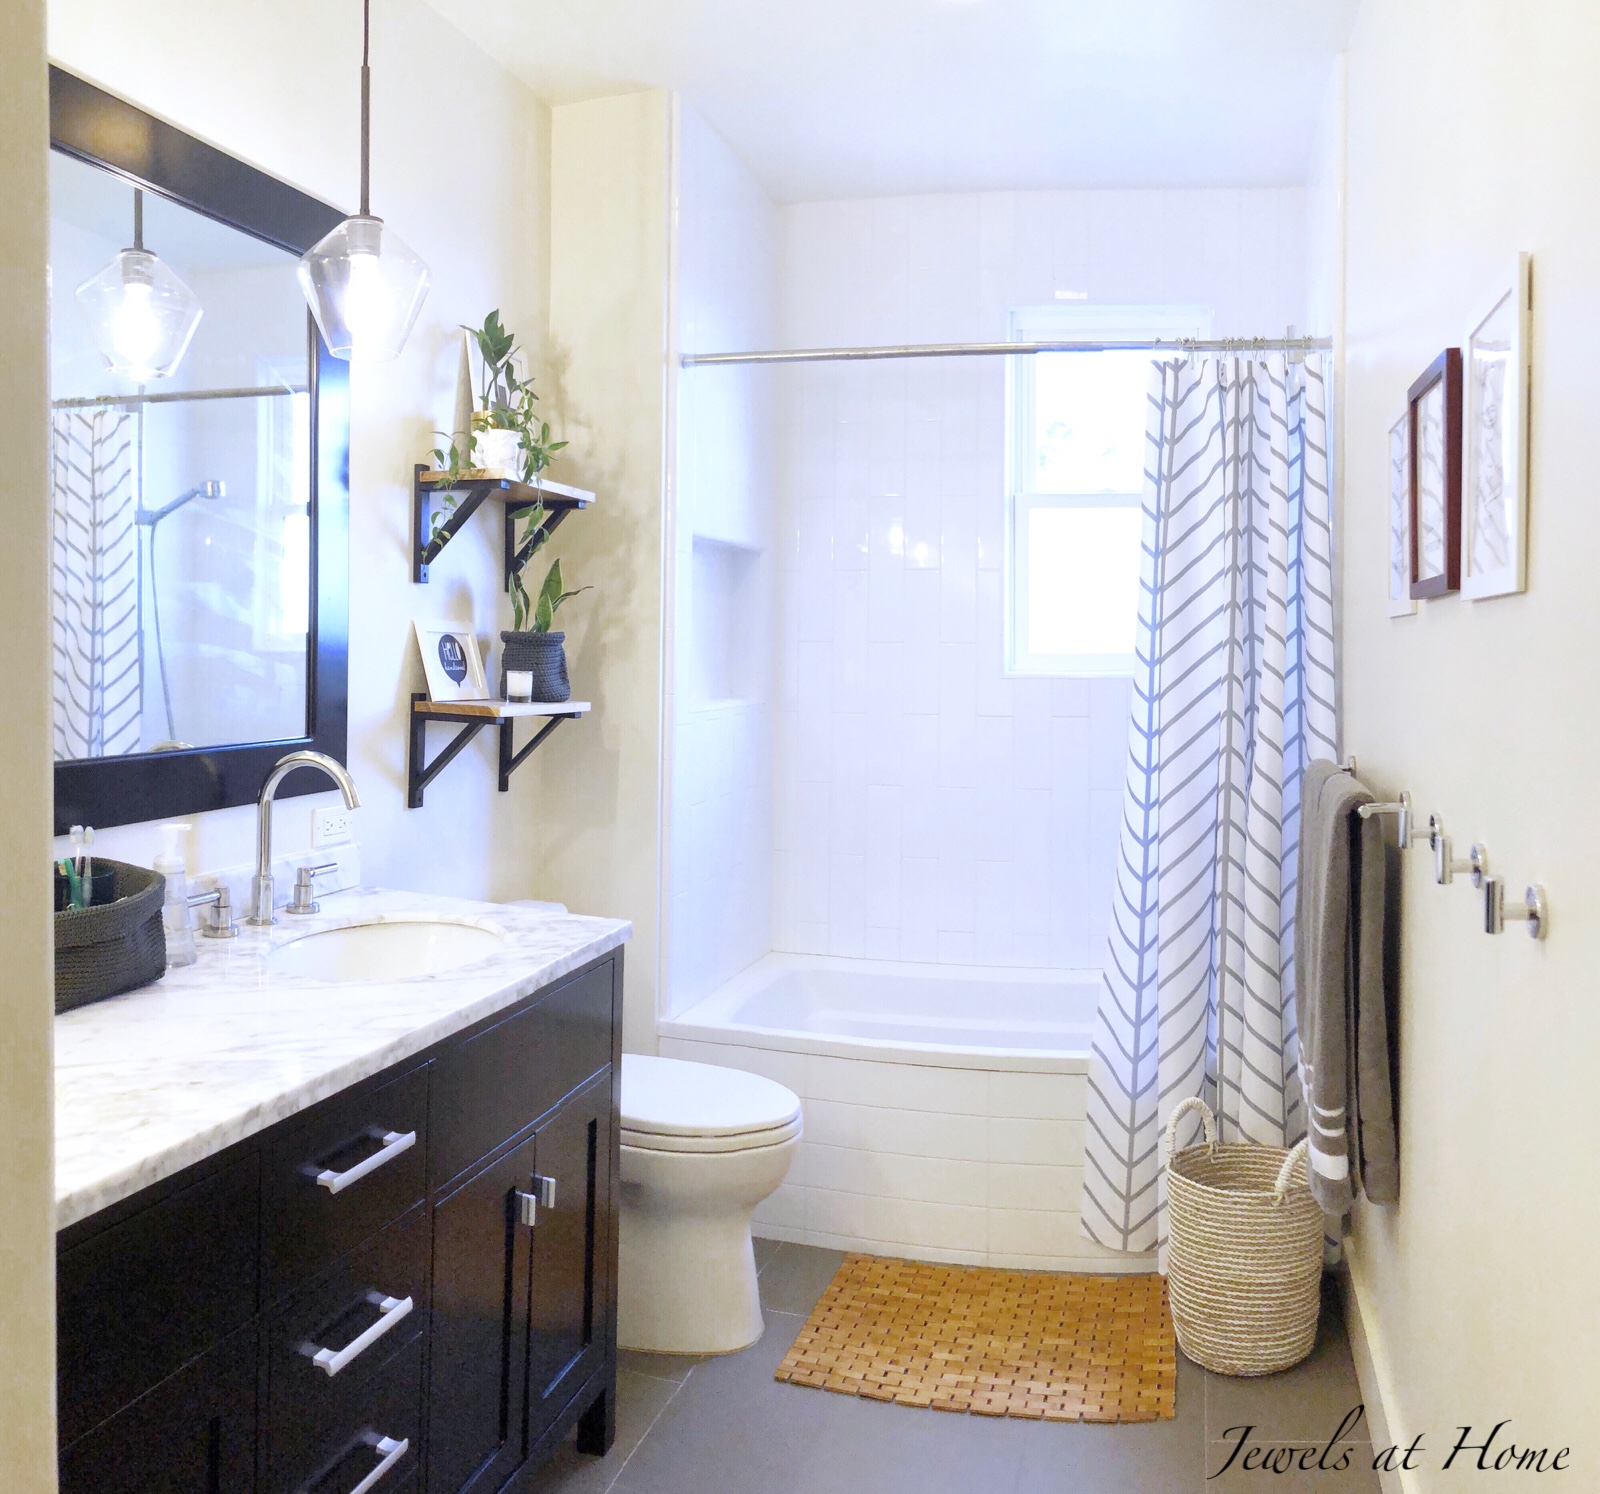
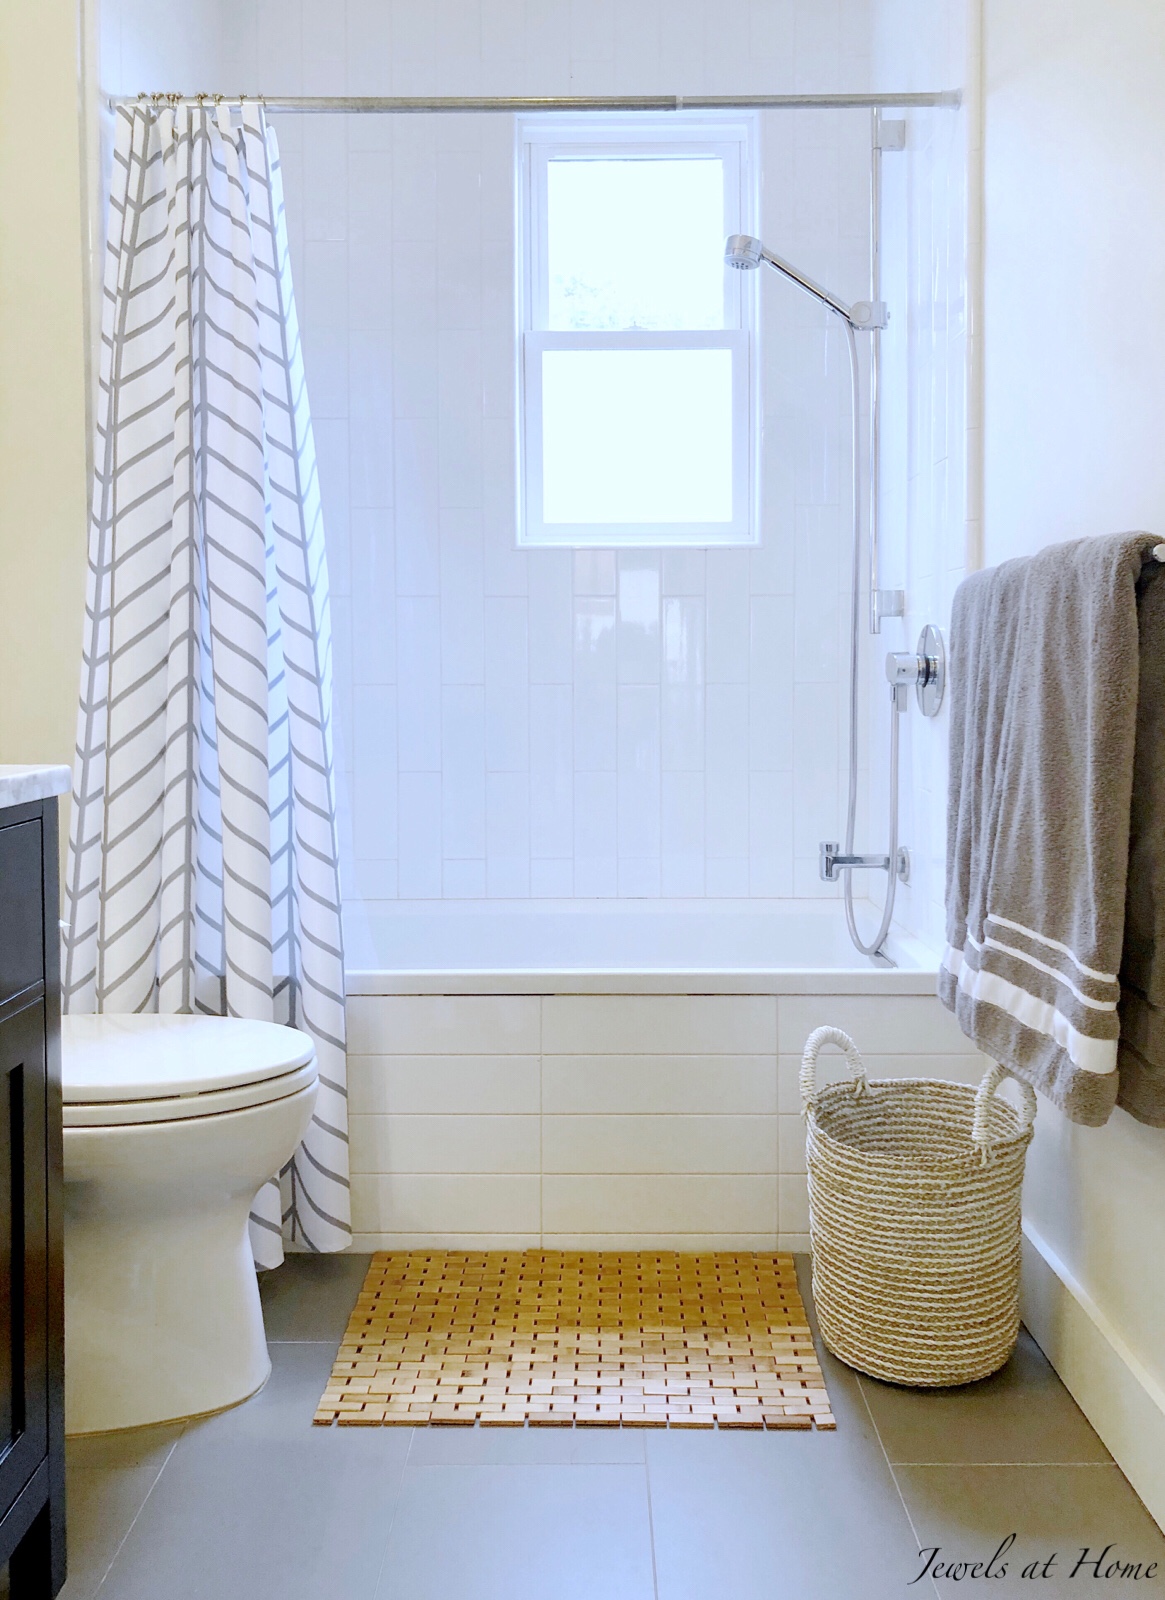
I’ll call this week to be the “telephone hold music” of the One Room Challenge – I am excited to share our new bathroom. I can take credit for the design, but not the construction. There’s also a small DIY project in there! In the meantime, I promise I am working away on other projects for decorating our new bedroom addition, including a custom daybed.

As a reminder, this season’s project is a bedroom and bathroom addition we built last year. It’s going to be a space for our oldest, when he’s home, and also serve as a guest room or lounge!

It’s fun to see how my vision for this room evolved. In the original “mood board,” I was going with my classic blue-and white look, but you could tell that I was already thinking about how to bring in some green.

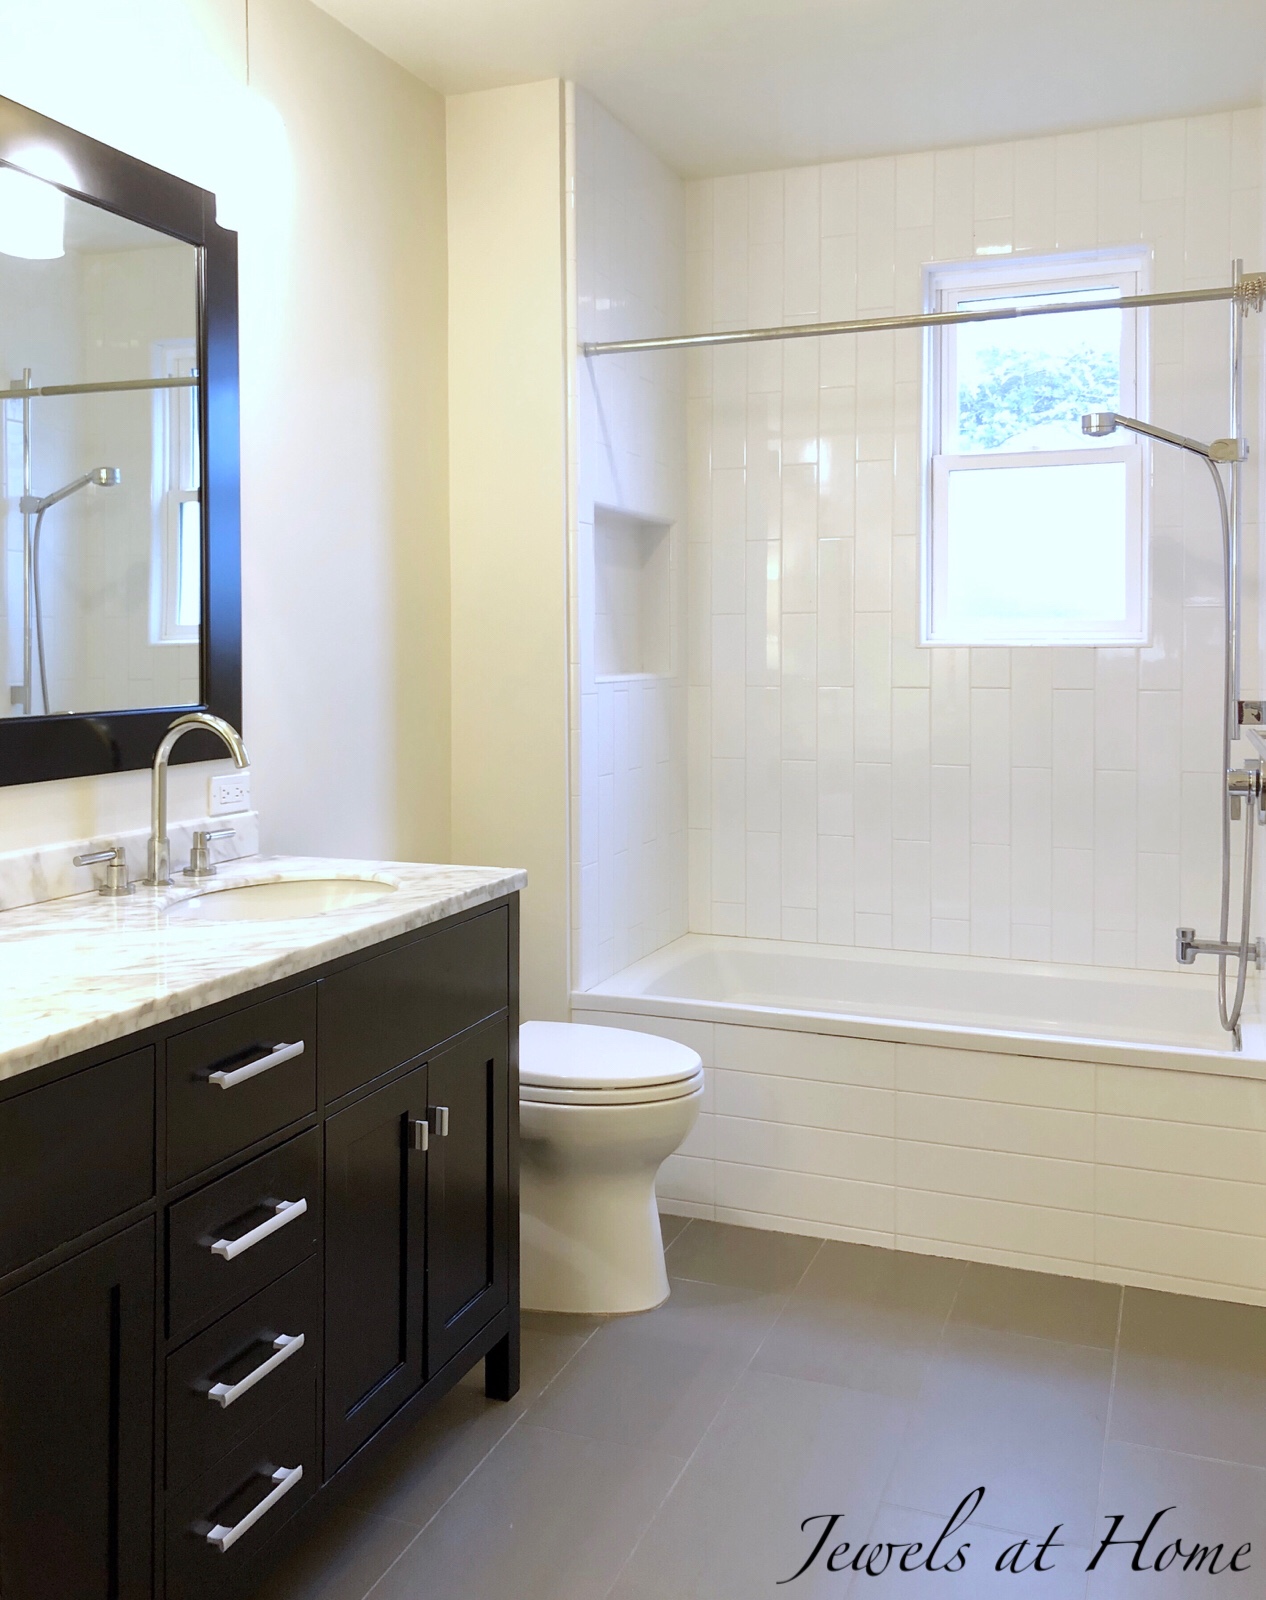
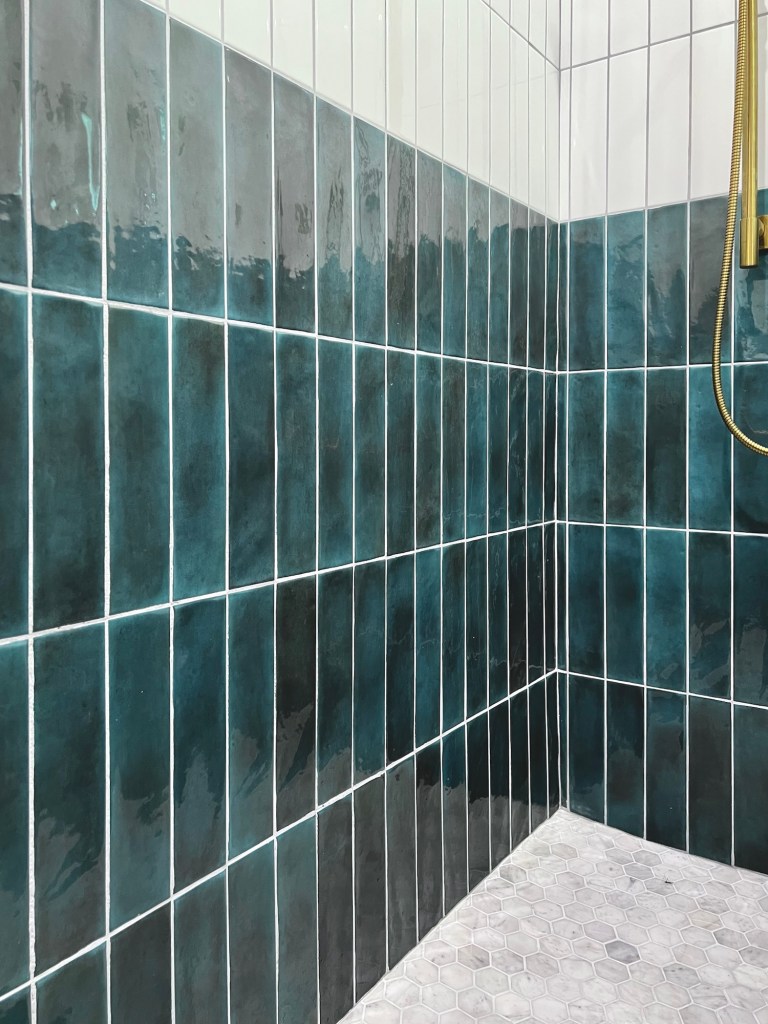
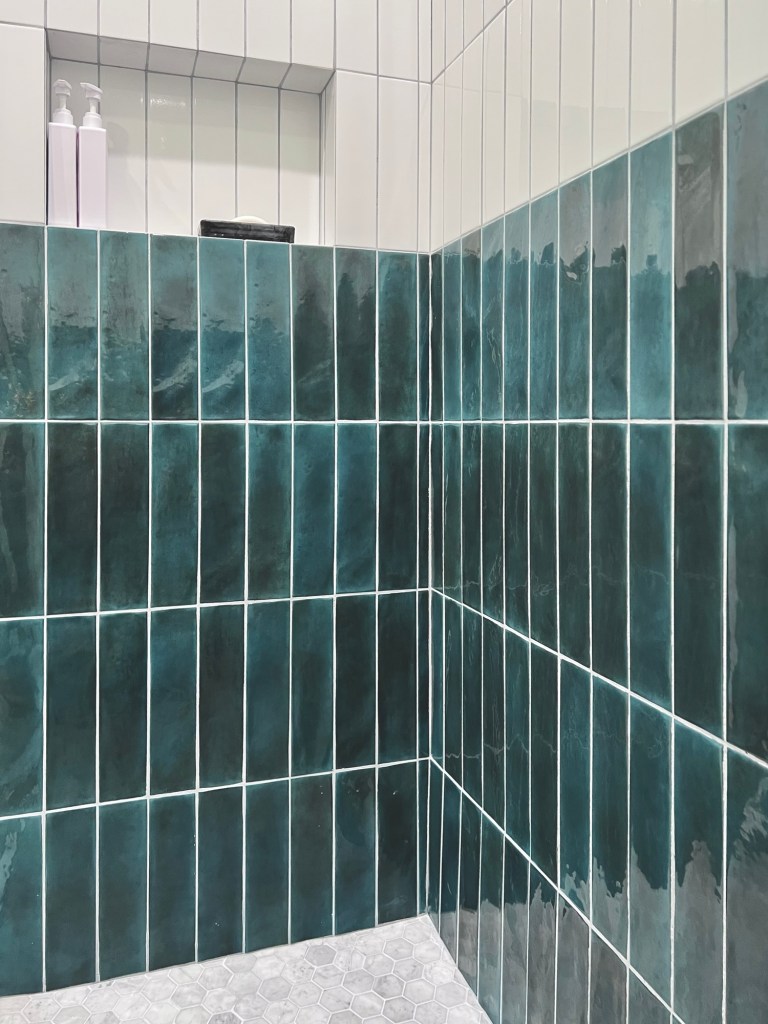
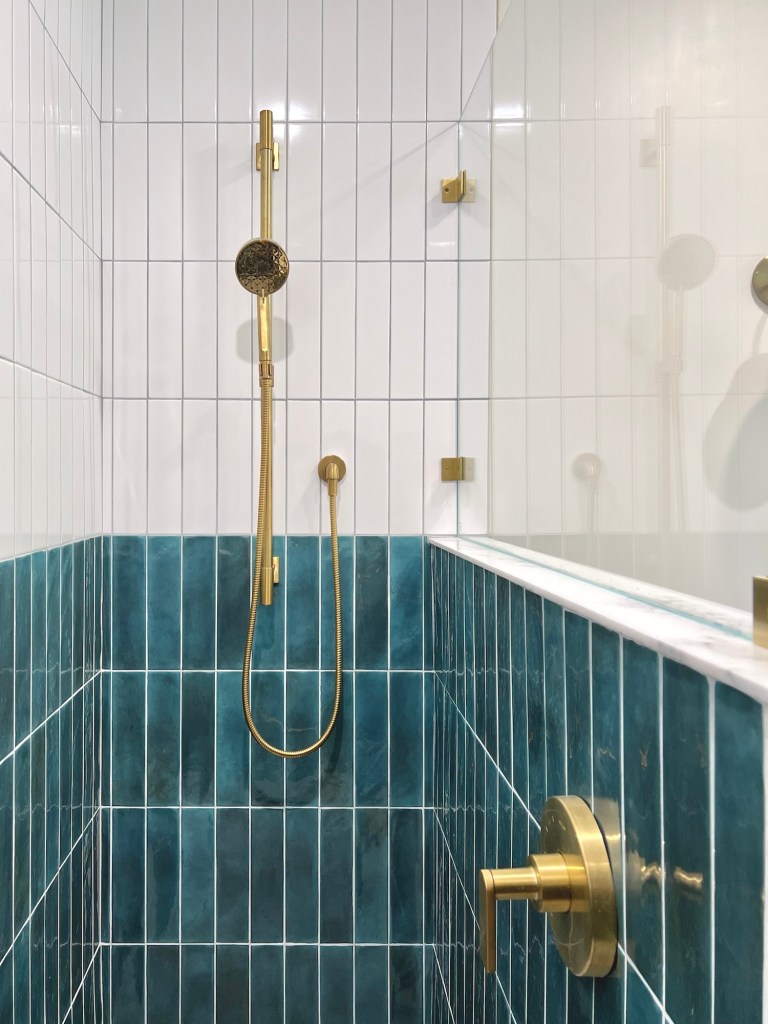
Over time, while we were waiting and waiting for building permits, my plan evolved to be more modern and more green. One of my major inspiration spaces was the Woodlark Hotel in Portland, where we enjoyed a stay a few years ago. From that space (left picture below). I was inspired by the elongated subway tile, stacked vertically, the mix of white and dark green tile, and a mix of black metal and antique brass. This led to my final design (right picture below):

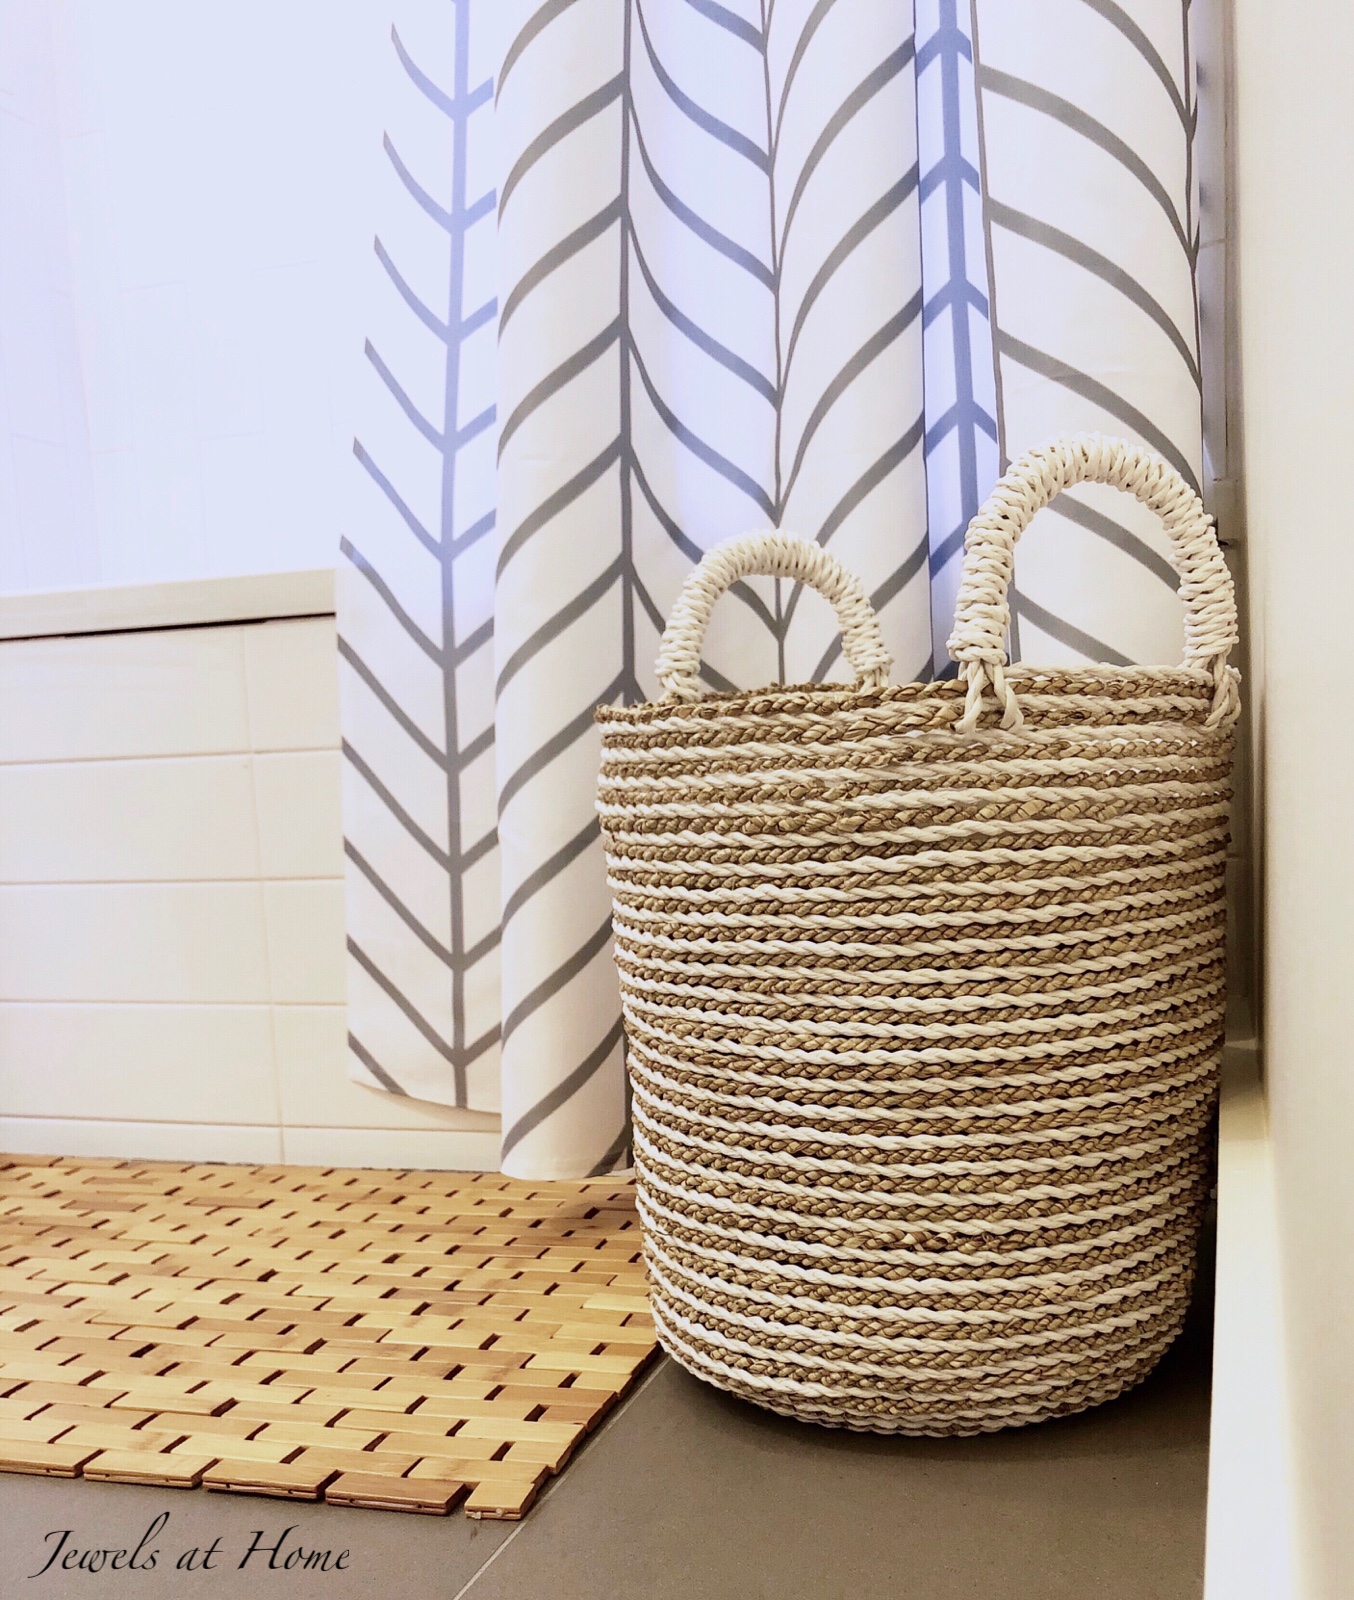
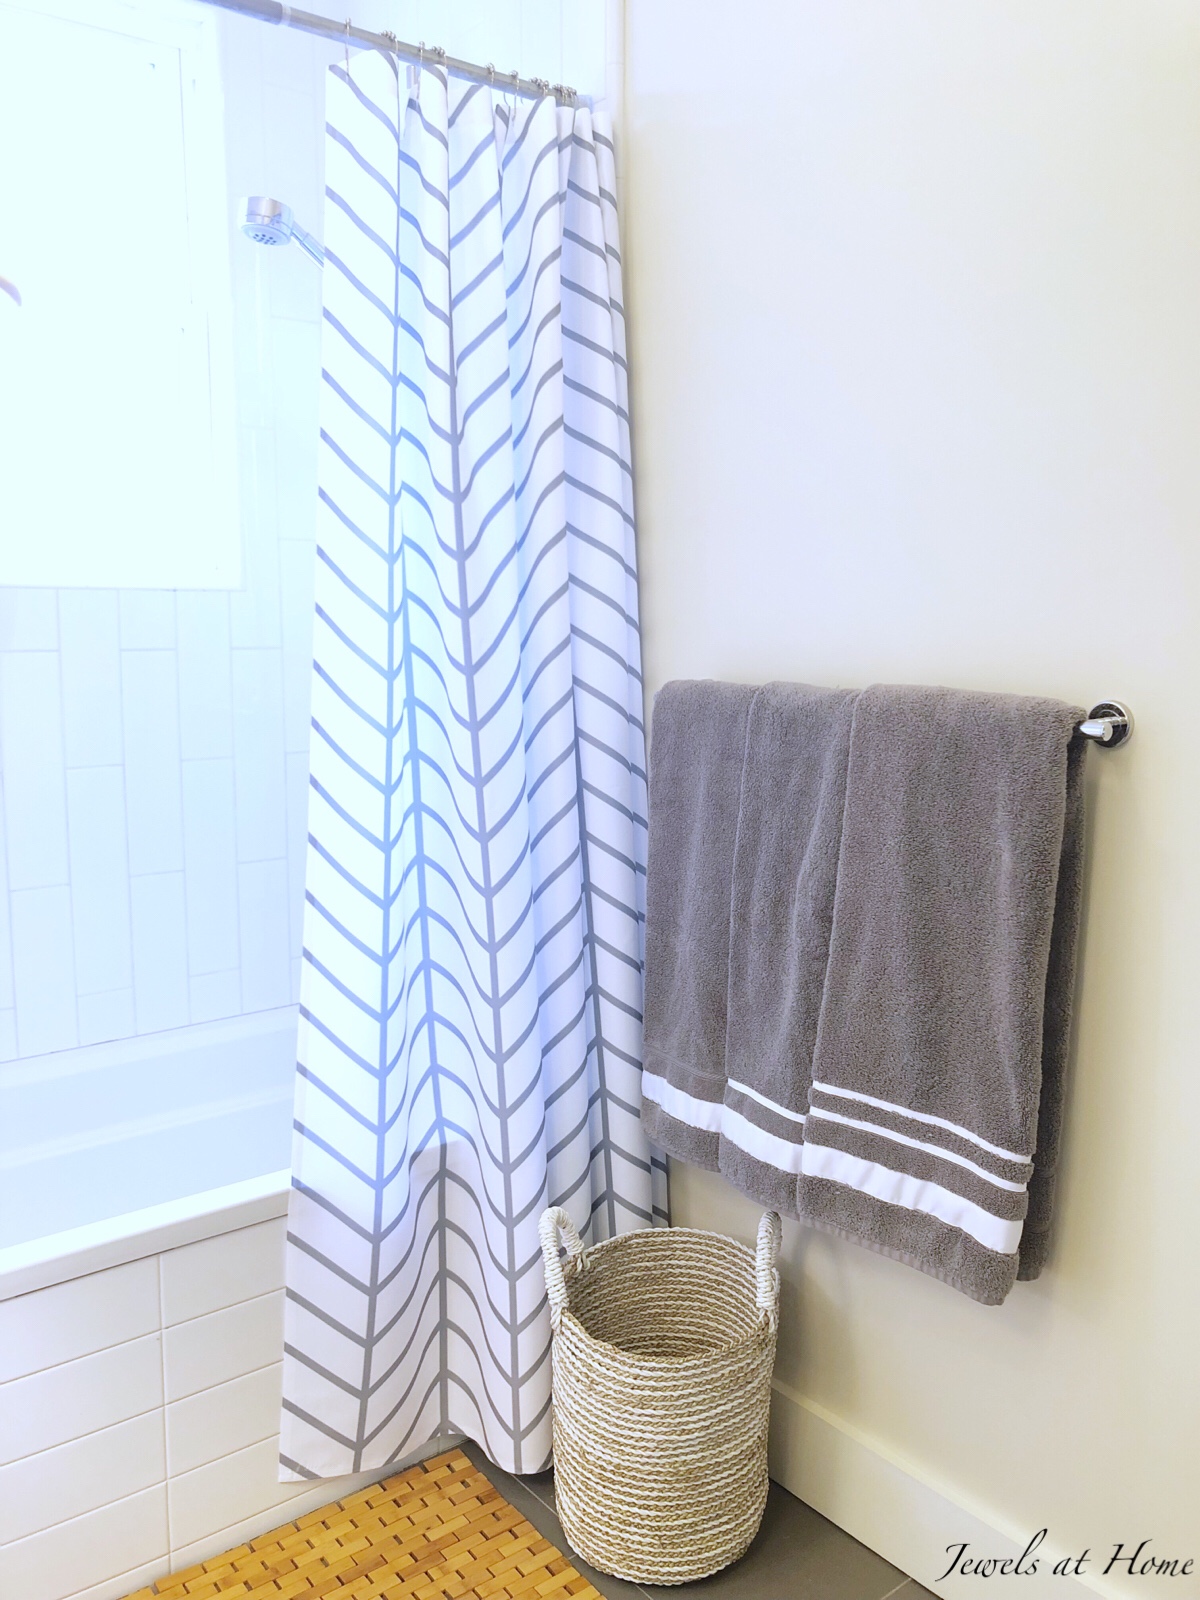
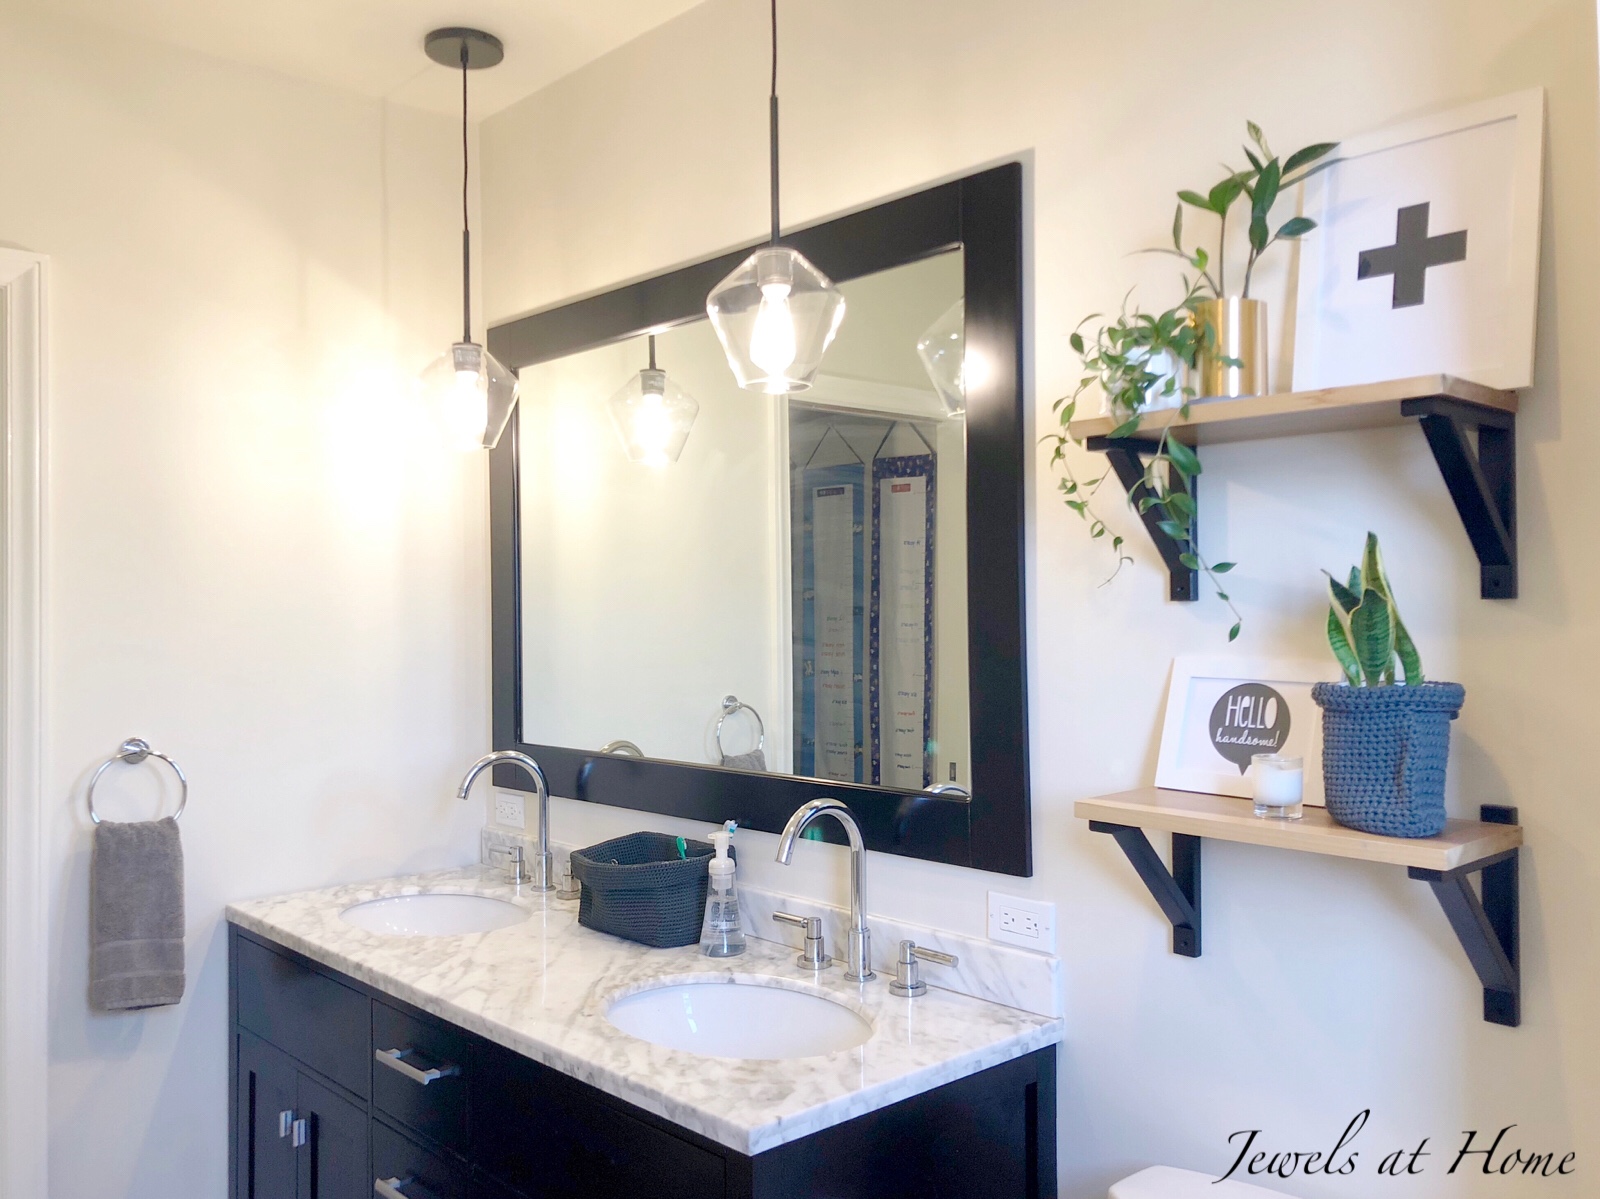
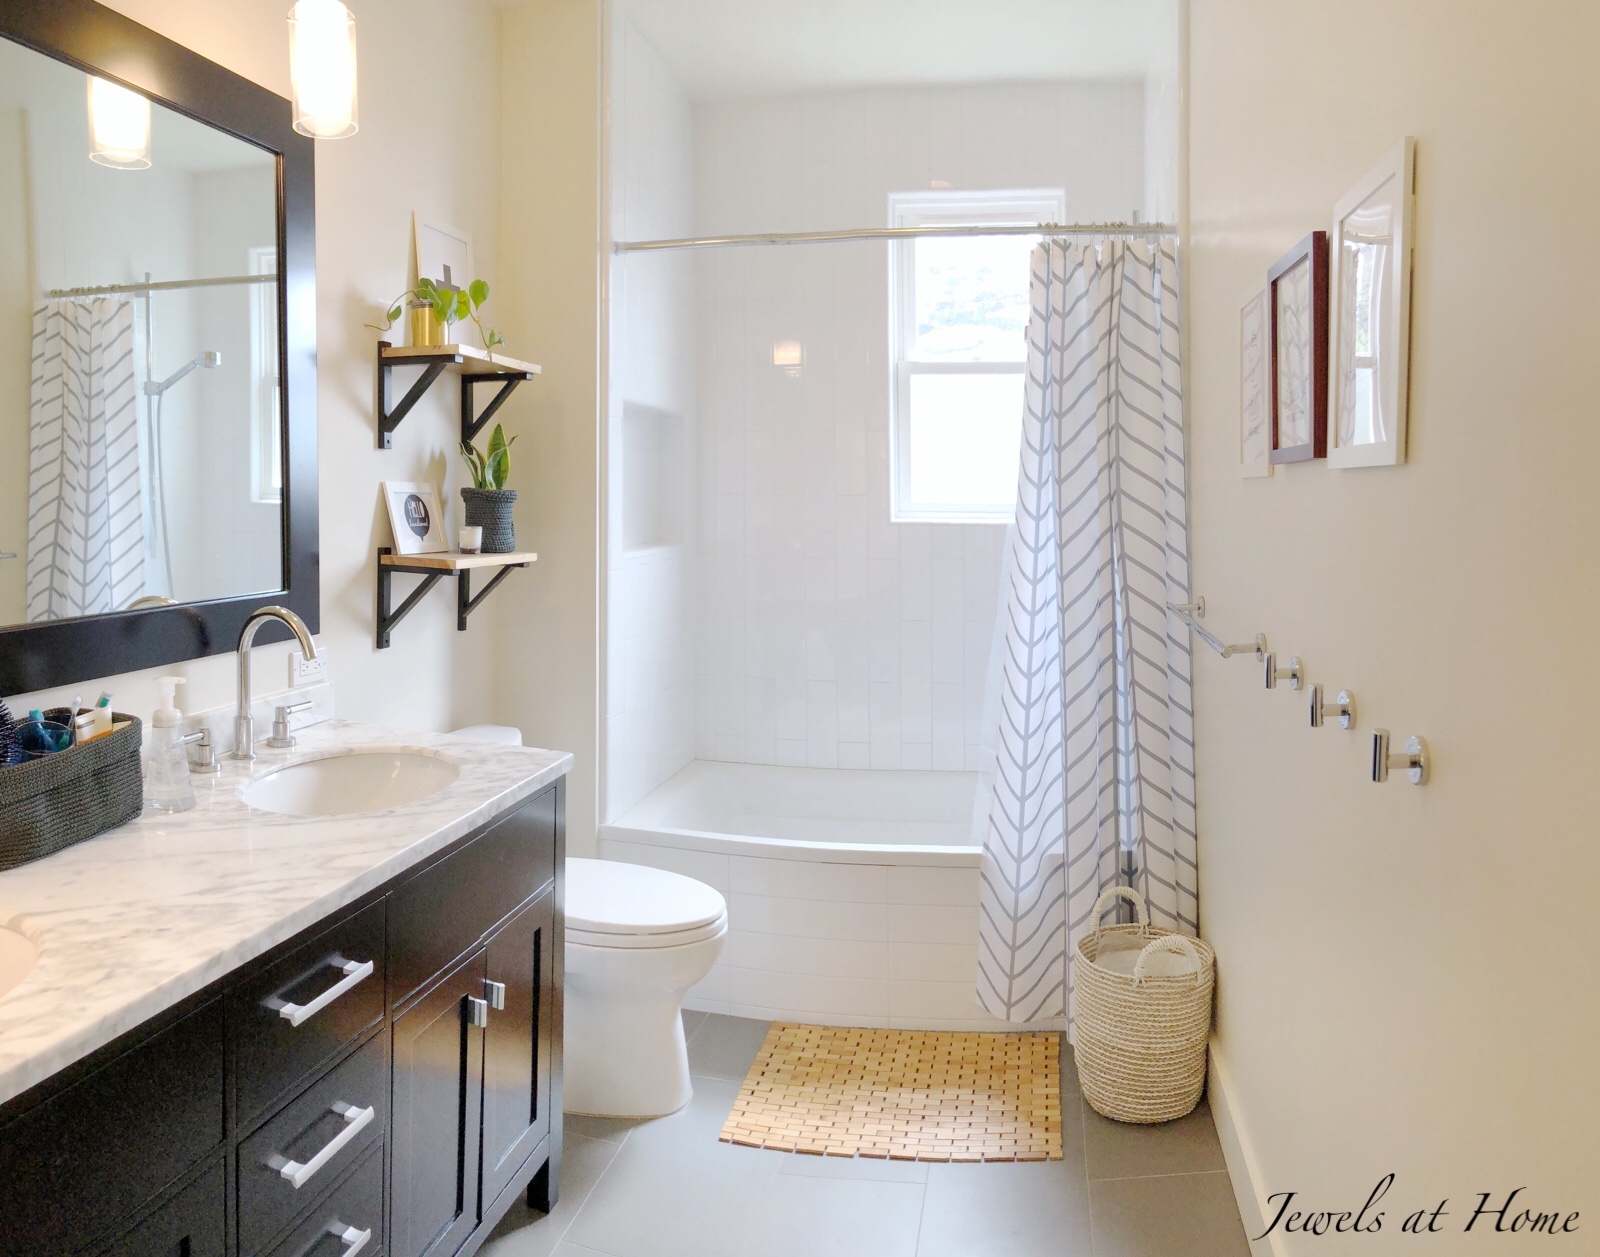
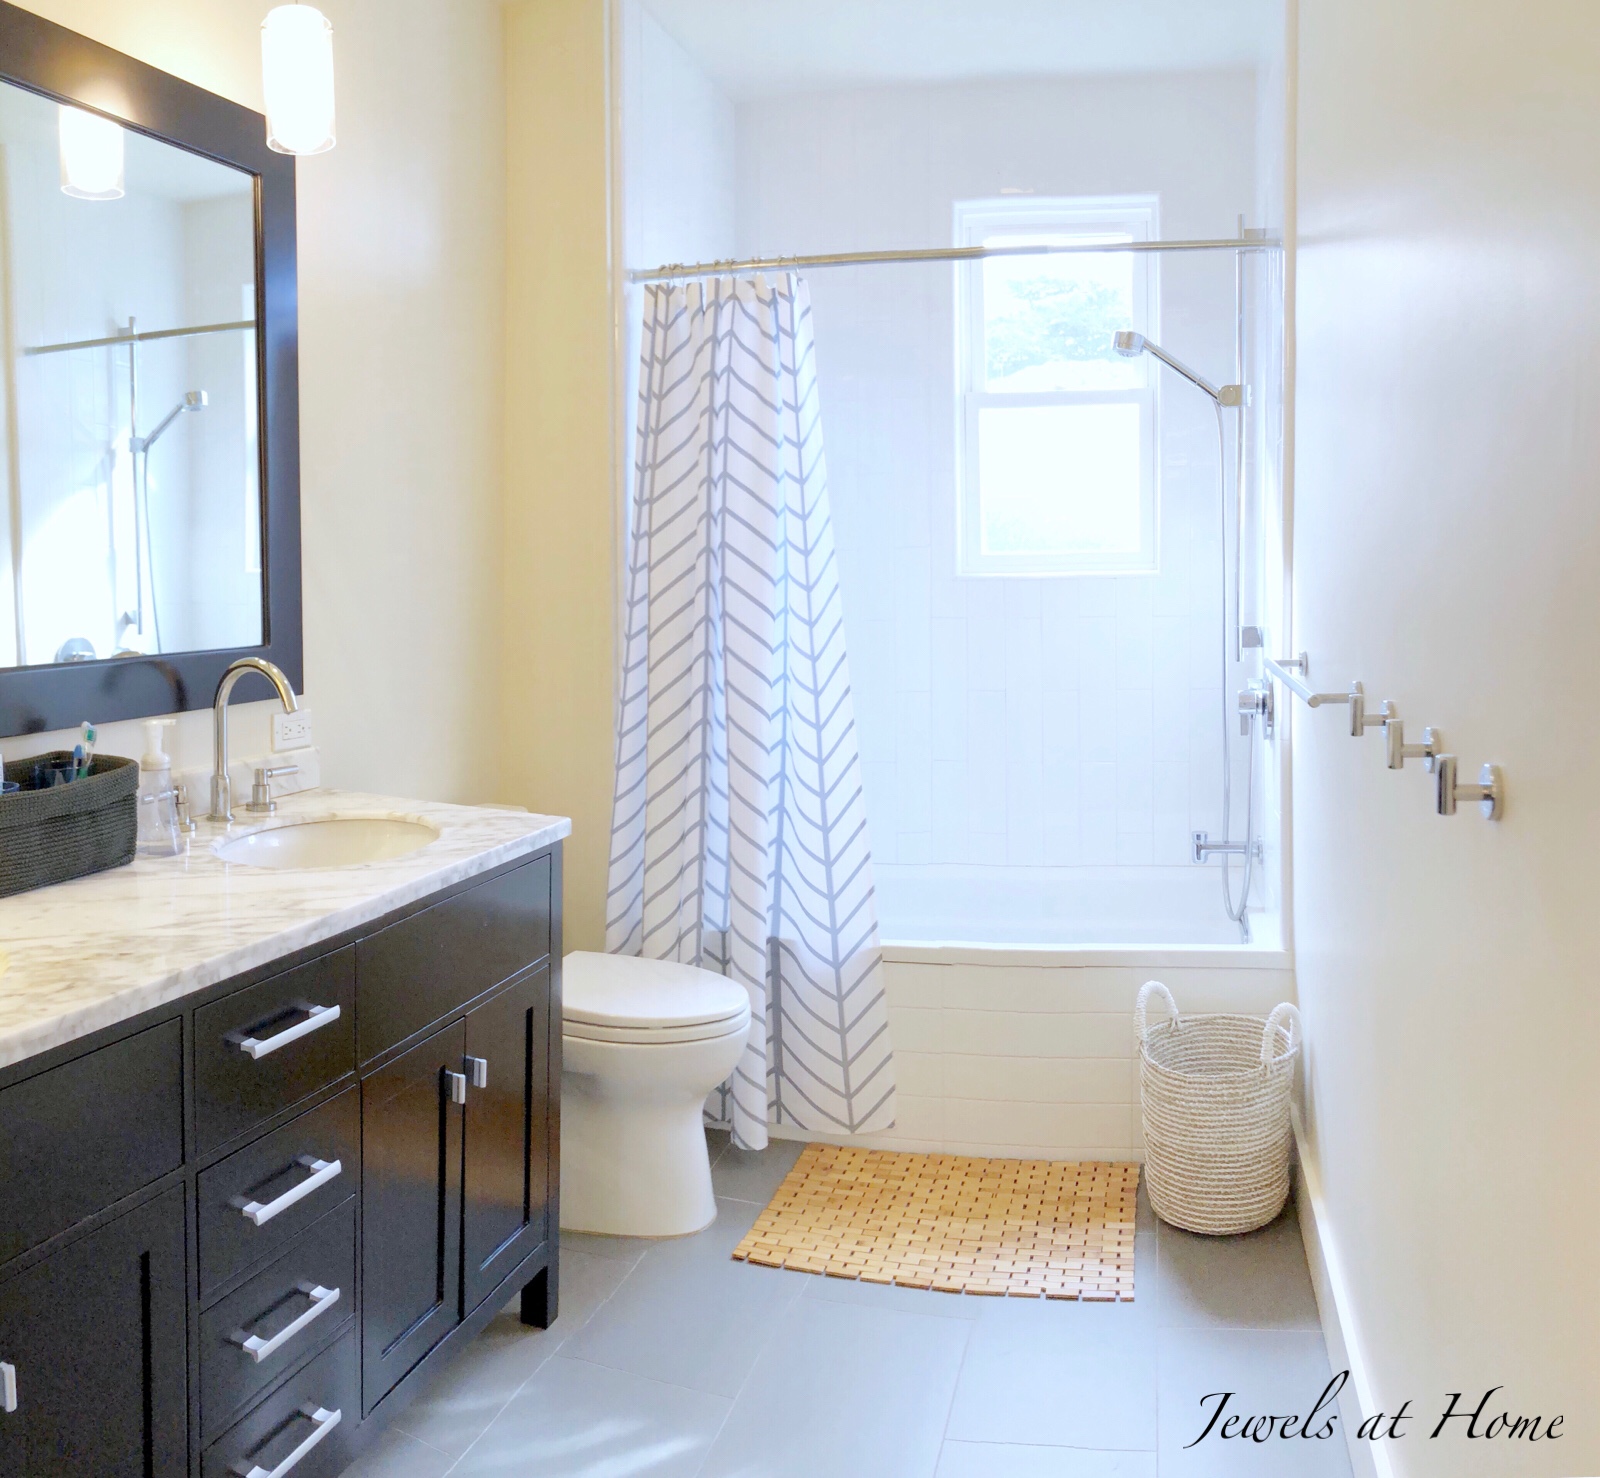
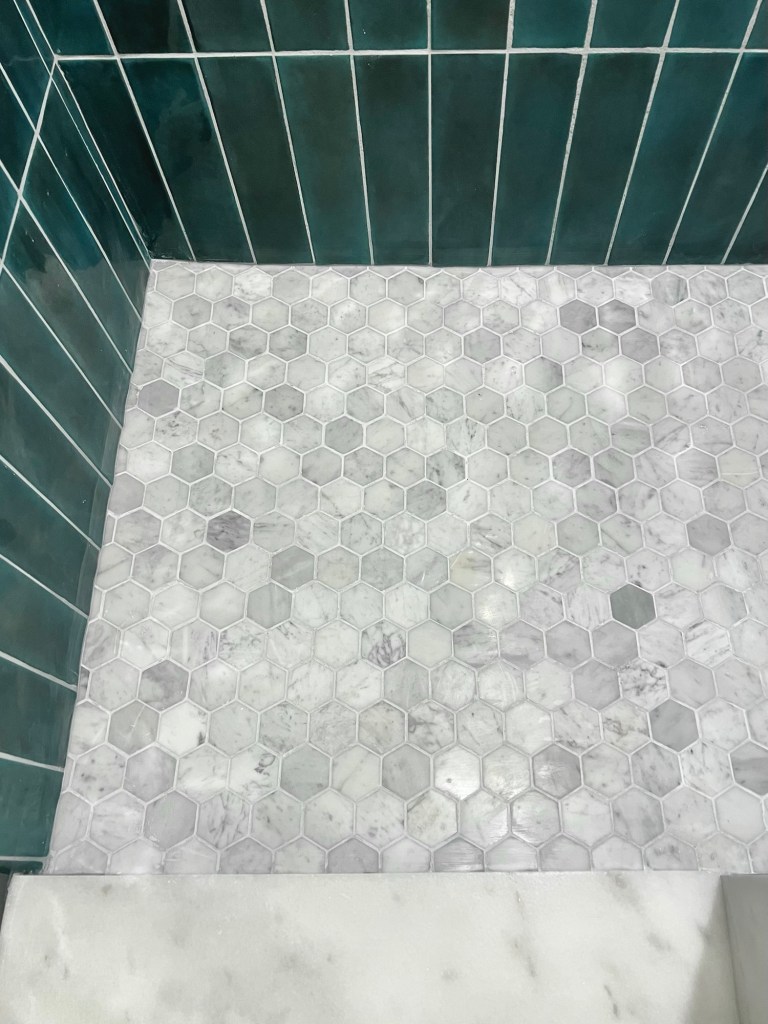
And here’s how the room turned out!

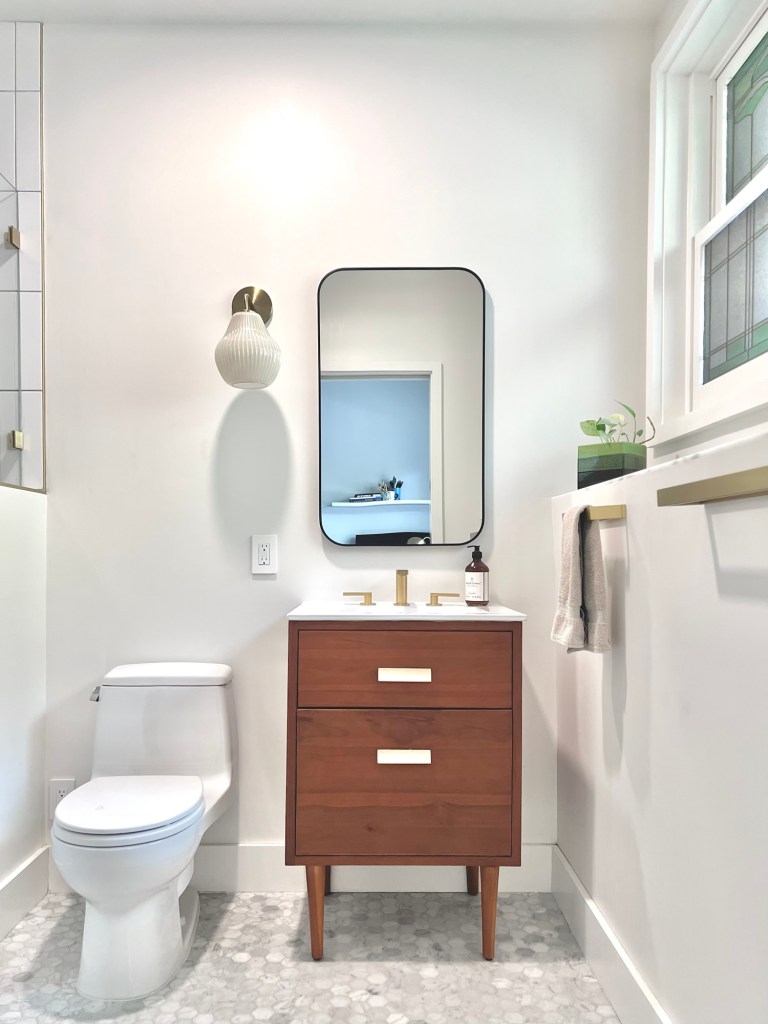
This tile combination makes me so happy!

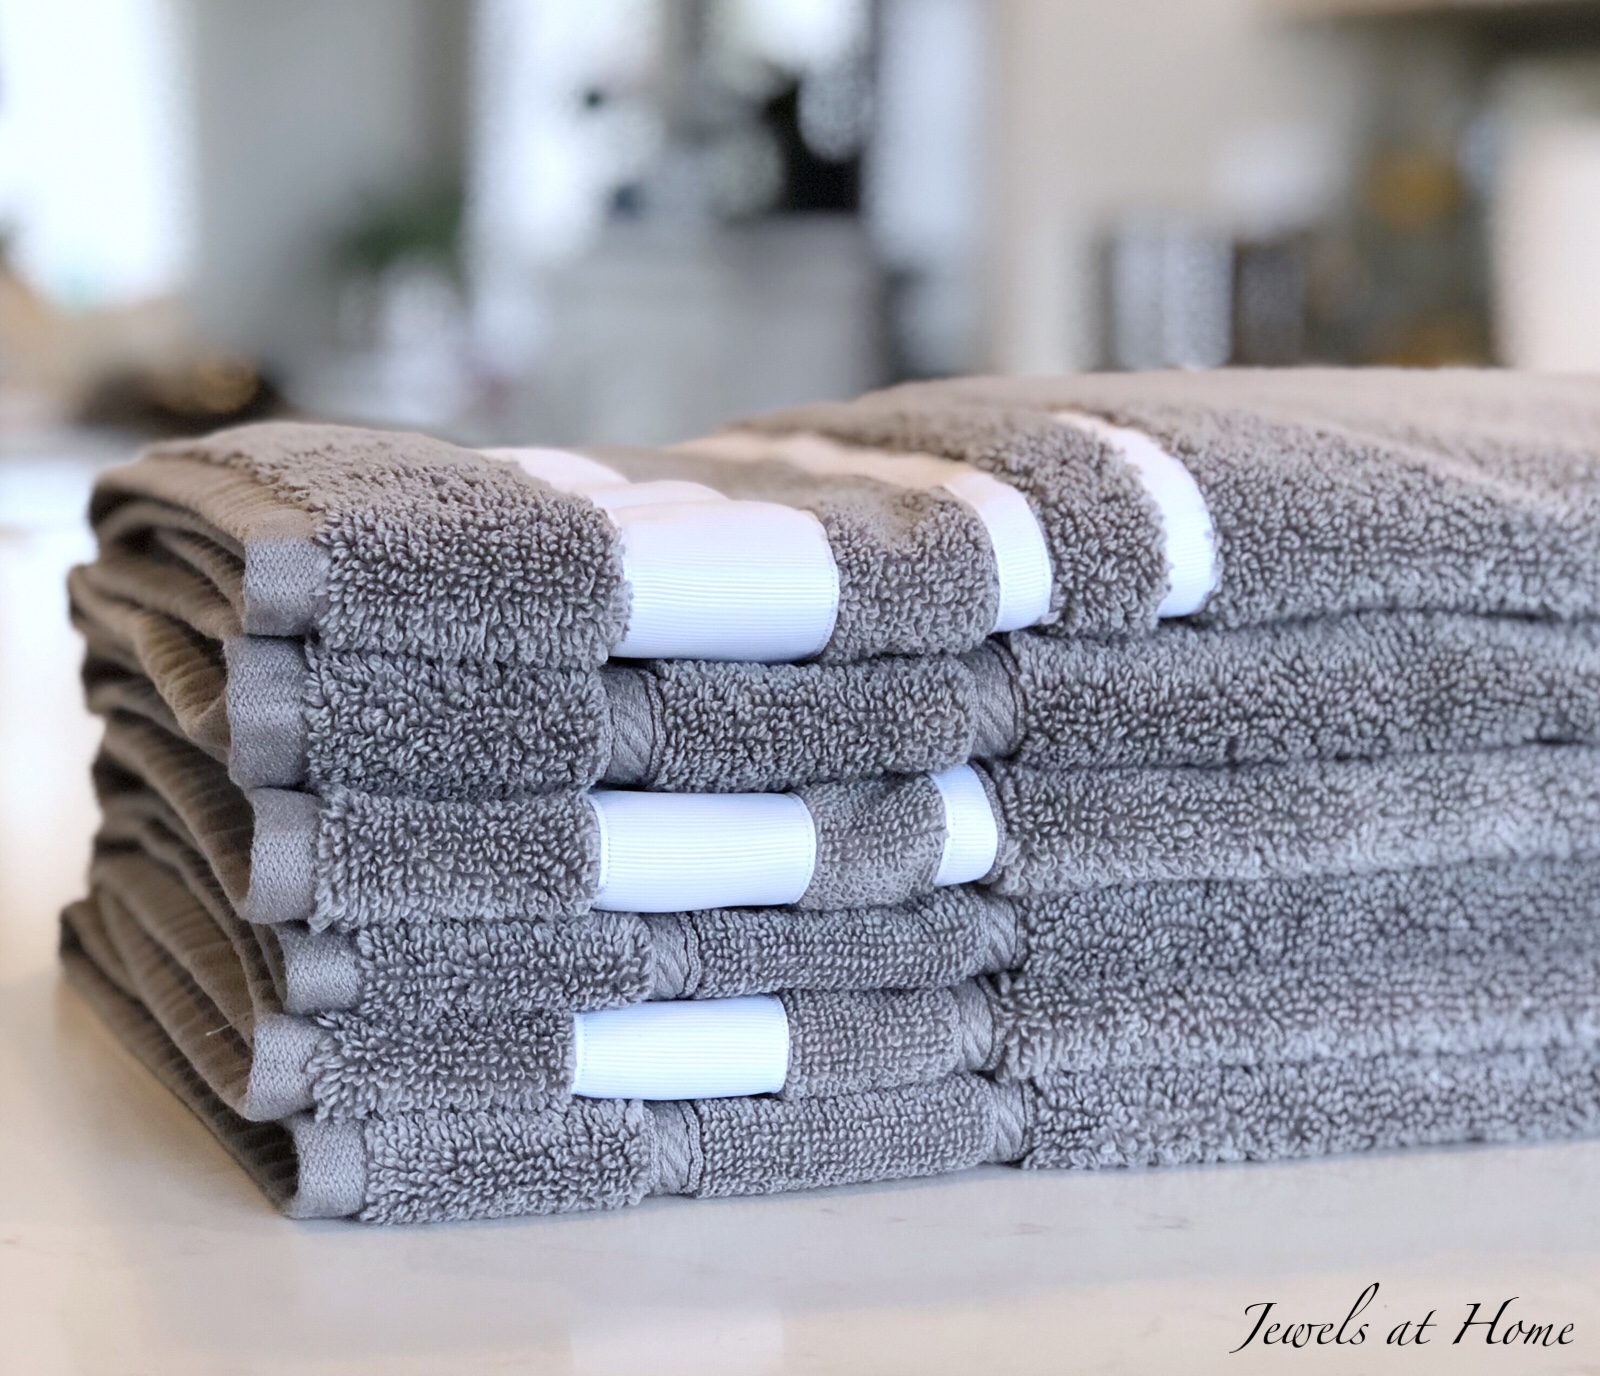
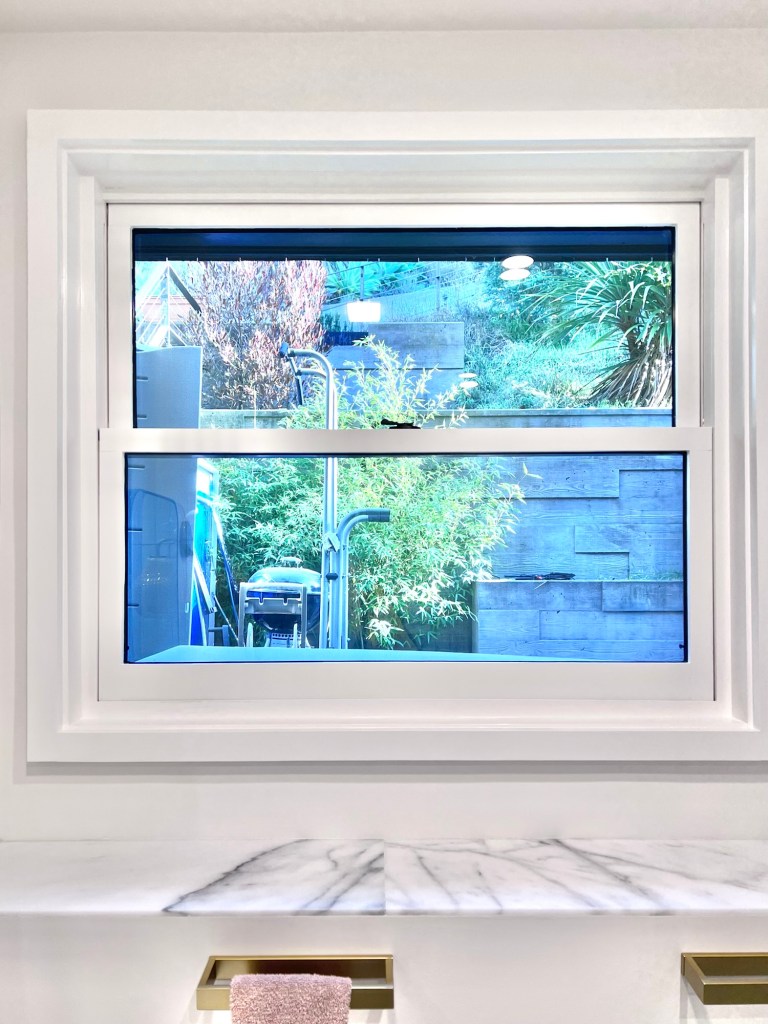
While I left the bathroom construction to our contractor, I did add a DIY touch with the window glass film. There are so many options for window film, so you can have fun browsing for your own favorite. The one that spoke to me for our space is the gingko-themed stained glass from Asgerart on Etsy. It was easy to apply and adds style and much-needed privacy to our little bathroom! To fit our windows, I used two panels side-by-side.

Hope to show you more progress in the bedroom soon! In the meantime, you can see all the other fun room transformations on the One Room Challenge website!

Julie AKA “Jewels”

Classic Blue and White Bathroom Design

So, the wheels of the planning department are turning, and we are hoping to be able to do a renovation to add a small guest bedroom and bathroom to our home. I’m getting excited and working on the design plan. The colors will be blue and white – of course! And the style will be classic, with a nod towards mid-century design.

I’m going to keep researching, but I like this direction! Let me know what you think, and keep your fingers crossed for our permits to be approved soon!

Julie AKA “Jewels”

This post includes some affiliate and paid links. There is no additional cost to you to shop through those links, but I may receive a small commission.

Create an Elegant Customized Organizer

I dressed up this wooden desk organizer to create some pretty storage in my kitchen. You could use it for a bathroom, office or craft space also! I love tea – and throwing tea parties – so this is perfect … Continue reading

Kids’ Bath Grows Up – New Lighting and Finishing Touches! One Room Challenge Week 6

I’m really excited to be a Guest Participant in my first One Room Challenge! This is a great way to get inspiration and motivation for your home. For this challenge, I’ve decided to re-do our kids’ bath. It started out with a cute beach theme that seemed perfect when the boys were little, but now I am ready for it to grow up with them. Our new look features neutral colors, natural touches, and enough personality to stand up to three boys! Thanks for following along!

Recap:

  • In week one, I took this room back to a blank slate, including a new wall color
  • In week two, I started adding accessories to make the room functional again
  • In week three, I built wall shelves to create storage and display space
  • In week four, I added whimsical printed artwork
  • In week five, I personalized towels for the boys

Have you noticed that I’ve only been taking pictures of this bathroom from one side? Yes, it’s a small room, but I’m not too proud to stand in the bathtub or behind the toilet to get a good picture, like when I redecorated our master bath or our powder room! The reason I’ve been taking pictures from just one side is that one of the pendant lights over the vanity was broken, and both of them were originally hung too high. Finally, almost seven years after we renovated this bath, I’m finally really happy with the pendant lights.

As you know, I’m not afraid to use power tools, like when I made the DIY shelves for this project or built these plant stands. But, I am a little afraid of electricity. Steve helped me out and hung the new lights from West Elm. They look great with these LED Edison-style bulbs!

Speaking of that, let’s talk about light bulbs! I wanted the vintage Edison-style light bulbs, but there was a bit of trial and error to get the right ones. These were the third set I ordered… I’m used to looking at the wattage, which tells you how bright the light will be, but I forgot to look at the Kelvin, which tells you how “warm” or “cold” the light will be. I started out with 5000K, which was a very bright white that didn’t feel quite natural in the space. I then (accidentally) bought 2200K bulbs, which are very warm amber-colored. I finally found these bulbs in 3000K, and the light is just right (I am feeling a bit like Goldilocks, here!).

This chart from the LED Exchange is helpful for understanding Kelvin:

Links to the products and DIY projects I used in this room are at the bottom of the post.

And without further ado, here are some more pictures of our finished space!

A huge thank you to Linda for creating the One Room Challenge community, and high fives to all my fellow bloggers whose hard work and creativity were great inspirations! Be sure to go back to the One Room Challenge page to check out all the other projects!

I’m already thinking about the fall challenge and wondering what room I will redecorate!

“Jewels”

Kids’ Bath Grows Up – Customized Bath Towels – One Room Challenge Week 5

I’m really excited to be a Guest Participant in my first One Room Challenge! This is a great way to get inspiration and motivation for your home. For this challenge, I’ve decided to re-do our kids’ bath. It started out with a cute beach theme that seemed perfect when the boys were little, but now I am ready for it to grow up with them. Our new look features neutral colors, natural touches, and enough personality to stand up to three boys! Thanks for following along!

Recap:

  • In week one, I took this room back to a blank slate, which involved cleaning, repairs, and a new wall color!
  • In week two, I started adding accessories to make the room functional again
  • In week three, I built wall shelves to create storage and display space
  • In week four, I added whimsical printed artwork

For week five, I am personalizing towels for the boys. I wanted the look of matching towels, but I still wanted to be able to tell their towels apart, because there are some things that even the closest family doesn’t want to share…

Fortunately, I remembered how I had added trim to our master bath towels, so I adapted that project for the boys. I started with solid grey towels and white grosgrain ribbon in 1.5 inch and 5/8 inch widths. I sewed on one stripe for our oldest, two for our middle boy, and three for our youngest.

I’m showing the towels folded nicely, but I actually have robe hooks for the boys to make it easier for them to hang up their towels.

Time to head back to the One Room Challenge link-up page to check out the progress on all the other exciting projects!

Final stretch this week! Hint: I am enlisting Steve to do play with electricity!

“Jewels”

Kids’ Bath Grows Up – Whimsical Wall Art – One Room Challenge Week 4

I’m really excited to be a Guest Participant in my first One Room Challenge! This is a great way to get inspiration and motivation for your home. For this challenge, I’ve decided to re-do our kids’ bath. It started out with a cute beach theme that seemed perfect when the boys were little, but now I am ready for it to grow up with them. Our new look features neutral colors, natural touches, and enough personality to stand up to three boys! Thanks for following along!

Recap:

  • In week one, I took this room back to a blank slate, which involved cleaning, repairs, and a new wall color!
  • In week two, I started adding accessories to make the room functional again
  • In week three, I built wall shelves to create storage and display space

Now that we are over the hump and into week four, it seemed like a great time to add some art. I though about creating something myself. And then I remembered I can’t draw… Etsy to the rescue! I bought downloadable files and printed and framed them for our space.

It’s amazing how art makes a room! These pieces add so much character and polish to our bathroom. Since this room has a neutral design, I like how these whimsical signs make it feel like it is still a kids’ bathroom.

Here are links (some affiliate links) for our new accessories:

There’s tons more inspiration back at the One Room Challenge link-up page. Go check it out!

“Jewels”

Kids’ Bath Grows Up – DIY Wall Shelves – One Room Challenge Week 3

I’m really excited to be a Guest Participant in my first One Room Challenge! This is a great way to get inspiration and motivation for your home. For this challenge, I’ve decided to re-do our kids’ bath. It started out with a cute beach theme that seemed perfect when the boys were little, but now I am ready for it to grow up with them. Our new look features neutral colors, natural touches, and enough personality to stand up to three boys! Thanks for following along!

one room challenge logo

Recap:

  • In week one, I took this room back to a blank slate, which involved cleaning, repairs, and a new wall color!
  • In week two, I started adding accessories to make the room functional again

For week three, I created wall shelves using Ikea Ekby Valter wall brackets and some wood that I had left over from another project. I cut the wood to 7.5″ x 16.5″ and finished it with clear polyurethane.

If you’re looking for ready-made shelves, here is an option with a similar look..

I mentioned how I really wanted to bring natural wood into this space, and these shelves help tie things together with the bamboo bathmat and seagrass basket.

I have used these wall brackets before to hang macrame planters, and I was excited to find them in this black finish, which coordinates with our existing vanity.

Here are links (some affiliate links) for our new accessories:

Head over to the One Room Challenge link-up page to see more inspiring ideas!

“Jewels”

Kids’ Bath Grows Up – Adding the Essentials – One Room Challenge Week 2

I’m really excited to be a Guest Participant in my first One Room Challenge! This is a great way to get inspiration and motivation for your home. For this challenge, I’ve decided to re-do our kids’ bath. It started out with a cute beach theme that seemed perfect when the boys were little, but now I am ready for it to grow up with them. Our new look features neutral colors, natural touches, and enough personality to stand up to three boys! Thanks for following along!

Recap:

  • In week one, I took this room back to a blank slate, which involved cleaning, repairs, and a new wall color

In week two, I got to have some fun decorating! I’m starting off by bringing in the practical things we need to make the room functional. I put the source list at the bottom of this post. The decorative accessories will come later, but I can already see our new look emerge.

This shower curtain is similar to the feather pattern from Serena and Lily, but they don’t sell the shower curtain anymore, so I was really happy to discover a look-alike product.

I knew I wanted to bring some natural wood into this room. While I loved the spa-like look of slatted teak mats, I was afraid that the kids would stub their toes in the middle of the night, because our bath mat sits right in front of the toilet. I settled for this low profile flexible bamboo mat, and I’m happy with the results!

Another bathroom essential is a wastebasket. Because this is a small room, ours has to sit in full view, and I wanted to find something more attractive than your average trash can. I was so excited when I figured out I could disguise our wastebasket by hiding it in this decorative basket! I reused a plastic nursery pot that fits neatly inside.

The kids’ toiletries used to be (kind of) corralled in a plastic bin on the vanity, and I wanted to find something that looked more sophisticated. At the same time, I saw how that plastic bin got encrusted with toothpaste and hair gel, so I did some searching to find this cute crocheted basket that is machine washable – yes!

Here are links (some are affiliate links) for our new accessories:

Now, I can get the boys out of my bathroom and back in their own! Hooray!

So far, my One Room Challenge experience has been so encouraging. What a great community! Please go check out week two of all the amazing makeovers!

“Jewels”

one room challenge logo

Kids’ Bath Grows Up – A Clean Slate – One Room Challenge Week 1

I’m really excited to be a Guest Participant in my first One Room Challenge! This is a great way to get inspiration and motivation for your home. For this challenge, I’ve decided to re-do our kids’ bath. It started out with a cute beach theme that seemed perfect when the boys were little, but now I am ready for it to grow up with them. Our new look features neutral colors, natural touches, and enough personality to stand up to three boys! Thanks for following along!

Fortunately, we renovated this bath when we moved into our house a few years ago, and all the “bones” are still good. Without doing a major renovation, I have a feeling I can still completely change our look! I’ve been so inspired by the clean palette of today’s most popular design styles – whether it’s “Scandinavian-inspired,” “California Casual,” or “Modern Farmhouse,” everyone – myself included – is loving white walls and lots of natural materials.

For week one, my task was make this room a blank slate! I took down all the decorations, touched up the existing vanity, sealed the marble, and got some help painting the walls from our friend Joe.

The new wall color is “Feather Down” from Benjamin Moore. I’ve used it in our master bath as well, and I love the warm neutral feel.

Here are a few “before” (or “old after”) and “after” (or “new before”) pictures. I am so excited to get to work rebuilding this space!

Go check out all the other exciting guest great projects over at the Spring 2018 One Room Challenge!

I hope you come back to see the rest of this room’s transformation!

“Jewels”

one room challenge logo

Easy Tile Makeover – The Great Cover-up!

Our powder room is really tiny. And it was really plain when we moved in to our house a few years ago. I spruced up the space a few years ago, and I’ve been pretty happy with it, but the one last part that I still kind of hated was the pink floor tile. Now, I can finally say I love every part of this room!

The secret ingredient for this mini-makeover is vinyl tile decals! They come in many patterns and sizes, and most of the vendors will even help you with custom sizes, which is what I ordered. I chose this Moroccan-inspired pattern that is so popular right now. It’s very similar to the tile I used for my DIY tile table runner.

I painted my grout first, to cover the pink, and the decals are very easy to apply – they are repositionable and a nice weight and quality. I was afraid vinyl would be too cheap-y, but it turns out that they add function as well as form, because the floor is not as cold underfoot. I’m sure they won’t last forever, but I feel like this little change will really help hold us over until a real renovation some day.


Finn came to hang out with me and check out the new smells… I mean floor.

Also, I am so in love with my new blue Rothy’s shoes. If you want to check out a pair, here’s a $20 discount code!


Where will you try a tile makeover?

“Jewels”