Sunroom Funroom!

When we moved into our house, the small enclosed balcony became a place for LEGO, board games, and other toys. Now that the boys are older, I’m excited to reclaim this room as a more grown-up space for reading, lounging,… maybe even napping!

At 5’x15′, there is not much space in here, which made this a quick project! The key elements I wanted to include were:

  • Comfortable seating with plush cushions
  • Side table for books and drinks
  • Plants to bring the outside in
  • Throw blankets to snuggle in all seasons

The look I wanted to achieve included:

  • White paint
  • Light-colored fabrics
  • Natural materials, like rattan and bamboo
  • My signature blue-and-white decor

Here are some pictures of how it has all come together. I did buy this daybed quilt set, but otherwise, everything in the room we already had in our house!

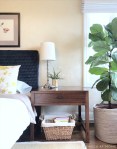
I love this ceramic garden stool, but I have been looking for the right spot for it – what could be better than this indoor-outdoor room?!

This bookcase was my grandmother’s. I repainted it about 20 years ago and added the caning (post coming soon) for this space, to create a tropical feel.

We’ve had this round mirror for a while, and it’s a bit small for where it was hanging before, but it works perfectly here. The walls in this room are crazy hard to drill into (which makes sense, because they are actually exterior walls), so I braided some rope from my macrame days and hung it from a hook in one of the ceiling beams. I like how it adds to the outdoorsy, bohemiam vibe in here!

This room is a win-win with the plants – they love all the light, and they definitely help make me feel like I’m outside in nature!

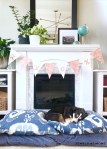
This daybed is a magnet for people who love to snuggle!

Finn would also like to snuggle on the daybed. This is his mildly dissatisfied face, because he had to stay on the rug…

Last couple of close-ups of this vignette. I love how everything old feels new again, when you find just the right combination!

So excited to read, and snuggle, and knit, (and nap) in our new sunroom!

Julie aka “Jewels”

DIY Citrus Collage Canvases – When Life Gives you Lemons

San Francisco’s fog is not the best climate for gardening, but my little lemon tree is getting established, and I wanted to create something citrus-inspired! I had some old canvases lying around (let’s just say that for me, paint-with-wine events are more about the experience than the product!), so I decided to transform them into something new!

Here’s what you’ll need:

  • Stretched canvases
  • Paint in background color
  • Craft paper in a variety of oranges, yellows, pinks, light greens, and dark greens
  • Mod-Podge

Here’s how to do it:

Paint the canvases in your background color:

ezy watermark_05-07-2019_06-19-21pm

Cut out your shapes:

  • pink blossoms
  • yellow lemons
  • light green limes
  • orange oranges (duh!)
  • green stems and leaves (I started with straight stems, but I recommend adding some curved ones as well)

ezy-watermark_05-07-2019_06-20-01pm.jpg

Start arranging your citrus into branches:ezy watermark_05-07-2019_06-20-42pm

For ideas on how to arrange your shapes, you can look at these inspiration images I found, as well as my finished product.

I am thinking of eventually putting these canvases in my office at work, but for now, I like the feeling of going to sleep in a garden here!

Julie aka “Jewels”

DIY Marbled Clay Ring Dishes

Here is version two of these DIY clay ring dishes! First, I made some in white with stamped designs. I love how those look, but keeping the white clay as clean as possible is a bit stressful. The marbled dishes, on the other hand, are so addictive and relaxing!

ezy watermark_24-05-2019_05-33-05pm

Here’s what you’ll need:

  • Premo Sculpey in a coordinating colors (approximately 2oz per bowl)
  • Rolling pin or smooth glass jar
  • Parchment paper or wax paper
  • Circle to trace (approximately 4″)
  • Bowl or other oven-safe mold
  • Optional: sandpaper
  • Paint brush
  • Gold paint
  • Clear glossy varnish

Here’s how to do it:

  • Make strips of clay in each color you want to include. Twist and roll them together until you get the amount of mixing you want.
  • Using a parchment or wax paper work surface, roll the marbled clay flat – about 1/4″ thick
  • Cut out the circle – you can take the cut-off edges and add them to your next marbled bowl, so each one is unique!
  • Place your circle on your mold – I tried it on the outside of a bowl, but I think inside would be better, if you have the right size, because the mold indented the surface slightly
  • Bake according to the instructions for the clay
  • Let it cool, and sand rough edges
  • Paint rim with gold paint
  • Coat with clear varnish

Here are some progress shots and the final products!

Here is how to start the marbling process:ezy watermark_13-05-2019_06-01-26pm

This is what the bowls looked like out of the oven.

ezy watermark_13-05-2019_08-55-52pm

Next step: gold paint on the rim!

Last step: clear gloss varnish!


I’m seriously addicted to making these bowls… can you guess what’s up next?!

Julie aka “Jewels”

DIY Stamped Ring Dishes in White and Gold

These little pretty and versatile trinket dishes have been catching my eye for some time now, and I just needed an occasion to try them!

I’ve been so lucky to have a lot of fun dinners/ brunches/ weekends with my girlfriends recently. (See the moms’ brunch I hosted here.) I thought these dishes would be fun to make as party favors/ souvenirs.

I tried making a few different styles of dishes, and I’ll post the variations here soon. While I love the results of all of them, the white bowls are a bit stressful to make (hard to keep clean!), and the marble is really relaxing, so choose your project accordingly!!

There are so many different kids of polymer clay, and when I found myself overwhelmed standing in Michael’s, I appreciated this overview of the different clays and their uses. After reading this summary, I ended up choosing Premo Sculpey.

Here’s what you’ll need:

  • Premo Sculpey in white (approximately 2oz per bowl)
  • Rolling pin or smooth glass jar
  • Stencils and stamps
  • Parchment paper or wax paper
  • Circle to trace (approximately 4″)
  • Bowl or other oven-safe mold
  • Optional: sandpaper
  • Paint brush

Here’s how to do it:

  • This white clay collects and shows dust and lint very easily, so try to keep your hands, tools, and work surface as clean as possible
  • Using a parchment or wax paper work surface, knead your clay and roll it flat – about 1/4″ thick
  • Cut out the circle
  • Stamp your designs in the center
  • Place your circle on your mold – I tried it on the outside of a bowl, but I think inside would be better, if you have the right size, because the mold indented the surface slightly
  • Bake according to the instructions for the clay
  • Let it cool, and sand rough edges
  • Paint rim with gold paint
  • Coat with clear varnish

Here are some progress shots and the final products!

Clay rolled out, stamped, and ready to mold

This is what the bowls looked like out of the oven, before paint and varnish. I like the matte look, but I suspect they’d get dirty over time.

Next step: gold paint on the rim!

Last step: clear gloss varnish!

Here’s a sneak peak at the marble bowls. I’ll get the post up some time (soon?)!

I’m seriously addicted to making these bowls…

Julie aka “Jewels”

Calm Spaces for a Calm Mind – Tips for Cord Management

I want to be very clear that I’m no minimalist, but I’ve definitely been working hard on taming the clutter in our house. In the process, I’ve really noticed how calming it is to see a formerly-cluttered space all cleared … Continue reading

Valentine’s Day Pennant Banner

I’m not usually a big Valentine’s Day person, but then again, a holiday built around chocolate can’t be all bad! Anyway, a couple of weekends ago, I got the urge to make something – anything! – and I put together … Continue reading

Recipe Tea Towels

If you’re already familiar with Spoonflower, then you know how amazing their site is. If you haven’t been introduced to them yet, be prepared to be completely addicted! They can custom print anything on fabric, and you can design your … Continue reading

DIY Hand-Painted Chinoiserie Christmas Ornaments

For this year’s Chinoiserie Christmas, I mostly used decorations I already had from our “white and woodsy Christmas,” with the addition of these hand-drawn ornaments! This post is coming late, because it took me all month to finish these ornaments, … Continue reading

I’m dreaming of a (Blue and) White Chinoiserie Chic Christmas

It has been a busy few months here, but I’m sitting by the fire and finally have a minute to share our Christmas decorations – just under the wire this Christmas Eve. If there were a graph showing how many … Continue reading